- Unity: 2022.3.35f1
- UniTask: 2.5.4
- ScenarioFlow: 1.1.0
Introduction
To build a dialogue system in ScenarioFlow, at least we have to implement commands, decoders, a class that implements the INextNotifier interface, and the ICancellationNotifier interface. We can play a simple dialogue scene by writing a scenario script after we build a dialogue system that consists of these implementations and prepare necessary resources and objects. However, the dialogue system has to be extended in order to let the player enjoy story more comfortably or broaden expression of direction in dialogue scenes.
In this article, we are going to learn how to implement functionalities for branching scenarios and fast-forwarding as practical features.
Set Up the Sample Project
Import practical-features.unitypackage below to an Unity project to set up programs and objects necessary for this learning. You can play the sample dialogue scene by opening the practical-features scene and starting the play mode, where Story.sftxt is executed.
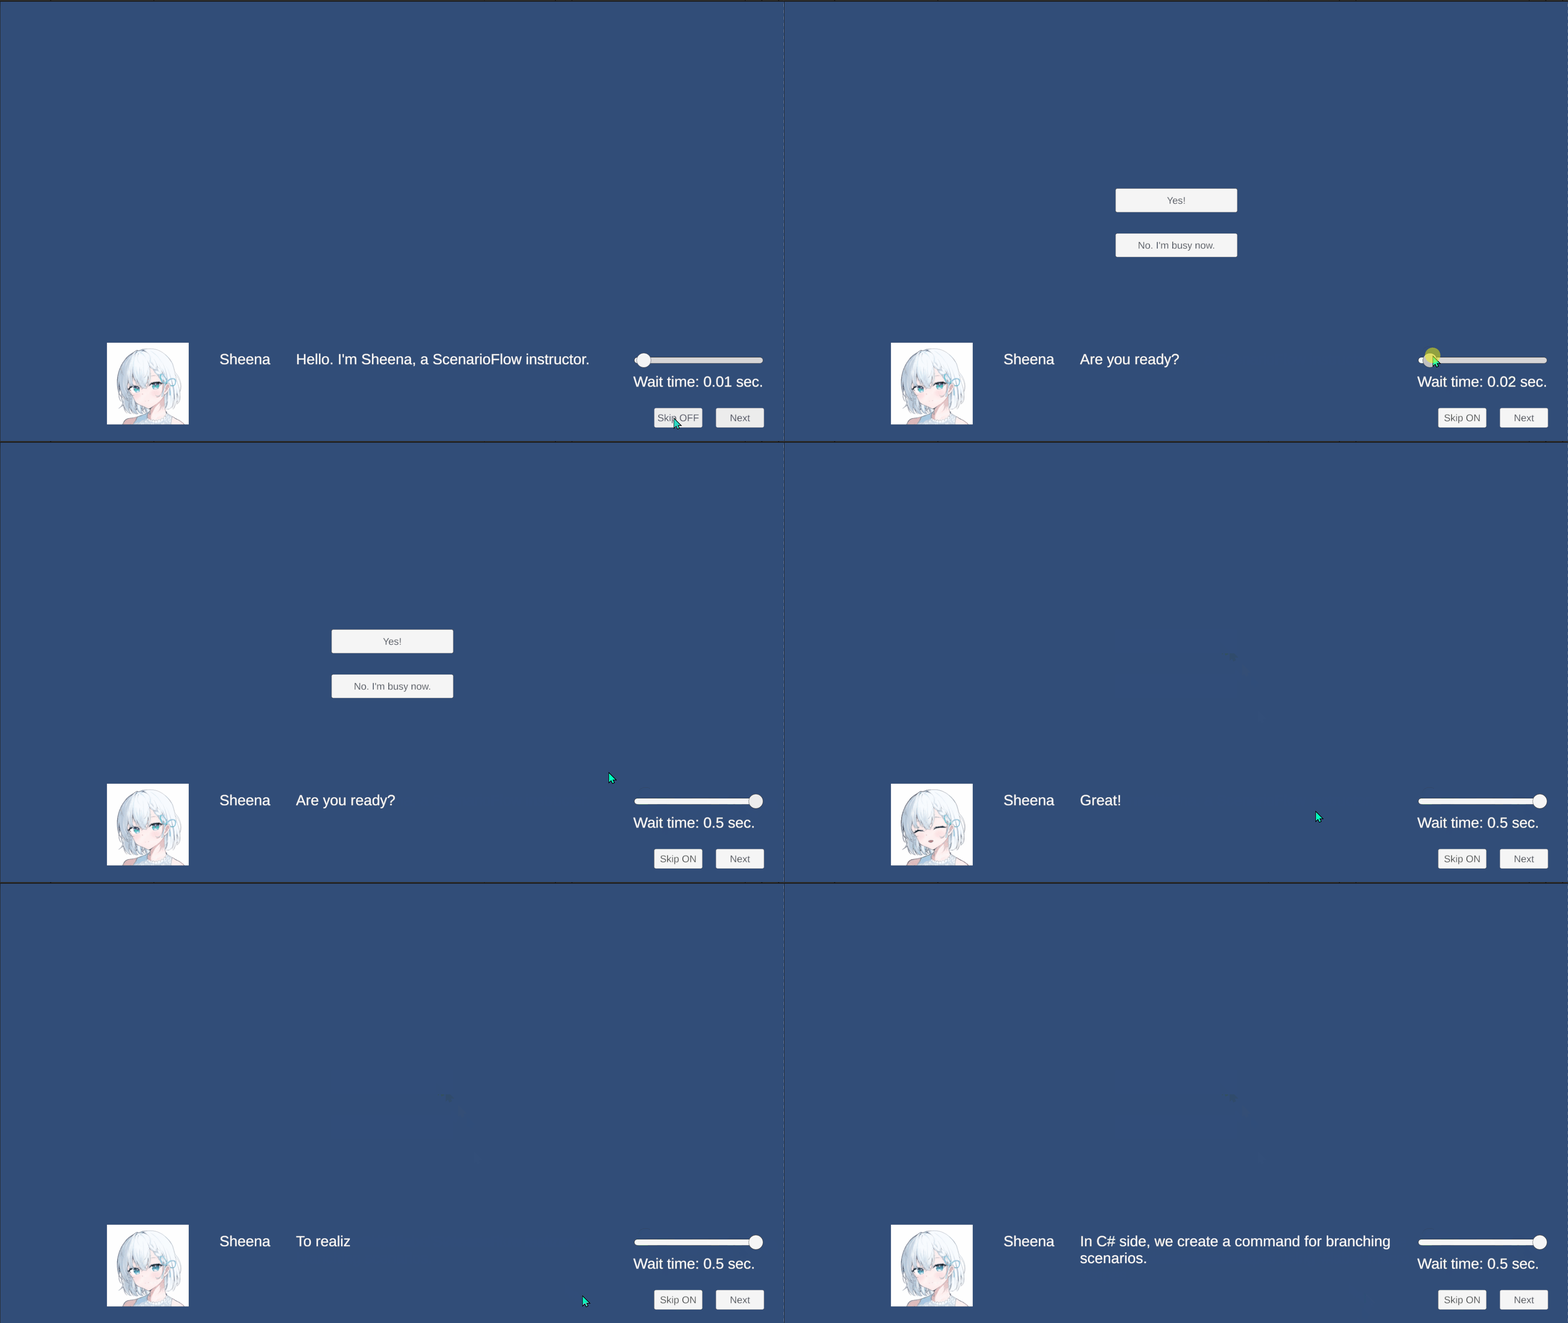
In this sample, we proceed with the dialogue scene by clicking the Next button. There are the Skip button that enables “skip mode” we are going to learn later and the slider that changes the speed of skip on the scene.
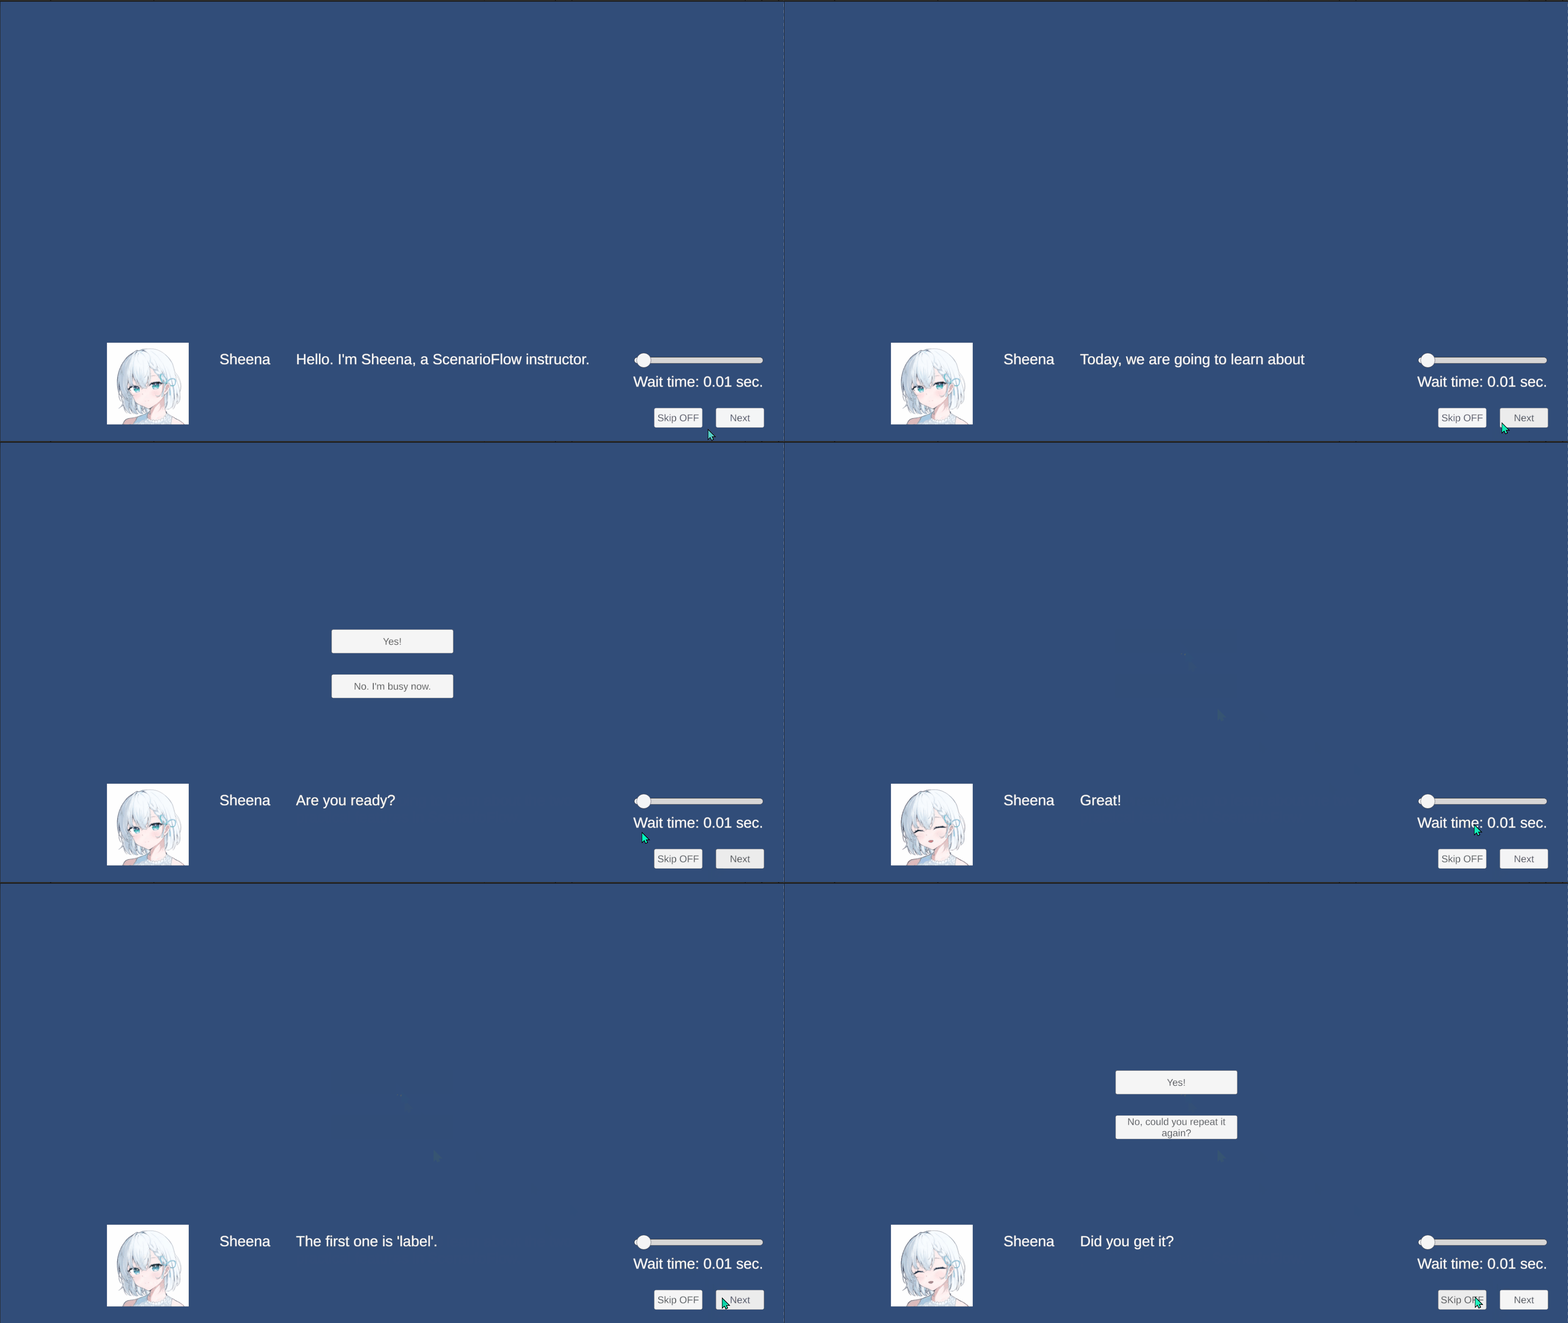
The following table summarizes the important classes and commands for this learning.
| Class | Summary |
|---|---|
| ScenarioManager.cs | Builds the dialogue scnee |
| ScenarioBranchMakaer | Implements commands for branching scenarios |
| SkipActivator | Controls skip mode to implement the fast-forwarding functionality |
| Command | Summary | Implemented by |
|---|---|---|
| show two selections async | Shows two options and makes a scenario branches out into the target label based on the answer | ScenarioBranchMaker |
| jump to label | Makes a scenario branches out into the specified label | ScenarioBranchMaker |
Branching Scenarios
Branching scenarios are used to switch dialogue scenes that will be played based on some sort of criterion such as player’s choice and flags. Direction that shows the player options and switches stories should especially give the player the feeling of being immersed in the story at a deeper level.
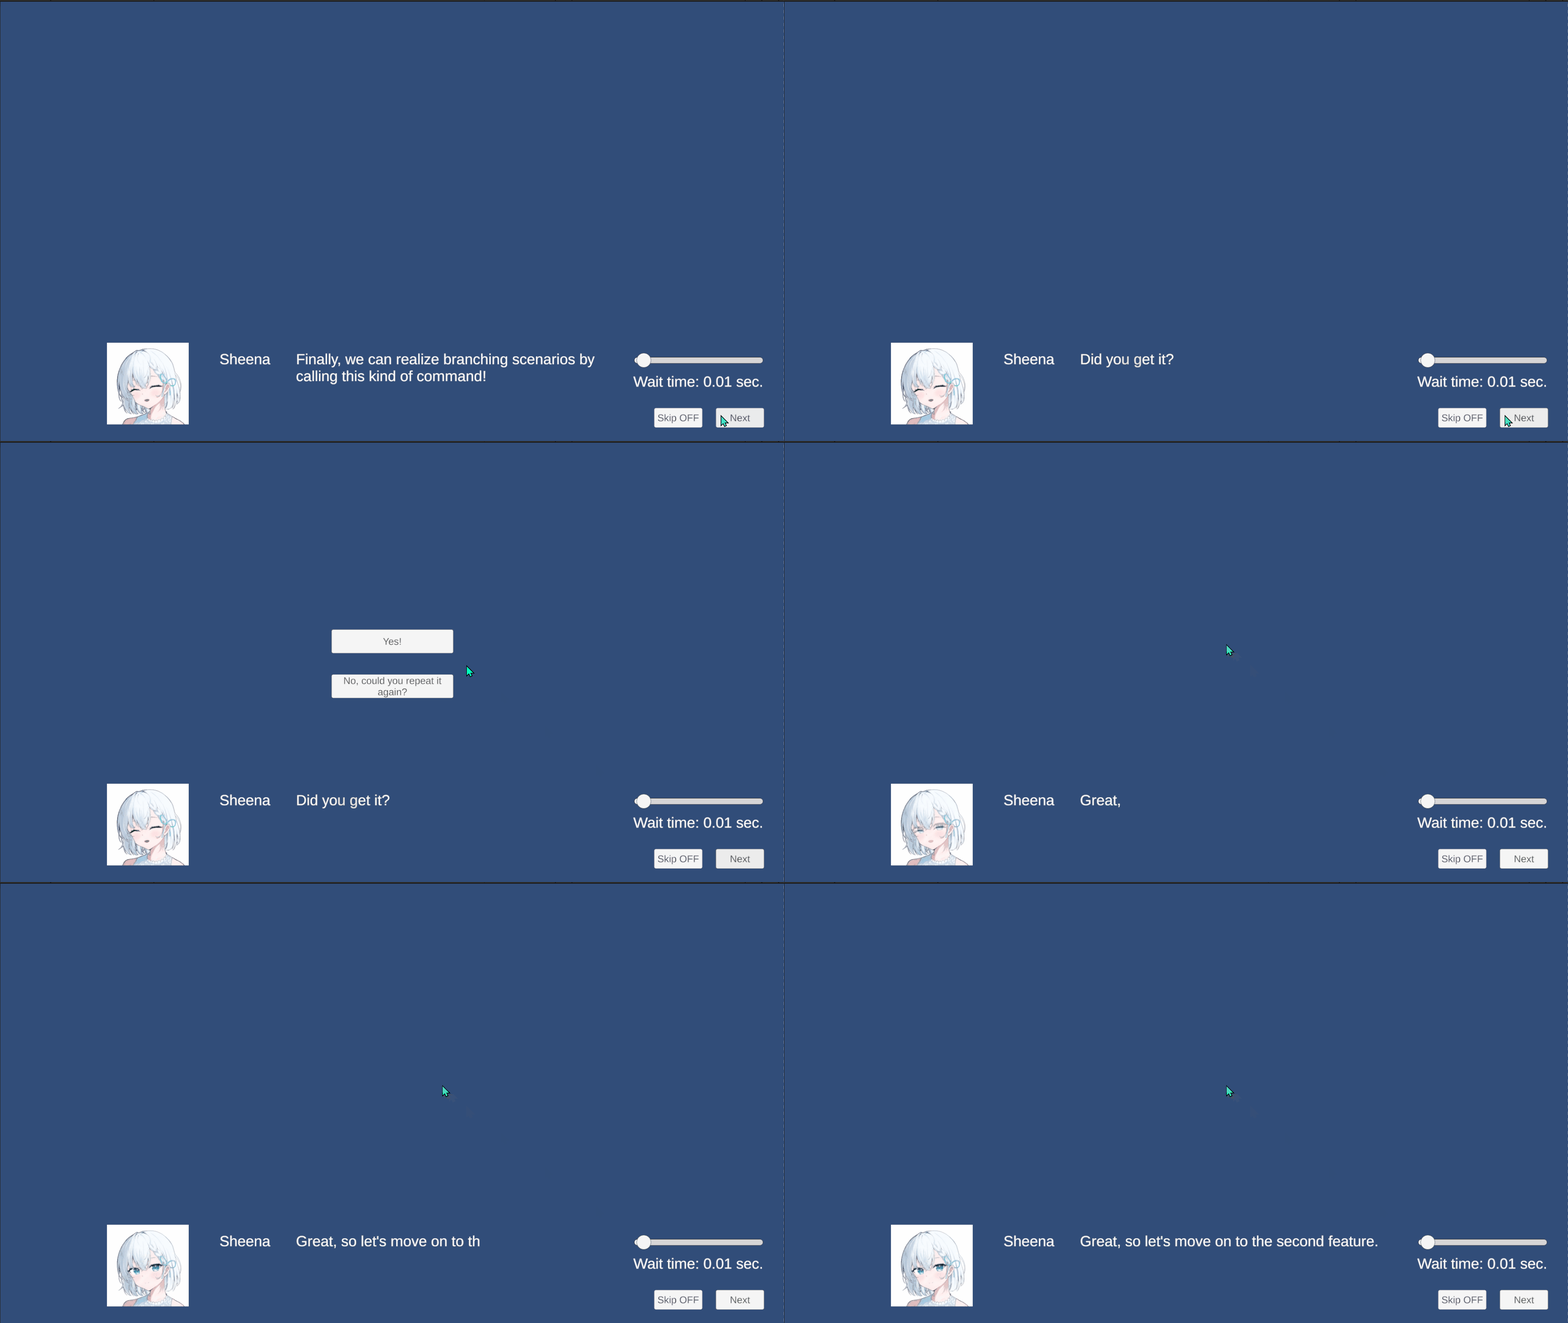
How to Implement Branching Scenarios in ScenarioFlow
In ScenarioFlow, we can implement branching scenarios mainly in two ways.
The first way is to finish a scenario script at a fork in a story and prepare multiple scenario scripts as brangh targets. For example, we can realize branching scenarios by storing some sort of flag as a variable and switching the next scenario script that will be played after a running scenario script finishes based on the variable.
The second way is to use “label”. A scenario script stores its dialogue scene data as an array of command calls, and we can actually attach a label to any of those command calls. Then, we can change the execution order of commands by referring to labels while a scenario script is running. Finally, we can realize branching scenarios by creating a command that performs such process.
The first way works well, for example, in the case of making branching scenarios at the end of a chapter in a story, but it’s not suitable for branching scenarios based on the player’s decision if this kind of branching appears very frequently. That is, we should exploy the second way for types of branching that appear frequently so that they are handled within a single scenario script.
In this article, we are gonig to learn the first way because label is an unique idea in ScenarioFlow.
Attach Labels
We are going to learn how to attach labels in the main scenario scirpt, SFText. (Note that it doesn’t mean labels have to be attached in the same way in all types of scenario scripts. SFText is just a kind of scenario script.) See 【ScenarioFlow】How to Write SFText for the details of SFText grammar.
In SFText, we attach a label by declaring a #label macro scope with its name. This label is attached to the following dialogue scope or command scope, and we can refer to this label with its name later to make the scenario “jump” to the point at which the scope with the label is declared.
#label      | //============ {Q1-No} ============//                                        |
Sheena      | Ok, see you later!                                                           |
            | --> Change the icon to {smile}                                               |
$sync       | jump to label                                                                |
            | Jump to {End}                                                                |
            |                                                                              |
#label      | //============ {Q1-Yes} ============//                                       |
Sheena      | Great!                                                                       |
            | --> Change the icon to {smile}                                               |
            |                                                                              |
#label      | //============ {explain label} ============//                                |
$parallel   | change character image async                                                 |
            | Change the icon to {normal} immediately                                      |
Sheena      | The first one is 'label'. We use it to realize branching scenarios.          |
            |                                                                              |
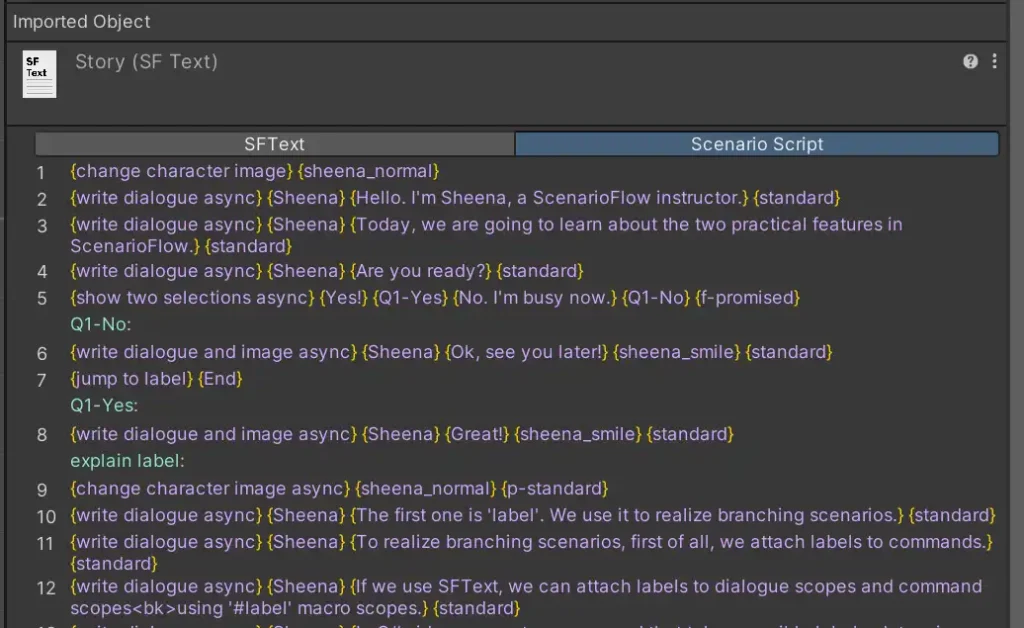
Sheena | To realize branching scenarios, first of all, we attach labels to commands. | We can make sure that labels are attached to the corresponding scopes in the “Scenario Script” tab on the Inspector window. The following figure shows the Scenario Script tab on the Inspector window of Story.sftxt in the sample project.
A label can be placed at the end of line in a script. A running scenario script finishes immediately when the scenario jumps to this label.
Sheena      | Good bye.                            |
            | --> Change the icon to {smile}       |
            |                                      |
#label | //============ {End} ============// | Implement Commands for Branching Scenarios
To perform a scenario branching process by referring to labels in a scenario script, we have to implement a command that causes scenario branching. We can create this kind of command using the OpenLabel method provided by the ScenarioBookReader class thorough the ILabelOpener interface.
In the sample project, the two commands for branching scenarios, show two selections async and jump to label, are implemented in the ScenarioBranchMaker class. The former takes labels, shows options to the player, and makes the scenario branch into a different label depending on the answer while the latter takes a label and makes the scenario branch into the given label unconditionally. Note that the class has the LabelOpener property as an implementation of the ILabelOpener interface and uses it.
public class ScenarioBranchMaker : MonoBehaviour, IReflectable
{
	[SerializeField]
	private Button button1;
	[SerializeField]
	private Button button2;

	public ILabelOpener LabelOpener { get; set; }

	private void Awake()
	{
		button1.gameObject.SetActive(false);
		button2.gameObject.SetActive(false);
	}

	[CommandMethod("show two selections async")]
	public async UniTask ShowTwoSelectionsAsync(string selection1, string label1, string selection2, string label2, CancellationToken cancellationToken)
	{
		button1.gameObject.SetActive(true);
		button2.gameObject.SetActive(true);
		button1.GetComponentInChildren<TextMeshProUGUI>().text = selection1;
		button2.GetComponentInChildren<TextMeshProUGUI>().text = selection2;
		try
		{
		  // Determine the branch target
			var answerIndex = await UniTask.WhenAny(WaitUntilClicked(button1, cancellationToken), WaitUntilClicked(button2, cancellationToken));
			var targetLabel = answerIndex == 0 ? label1 : label2;
			// Branch out into the target label
			LabelOpener.OpenLabel(targetLabel);
		}
		finally
		{
			button1.gameObject.SetActive(false);
			button2.gameObject.SetActive(false);
		}
	}

	[CommandMethod("jump to label")]
	public void JumpToLabel(string label)
	{
	  // Branch out into the specified label
		LabelOpener.OpenLabel(label);
	}

	private UniTask WaitUntilClicked(Button button, CancellationToken cancellationToken)
	{
		return button.OnClickAsAsyncEnumerable(cancellationToken: cancellationToken)
			.FirstOrDefaultAsync(cancellationToken: cancellationToken);
	}
}An object of the LabelOpener property is given from outside the class that declares the property. In the sample project, the ScenarioManager class asigns an instance of the ScenarioBookReader class to that property. Again, note that the ScenarioBookReader class implements the ILabelOpener interface, and the OpenLabel method is called as a member method of that interface.
	public class ScenarioManager : MonoBehaviour
	{
		private ScenarioBranchMaker scenarioBranchMaker;

		private async void Start()
		{
			// Build ScenarioBookReader
			ScenarioTaskExecutor scenarioTaskExecutor = new(buttonNotifier, buttonNotifier);
			ScenarioBookReader scenarioBookReader = new(scenarioTaskExecutor);
			// Build ScenarioBookPublisher
			scenarioBranchMaker.LabelOpener = scenarioBookReader; // Asign the property value
			ScenarioBookPublisher scenarioBookPublisher = new(
				new IReflectable[]
				{
					// Commands
					characterAnimator,
					dialogueWriter,
					scenarioBranchMaker,
					// Decoders
					new CancellationTokenDecoder(scenarioTaskExecutor),
					new PrimitiveDecoders(),
					spriteProvider,
				});
		}
}Call Scenario Branching Commands
After implementing commands for branching scenarios, what we have to do to realize branching scenarios is just to call them in a scenario script.
#label      | //============ {explain label} ============//                        |
$parallel   | change character image async                                         |
            | Change the icon to {normal} immediately                              |
Sheena      | The first one is 'label'. We use it to realize branching scenarios.  |
            |                                                                      |
// ------   | -------------------------------------------------------------------- | Omitted
            |                                                                      |
Sheena      | Did you get it?                                                      |
            |                                                                      |
$f-promised | show two selections async                                            |
            | {Yes!}                                                               |
            | --- Jump to {Q2-Yes}                                                 |
            | {No, could you repeat it again?}                                     |
            | --- Jump to {Q2-No}                                                  |
            |                                                                      |
#label      | //============ {Q2-No} ============//                                |
Sheena      | Of course!                                                           |
            | --> Change the icon to {normal}                                      |
$sync       | jump to label                                                        |
| Jump to {explain label} | 
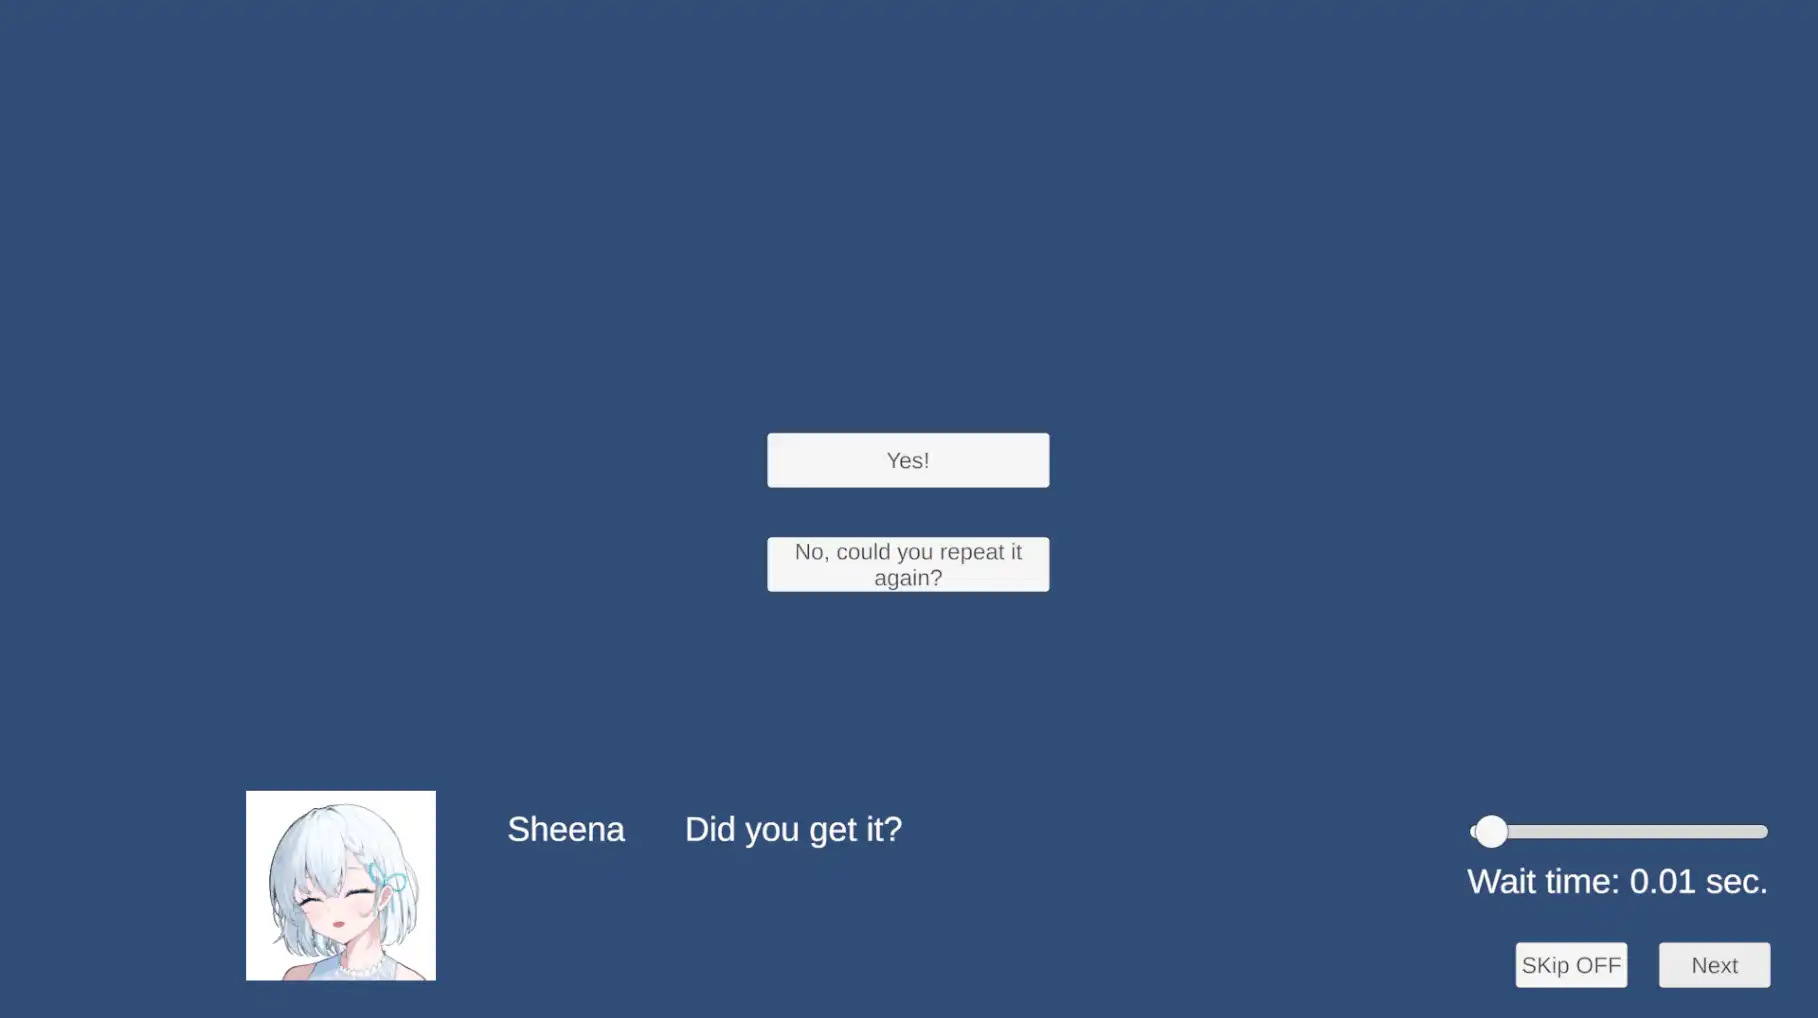
Note that we can make the scenario branch out backward.
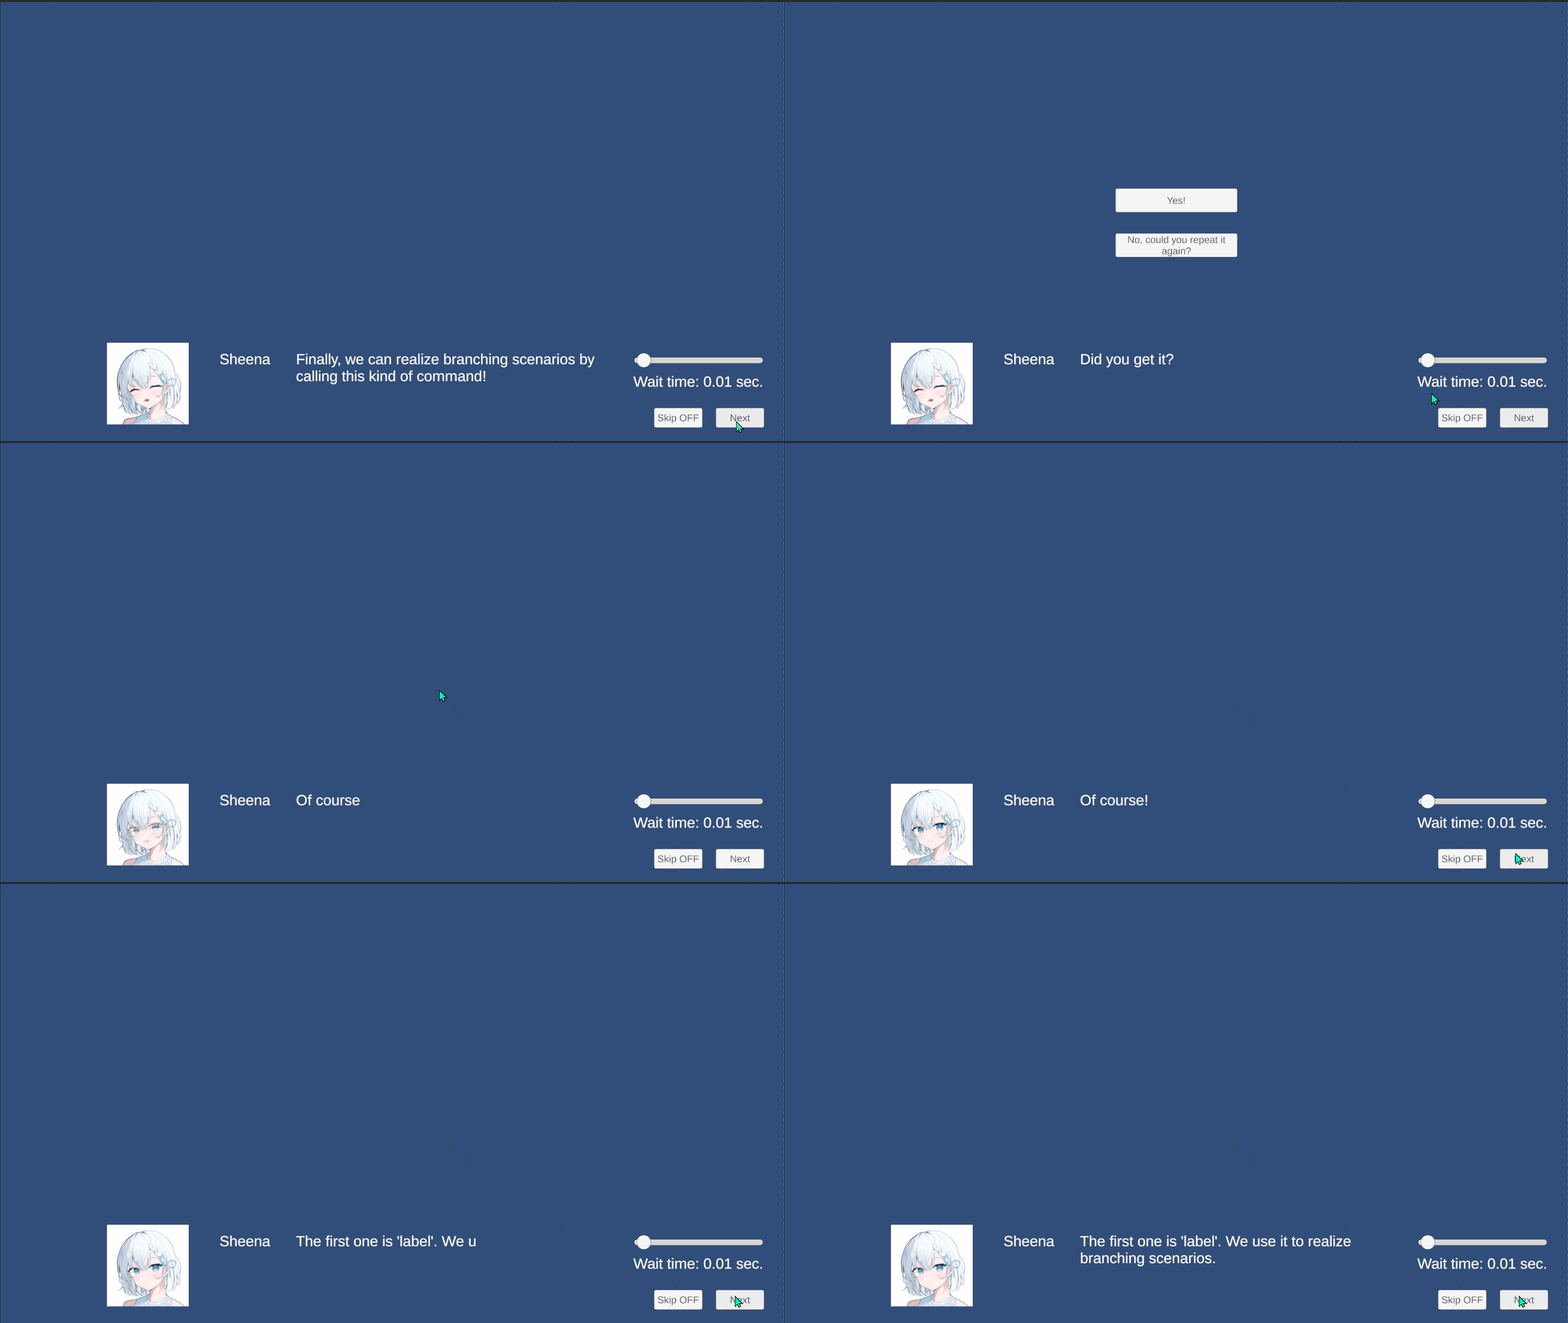
We can set as many branch options as we like, and we can also define any criteria to determine the branch target freely. To implement a command for branching scenarios, we only have to write a process that includes necessary conditional branching, determines the target label in some way, and calls the OpenLabel method for the target label, taking the rquirement into account.
Fast-forwarding
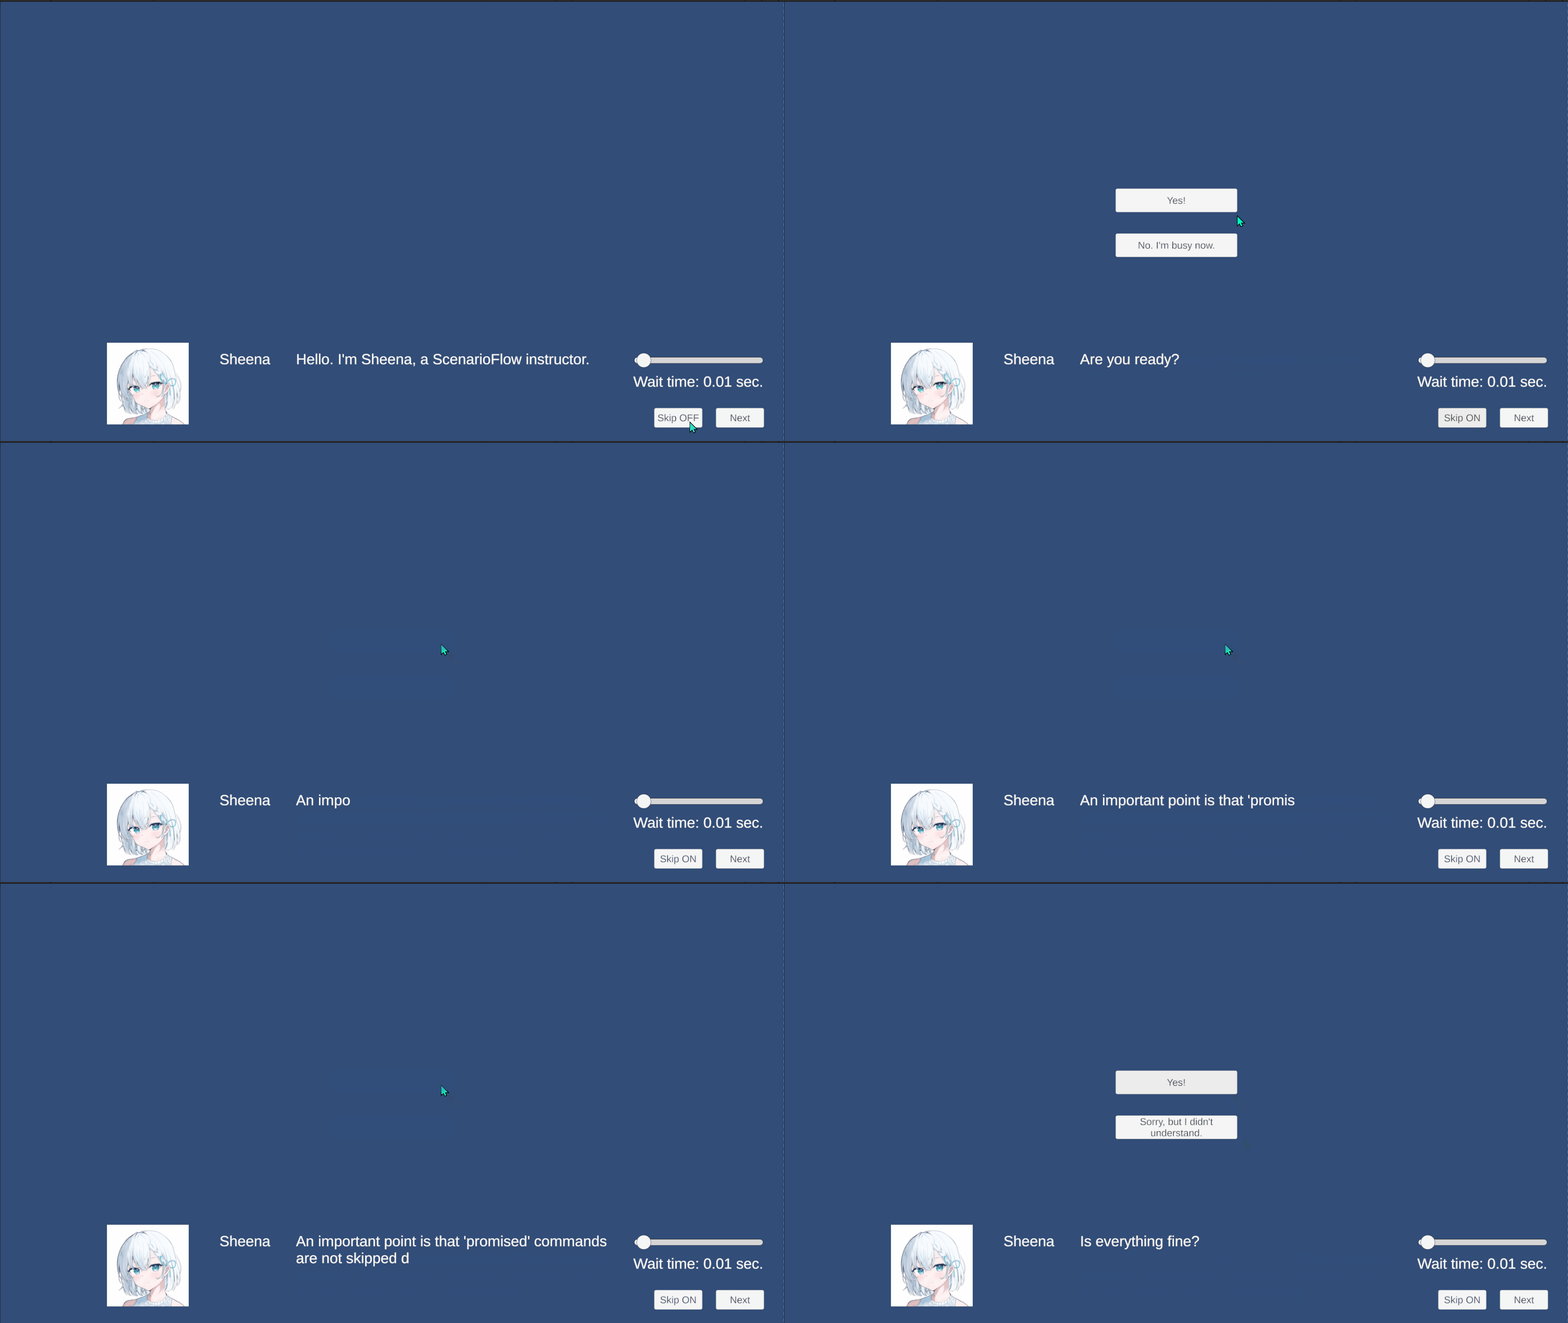
The fast-forwarding is a function used by the player to skip the story. The player activates the fast-forwarding when they would like to skip the story because they would like to re-read part of story or they feel the story tedious (altough it is undesirable situation), and as a result, dialogues are shown at high speed.
Implement Fast-forwarding Function
We can implement a function of fast-forwarding using “skip mode” provided by the ScenarioTaskExecutor class. While the skip mode is enabled, all commands except for those with promised token codes are started and canceled rapidly. The relation between token code and skip mode is described in 【ScenarioFlow】How to Choose Token Code in detail.
We control the skip mode by accessing the IsActive property and the Duration property through the ISkipActivator interface. IsActivater property expresses whether the skip mode is enabled or disabled, and the Duration property expresses the interval time (specified in seconds) while the skip mode is enabled.
In the sample project, the SkipActivator class implements the fast-forwarding functionality.
public class SkipActivator : MonoBehaviour
{
	[SerializeField]
	private Button skipButton;
	[SerializeField]
	private TextMeshProUGUI skipButtonText;
	[SerializeField]
	private Slider waitTimeSlider;
	[SerializeField]
	private TextMeshProUGUI waitTimeText;

	private readonly float InitialWaitTime = 0.01f;
	private readonly float MinWaitTime = 0.0f;
	private readonly float MaxWaitTime = 0.5f;

	public void ActivateSkipButton(ISkipActivator skipActivator)
	{
		waitTimeSlider.minValue = MinWaitTime;
		waitTimeSlider.maxValue = MaxWaitTime;
		// Change the wait time when the slider value is changed
		waitTimeSlider.OnValueChangedAsAsyncEnumerable(destroyCancellationToken)
			.Select(value => System.MathF.Round(value, 2))
			.ForEachAsync(value =>
			{
				skipActivator.Duration = value;
				waitTimeText.text = $"Wait time: {skipActivator.Duration} sec.";
			}, destroyCancellationToken);
		waitTimeSlider.value = InitialWaitTime;
		// Toggle the skip mode on/off when the Skip button is clicked
		skipButton.OnClickAsAsyncEnumerable(destroyCancellationToken)
			.ForEachAsync(_ =>
			{
				skipActivator.IsActive = !skipActivator.IsActive;
				skipButtonText.text = skipActivator.IsActive ? "Skip ON" : "SKip OFF";
			}, destroyCancellationToken);
	}
}The function of fast-forwarding is activated by calling the ActivateSkipButton method with an implementation of the ISkipActivator interface, which is performed in the ScenarioManager class.
早送り機能はISkipActivator インターフェースの実装をActivateSkipButton メソッドに渡すことで有効化されるようになっており、これはScenarioManager クラスで行われています。
public class ScenarioManager : MonoBehaviour
{
	private async void Start()
	{
		try
		{
		  // Activate the fast-forwarding function
			skipActivator.ActivateSkipButton(scenarioTaskExecutor);
			ScenarioBook scenarioBook = scenarioBookPublisher.Publish(scenarioScript);
			await scenarioBookReader.ReadAsync(scenarioBook, destroyCancellationToken);
		}
		finally
		{
			scenarioTaskExecutor?.Dispose();
			UnityEditor.EditorApplication.isPlaying = false;
		}
	}
}In the sample project, we can switch the value of the IsActive property to true/false with the Skip button and change the value of the Duration property with the slider. Especially, make sure that the speed of the fast-forwarding changes when the slider value is changed.
Summary
We learned how to implement the two practical features in the dialogue system, branching scenarios and fast-forwarding in this article.
In ScenarioFlow, we can realize branching scenarios by implementing scenario branching commands using the OpenLabel method that is a member method of the ILabelOpener interface, which the ScenarioBookReader class implements. This kind of command typically takes possible labels, determines the branch target label based on some criteria, and finally causes scenario branching by calling the OpenLabel method. Ultimately, as we only have to call the OpenLabel method with the branch target label to perform scenario branching, we can implement functions for branching scenarios freely based on the requirement.
Fast-forwarding is implemented by using the members of the ISkipActivator interface that the ScenarioTaskExecutor class implements, IsActive and Duration. While the IsActive is true, the skip mode is enabled and all commands except for promised commands are skipped (i.e., their processes are started and canceled rapidly and repeatedly). We specify the time interval of the skip in seconds with Duration.
These features are not essential for dialogue scenes, but they can give the player the feeling of being immersed in the story at a deeper level or let them play the game more comfortably. Understand how to implement these features in ScenarioFlow to be able to incorpolate them in your dialogue system according to the necessity in your project.


Comments