- Unity: 2022.3.35f1
- UniTask: 2.5.4
- ScenarioFlow: 1.1.0
This article covers the fundamental of “ScenarioFlow” that is a libary for making dialogue scenes. As the first step towards making dialogue scenes in Unity with ScenarioFlow, we are going to learn about the structure and primary functionalities of this library and how to make use of them with simple examples.
“Hello, world!” with ScenarioFlow
We will begin with displaying the message “Hello, world!” in the debug console using “command,” which is one of the primary functionalities of ScenarioFlow. Run the sample code by following the steps below. We are going to learn about the details of each functionality in the next section.
Library Setup
Create a project in Unity, and then import necessary libraries to use ScenarioFlow. You have to import UniTask before importing ScenarioFlow.
UniTask:
ScenarioFlow:

Create Scripts
Create a Command
We create a command that displays a specified message in the debug console. In the command, a 2-second delay is added before a specified message is displayed, where if the command execution is canceled during that delay, a message that notifies the cancellation is displayed instead of the specified one.
using Cysharp.Threading.Tasks;
using ScenarioFlow;
using System;
using System.Threading;
using UnityEngine;

public class MessageLogger : IReflectable
{
    [CommandMethod("log message async")]
    public async UniTask LogMessageAsync(string message, CancellationToken cancellationToken)
    {
        try
        {
            await UniTask.Delay(TimeSpan.FromSeconds(2.0f), cancellationToken: cancellationToken);

            Debug.Log(message);
        }
        catch (OperationCanceledException)
        {
            Debug.Log("Message canceled!");
            throw;
        }
    }
}Create Decoders
We create “decoders” which are used for calling commands.
using ScenarioFlow;

public class PrimitiveDecoder : IReflectable
{
    [DecoderMethod]
    public string ConvertToString(string input)
    {
        return input;
    }
}using ScenarioFlow;
using ScenarioFlow.Tasks;
using System;
using System.Threading;
public class CancellationTokenDecoder : IReflectable
{
private readonly ICancellationTokenDecoder cancellationTokenDecoder;
public CancellationTokenDecoder(ICancellationTokenDecoder cancellationTokenDecoder)
{
this.cancellationTokenDecoder = cancellationTokenDecoder ?? throw new ArgumentNullException(nameof(cancellationTokenDecoder));
}
[DecoderMethod]
public CancellationToken ConvertToCancellationToken(string input)
{
return cancellationTokenDecoder.Decode(input);
}
}Implement Command Control Classes
We create classes that control progress of dialogue scenes. In this example, we create two classes that are responsible for “invocation control” and “cancellation control,” respectively.
As a side note, when each key is pressed, each of the following codes notifies it for clarity.
using Cysharp.Threading.Tasks;
using Cysharp.Threading.Tasks.Linq;
using ScenarioFlow.Tasks;
using System.Threading;
using UnityEngine;
public class SpacekeyNextNotifier : INextNotifier
{
public UniTask NotifyNextAsync(CancellationToken cancellationToken)
{
return UniTaskAsyncEnumerable.EveryUpdate()
.Select(_ => Input.GetKeyDown(KeyCode.Space))
.Where(x => x)
.Do(_ => Debug.Log("Spacekey pushed!"))
.FirstOrDefaultAsync(cancellationToken: cancellationToken);
}
}using Cysharp.Threading.Tasks;
using Cysharp.Threading.Tasks.Linq;
using ScenarioFlow.Tasks;
using System.Threading;
using UnityEngine;
public class EscapekeyCancellationNotifier : ICancellationNotifier
{
public UniTask NotifyCancellationAsync(CancellationToken cancellationToken)
{
return UniTaskAsyncEnumerable.EveryUpdate()
.Select(_ => Input.GetKeyDown(KeyCode.Escape))
.Where(x => x)
.Do(_ => Debug.Log("Escapekey pushed!"))
.FirstOrDefaultAsync(cancellationToken: cancellationToken);
}
}Build a Dialogue System
We create a manager class that builds a dialogue system using the classes we created so far.
using Cysharp.Threading.Tasks;
using ScenarioFlow;
using ScenarioFlow.Scripts;
using ScenarioFlow.Tasks;
using UnityEngine;
public class ScenarioManager : MonoBehaviour
{
// A scenario script to run
[SerializeField]
private ScenarioScript scenarioScript;
private async UniTaskVoid Start()
{
// Build a system that executes scenario books
ScenarioTaskExecutor scenarioTaskExecutor = new(
new SpacekeyNextNotifier(),
new EscapekeyCancellationNotifier());
ScenarioBookReader scenarioBookReader = new(scenarioTaskExecutor);
// Build a converter that generates a scenario book from a scenario script
ScenarioBookPublisher scenarioBookPublisher = new(
new IReflectable[]
{
// Decoders
new CancellationTokenDecoder(scenarioTaskExecutor),
new PrimitiveDecoder(),
// Commands
new MessageLogger(),
});
// Convert a scenario script to a scenario book
ScenarioBook scenarioBook = scenarioBookPublisher.Publish(scenarioScript);
try
{
// Run the scenario book
Debug.Log("Story started.");
await scenarioBookReader.ReadAsync(scenarioBook, this.GetCancellationTokenOnDestroy());
Debug.Log("Story finished.");
}
finally
{
// ScenarioTaskExecutor implements IDisposable
scenarioTaskExecutor.Dispose();
}
}
}Create a Scenario Script
We create a “scenario script” to describe the details of a dialogue scene we will play. Right-click on the Project window to create a “SFText script” by selecting Create/ScenarioFlow/SFText Script. We call the created file “hello.”
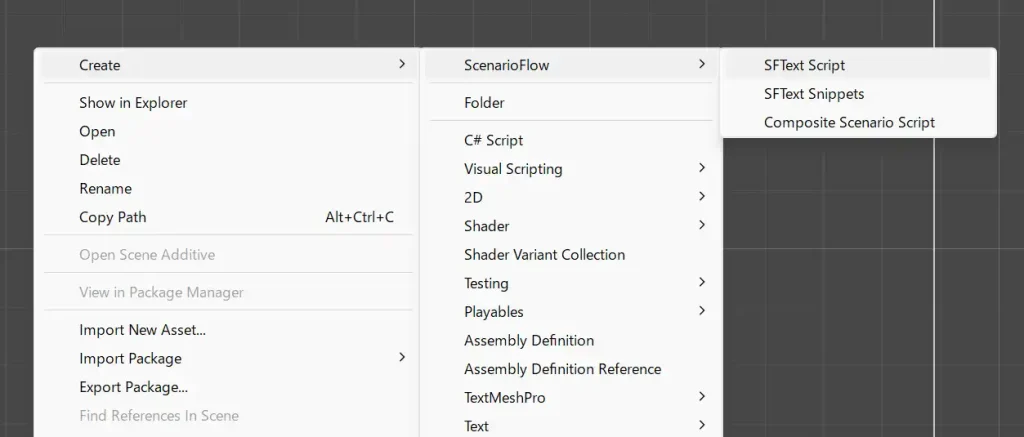
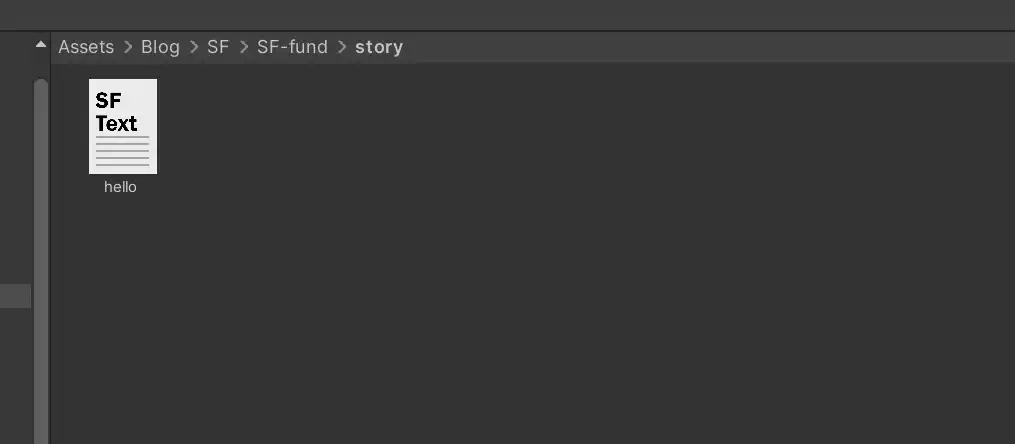
We describe the following script with a text editor.
$standard | log message async |
| {Hello, world!} |
$standard | log message async |
| {Hello, Unity!} |
$standard | log message async |
| {Hello, ScenarioFlow!} | You can utilize Visual Studio Code (VSCode) and editing support by its extensions when editing SFText scripts. We are going to learn about this functionality in another article, so you can edit a script with any text editor you like at this point.
Setup in Unity-side
We create an object, name it “SampleManager,” and attach SampleManager.cs to that object. After that, attach hello.sftxt to the ScenarioScript property of the SampleManager component.
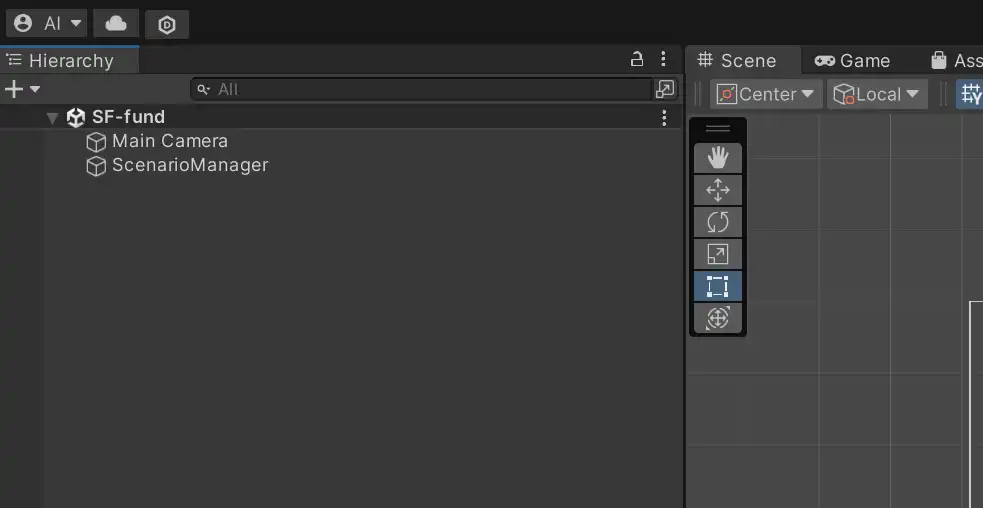
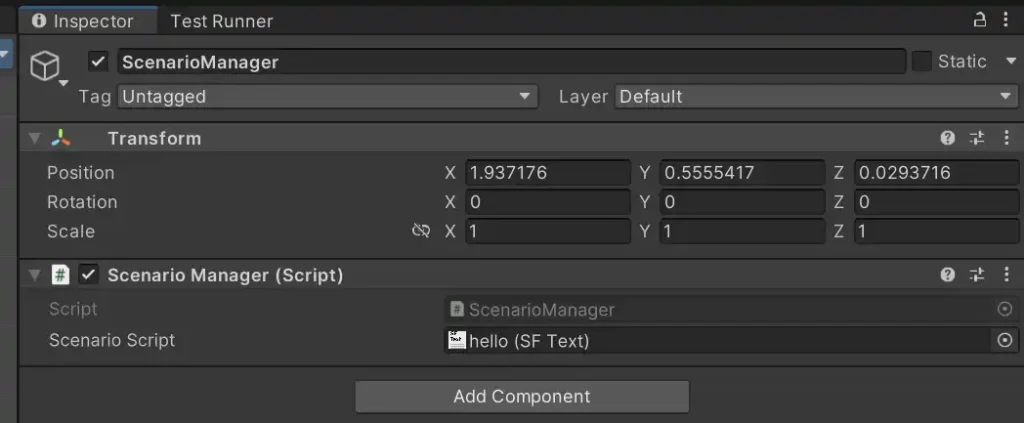
Play the Dialogue Scene
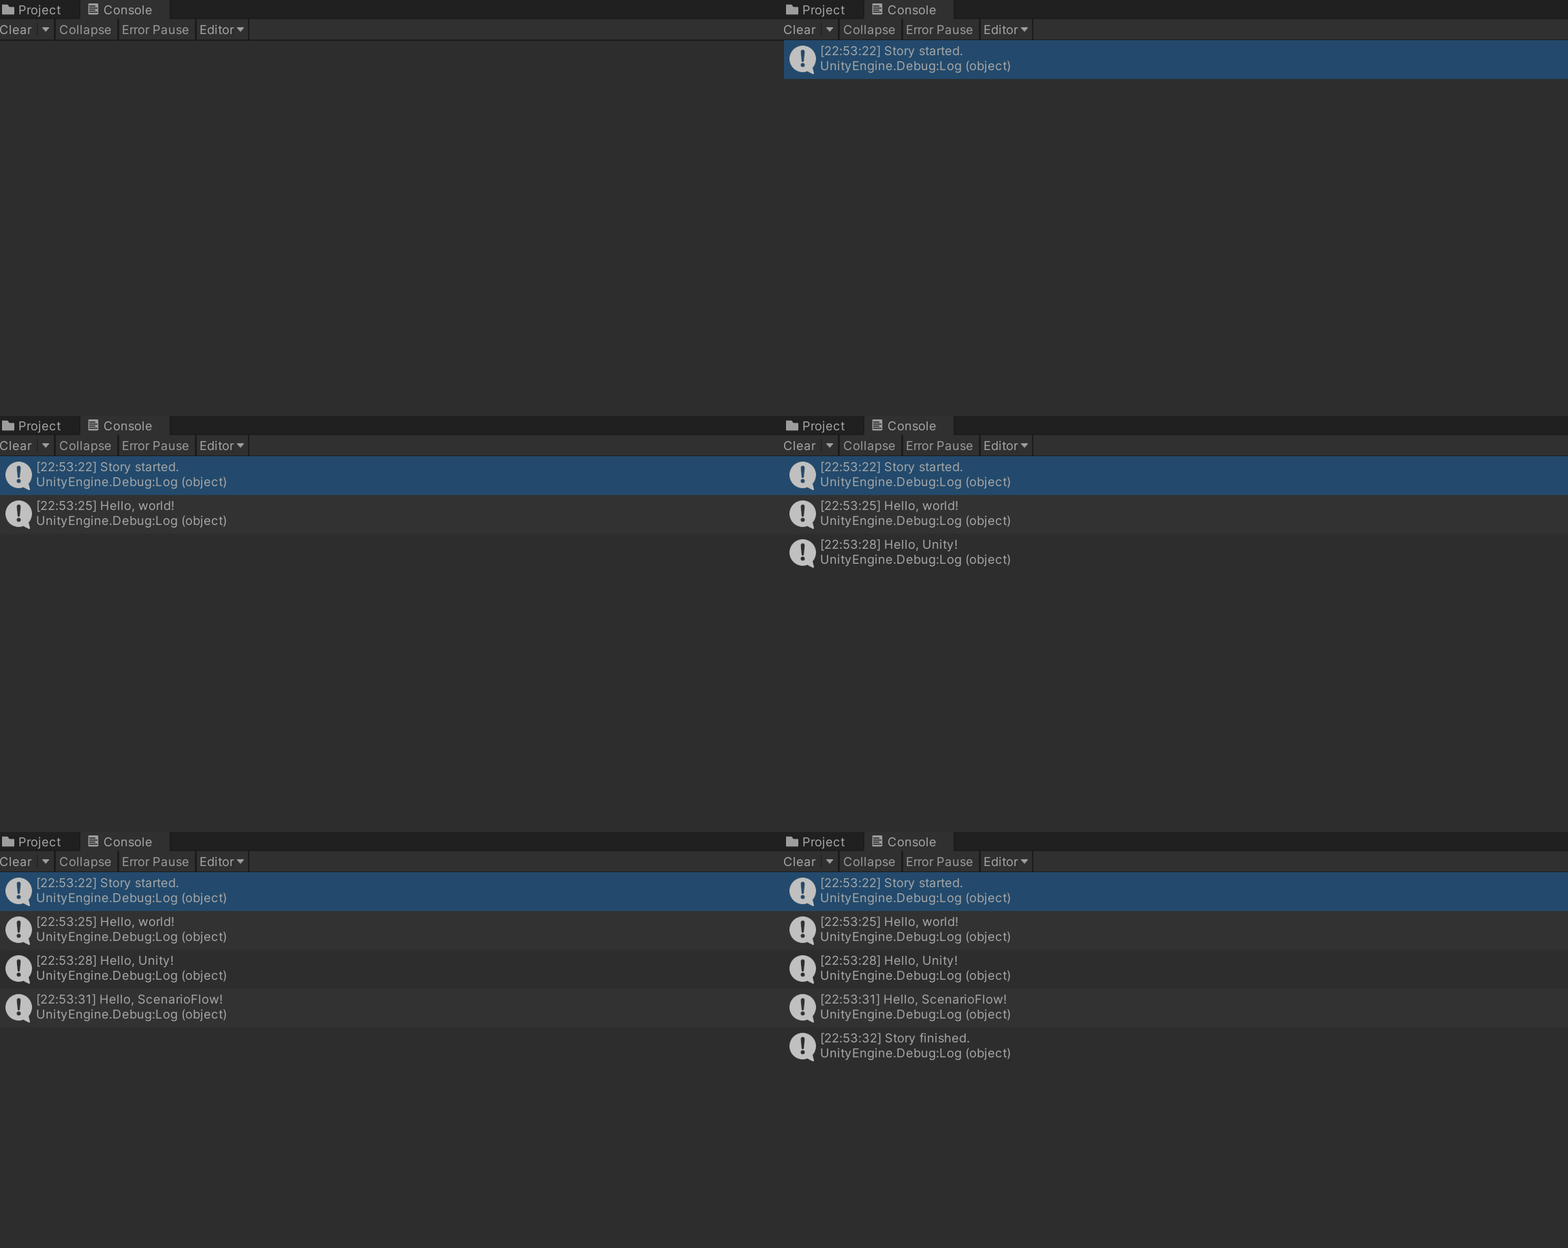
Click the play button to run the code. And then, the dialogue scene described in hello.sftxt will be played (although it will just show the specified messages).
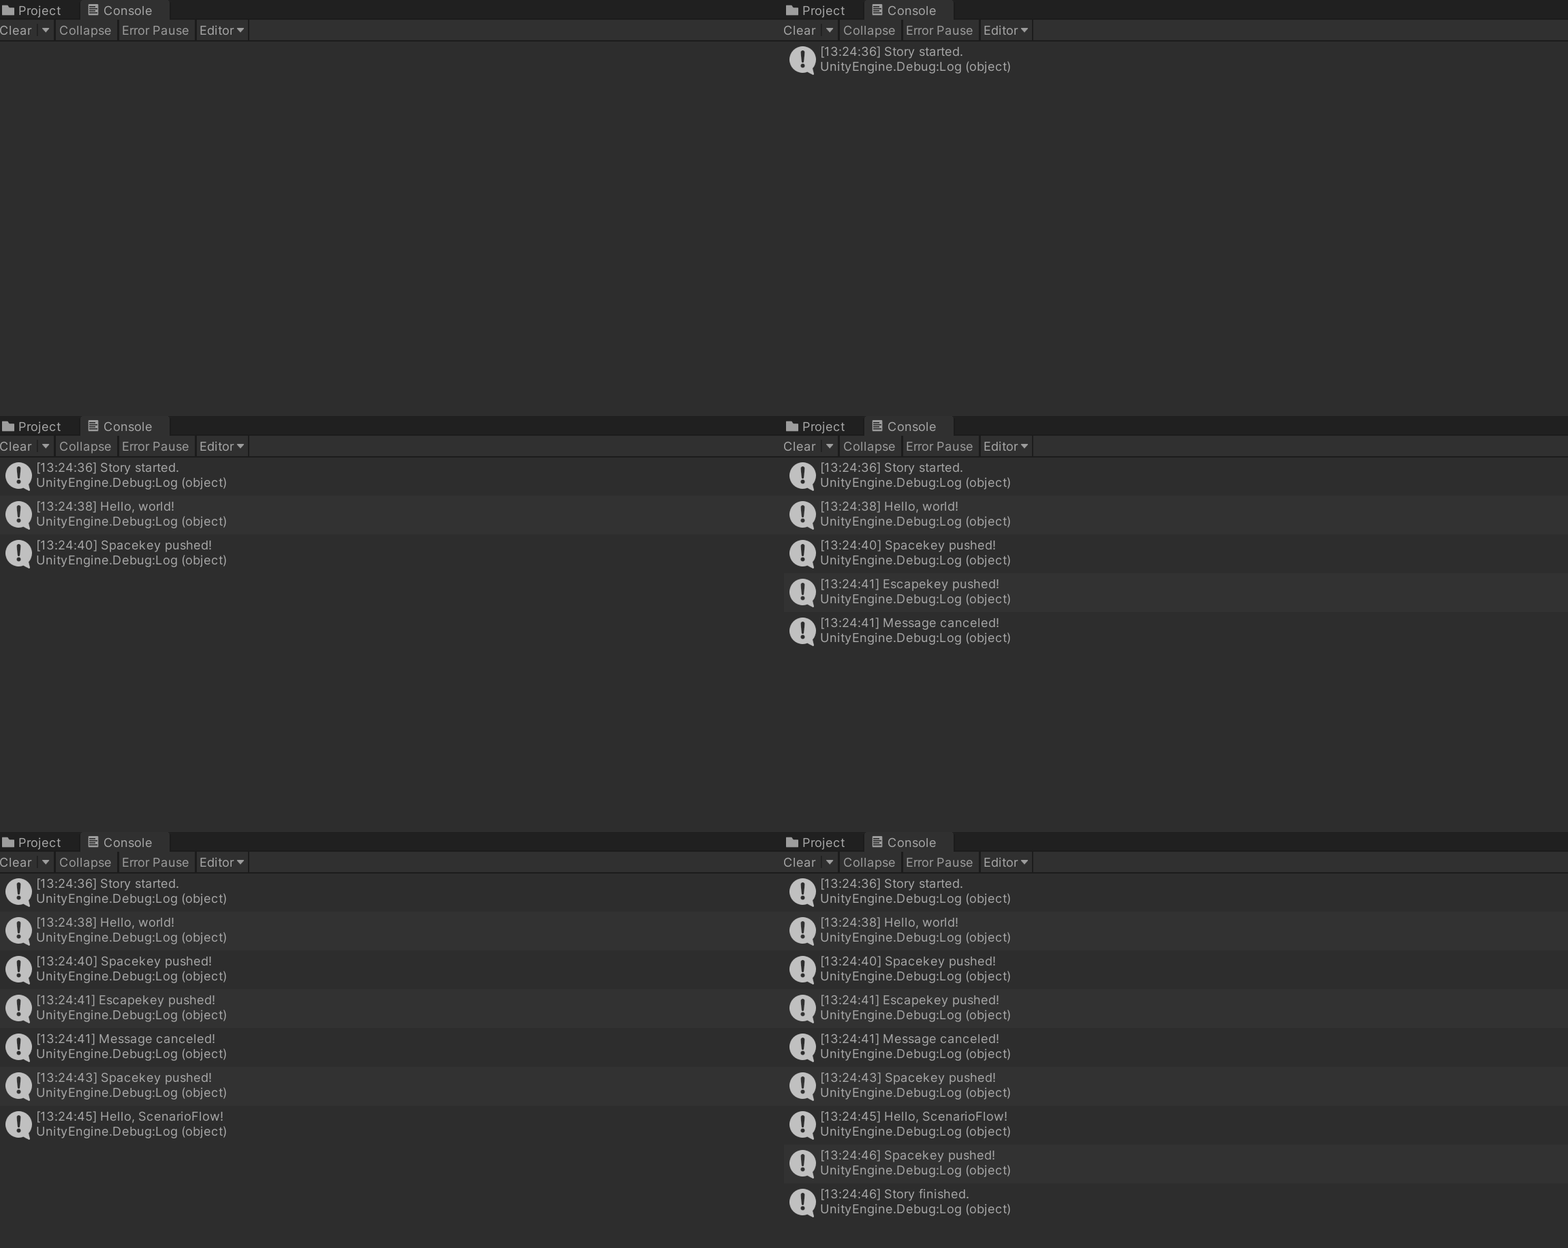
If you press the spacekey after one message is displayed, the next message will be displayed.
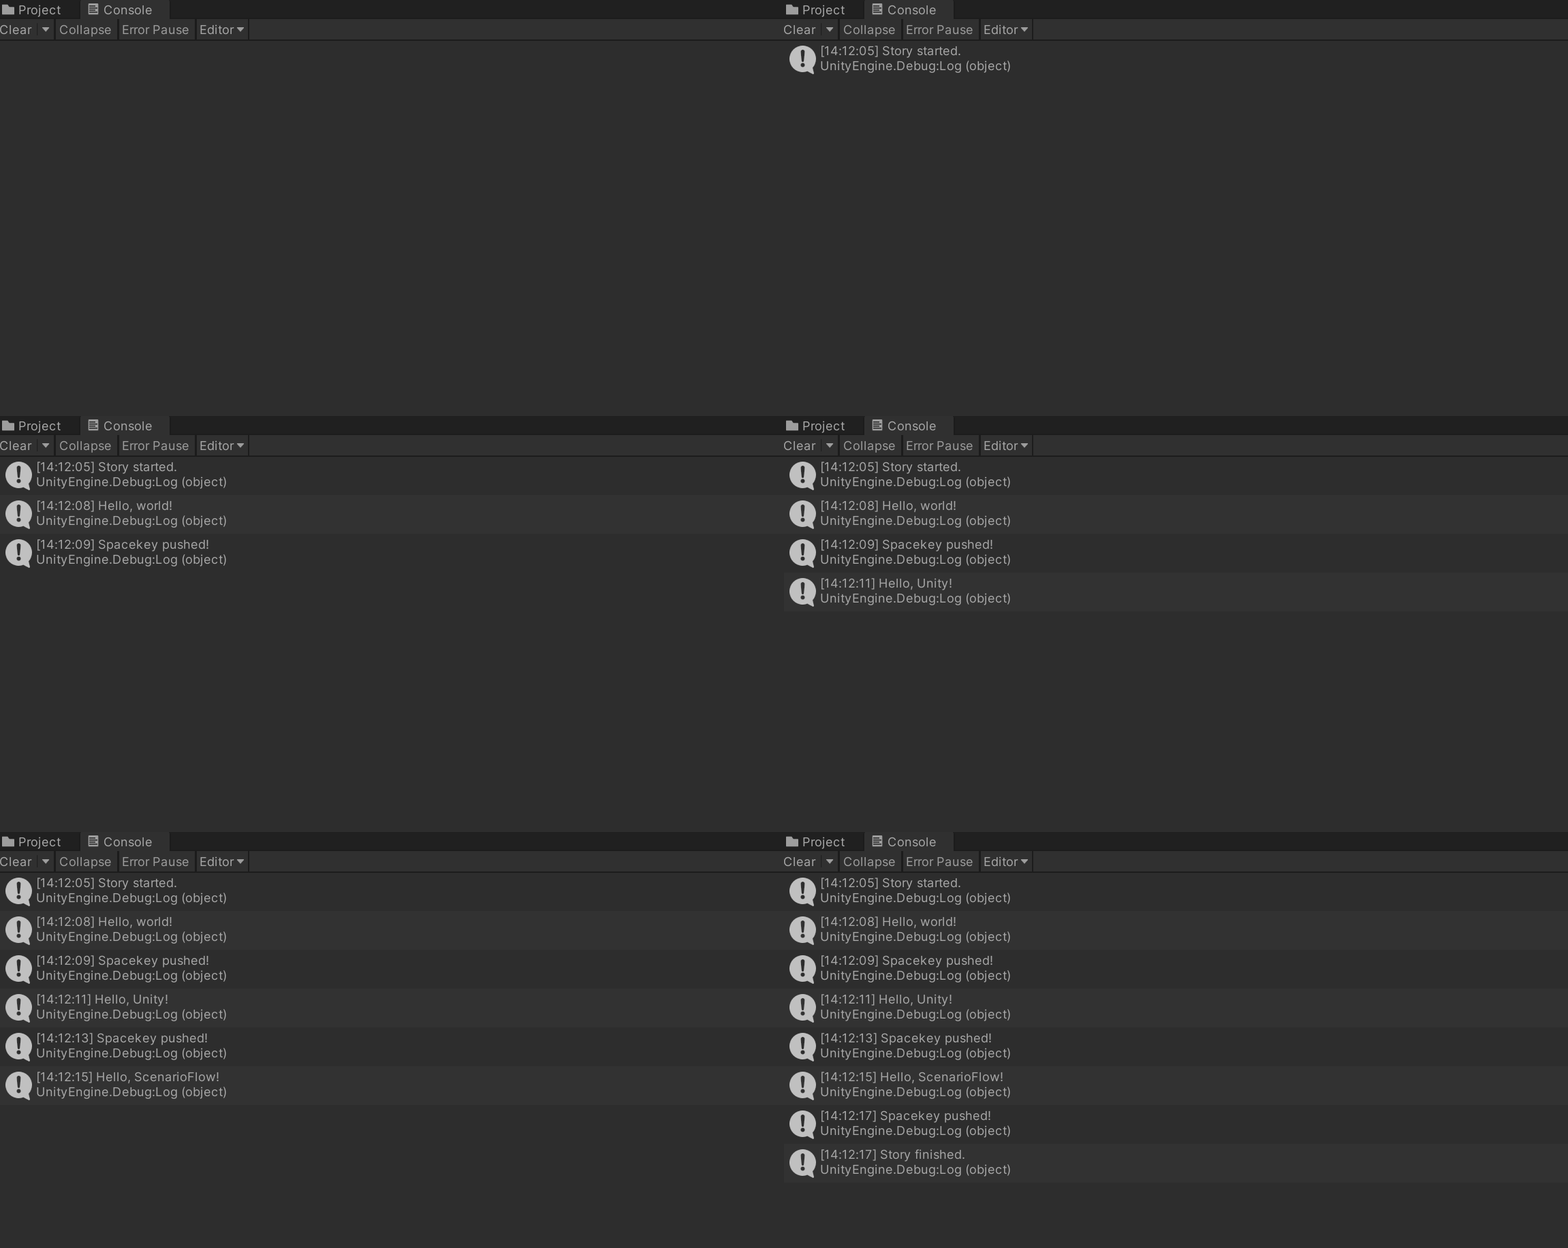
You can also cancel the messages. If you press the escape key during the delay before a message is shown, the message will be canceled and a message that notifies the cancellation will be displayed. In the following example, only the second message is canceled.
The Mechanism of Playing Dialogue Scenes
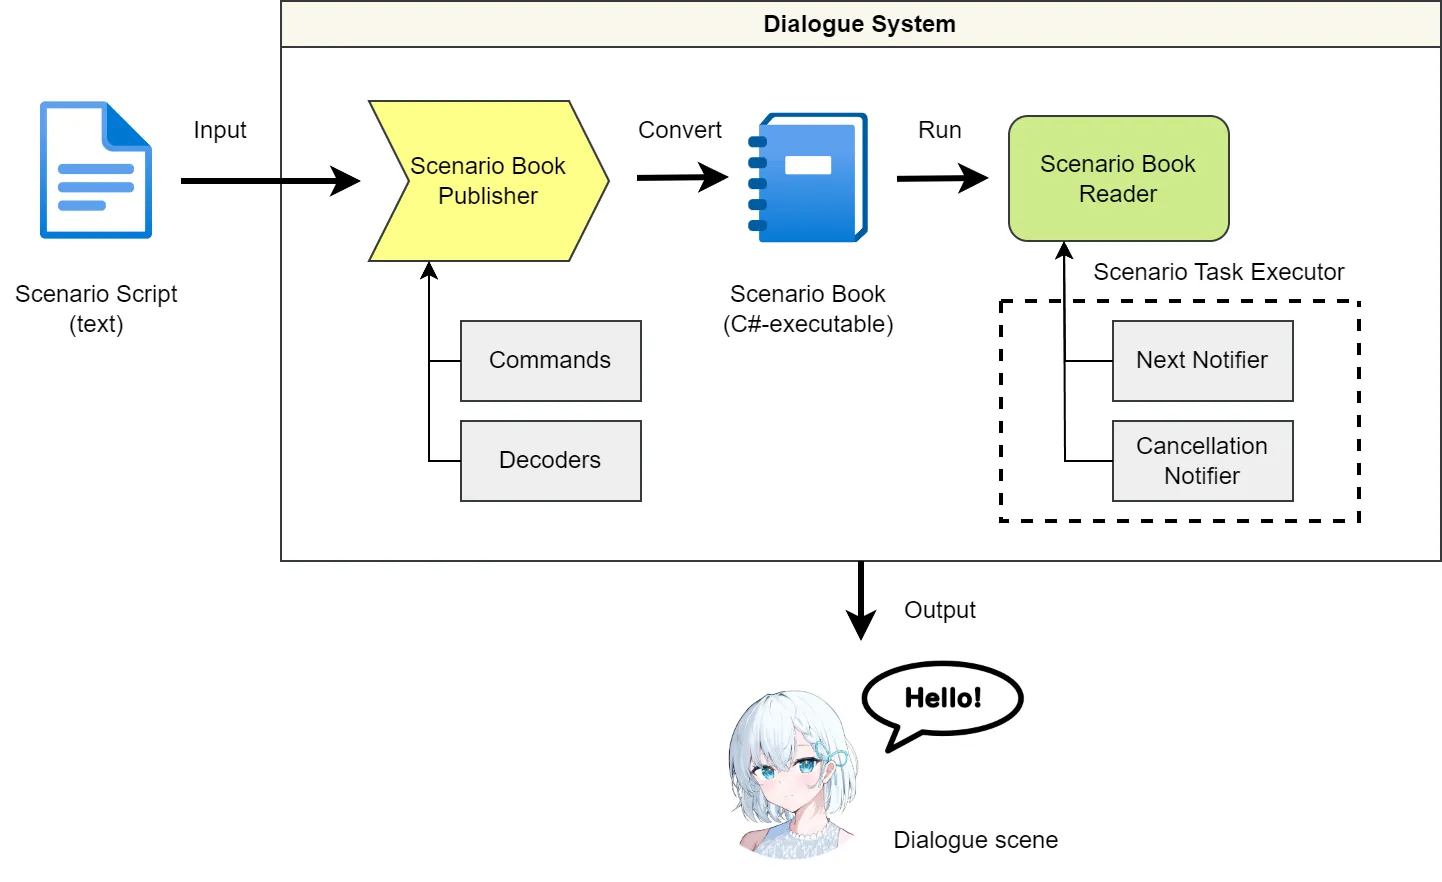
We will learn about how to play dialogue scenes with ScenarioFlow. To play a dialogue scene using ScenarioFlow, you follow the steps below.
- Build a dialogue system
- Create a scenario script
- Convert/Run the scenario script
Build a Dialogue System
A system, which is composed of C# scripts, receives data of a dialogue scene, controls the progress of the dialogue scene, and performs production such as showing dialogue and showing character images, is called “dialogue system.”
This dialogue system consits of two primary classes, ScenarioBookPublisher and ScenarioBookReader.
The ScenarioBookPublisher Class: Converts Scenario Scripts
In ScenarioFlow, the contents of a dialogue scene to play are described in a script as scenario data, and this script is called “ScenarioFlow script,” “scenario script,” or simply “script.” Since a scenario script is not basically described with C# but with an optimal format for scenario description, a scenario script has to be loaded by C# and converted to a C#-executable format in order to play the corresponding dialogue scene.
The ScenarioBookPublisher class performs the process of this scenario script conversion.
// Build a converter that generates a scenario book from a scenario script
ScenarioBookPublisher scenarioBookPublisher = new(
new IReflectable[]
{
// Decoders
new CancellationTokenDecoder(scenarioTaskExecutor),
new PrimitiveDecoder(),
// Commands
new MessageLogger(),
});
// Converts a scenario script to a scenario book
ScenarioBook scenarioBook = scenarioBookPublisher.Publish(scenarioScript);The ScenarioBookPublisher class is instantiated by receiving instances of classes that include “commands” and “decoders” as an array of the IReflectable interface (more precisely, IEnumerable<IReflectable>), where commands and decoders are used for converting scenario scripts. This class has the ScenarioBook Publish(IScenarioScript) class as a member, which receives an implementation of the IScenarioScript interface and returns an object of the ScenarioBook class.
The IScenarioScript interface defines the required data structure for being treated as a scenario script. Every object that implements this interface appropriately can be treated as a ScenarioScript in ScenarioFlow.
However, it is very important to note that a scenario script is usually treated as an object of the ScenarioScript abstract class to which the SerializeField attribute can be attached because it can be handled more effectively in Unity editor than the interface. The ScenarioScript class is an abstract class that inherits from the ScriptableObject class and implements the IScenarioScript interface.
// A scenario script to run
[SerializeField]
private ScenarioScript scenarioScript;As the ScenarioScript abstract class implements the IScenarioScript interface, every object that inherits from the ScenarioScript abstract class can be treated as a scenario script. A SFText script, which was used in “Hello, world!” example, is imported to Unity as an object of the SFText class. And this object can be attached to properties of the ScenarioScript type since the SFText class inherits from the ScenarioScript abstract class.

On the other hand, unlike the ScenarioScript class that holds just raw data of a dialogue scene, the ScenarioBook class holds data of a dialogue scene with a C#-executable format. Basically, we don’t instantiate the ScenarioBook class by ourselves, but we usually gain its instance by converting an object of the ScenarioScript class using the ScenarioBookPublisher class.
In summary, the ScenarioBookPublisher class is instantiated with classes that define “commands” and “decoders,” and it converts a scenario script to a scenario book, where scenario scripts hold scenario data as texts while scenario books hold scenario data with a C#-executable format.
The ScenarioBookReader Class: Run Converted Scenario Scripts
The ScenarioBookReader class executes a scenario book generated from a scenario script in order to play the dialogue scene described in the script.
using Cysharp.Threading.Tasks;
using ScenarioFlow;
using ScenarioFlow.Scripts;
using ScenarioFlow.Tasks;
using UnityEngine;
public class ScenarioManager : MonoBehaviour
{
// A scenario script to run
[SerializeField]
private ScenarioScript scenarioScript;
private async UniTaskVoid Start()
{
// Build a system that executes scenario books
ScenarioTaskExecutor scenarioTaskExecutor = new(
new SpacekeyNextNotifier(),
new EscapekeyCancellationNotifier());
ScenarioBookReader scenarioBookReader = new(scenarioTaskExecutor);
// (Convert a scenario script)
try
{
// Run the scenario book
Debug.Log("Story started.");
await scenarioBookReader.ReadAsync(scenarioBook, this.GetCancellationTokenOnDestroy());
Debug.Log("Story finished.");
}
finally
{
// ScenarioTaskExecutor implements IDisposable
scenarioTaskExecutor.Dispose();
}
}
}The ScenarioBookReader class cooperates with the ScenarioTaskExecutor class in running dialogue scenes. In fact, a ScenarioBook object holds processes to perform as an array, and then the former controls the execution order of the processes while the latter controls each execution of processes.
The constructor of the ScenarioTaskExecutor class requires an implementation of the INextNotifier interface and that of the ICancellationNotifier interface. The former defines a trigger for starting the next process after one process finishes while the latter defines a trigger for canceling a running process. Make sure to dispose of an instance of this class at the end of program because this class implements the IDisposable interface.
In “Hello, world!” example, the SpacekeyNextNotifier class and the EscapekeyCancellationNotifier class are given as an implementation of the two interfaces, respectively. The former starts a next process when the spacekey is pressed, and the latter cancels a running process when the escape key is pressed.
First, with the SpacekeyNotifier class, the next message is not shown after one message is shown until the spacekey is pressed.
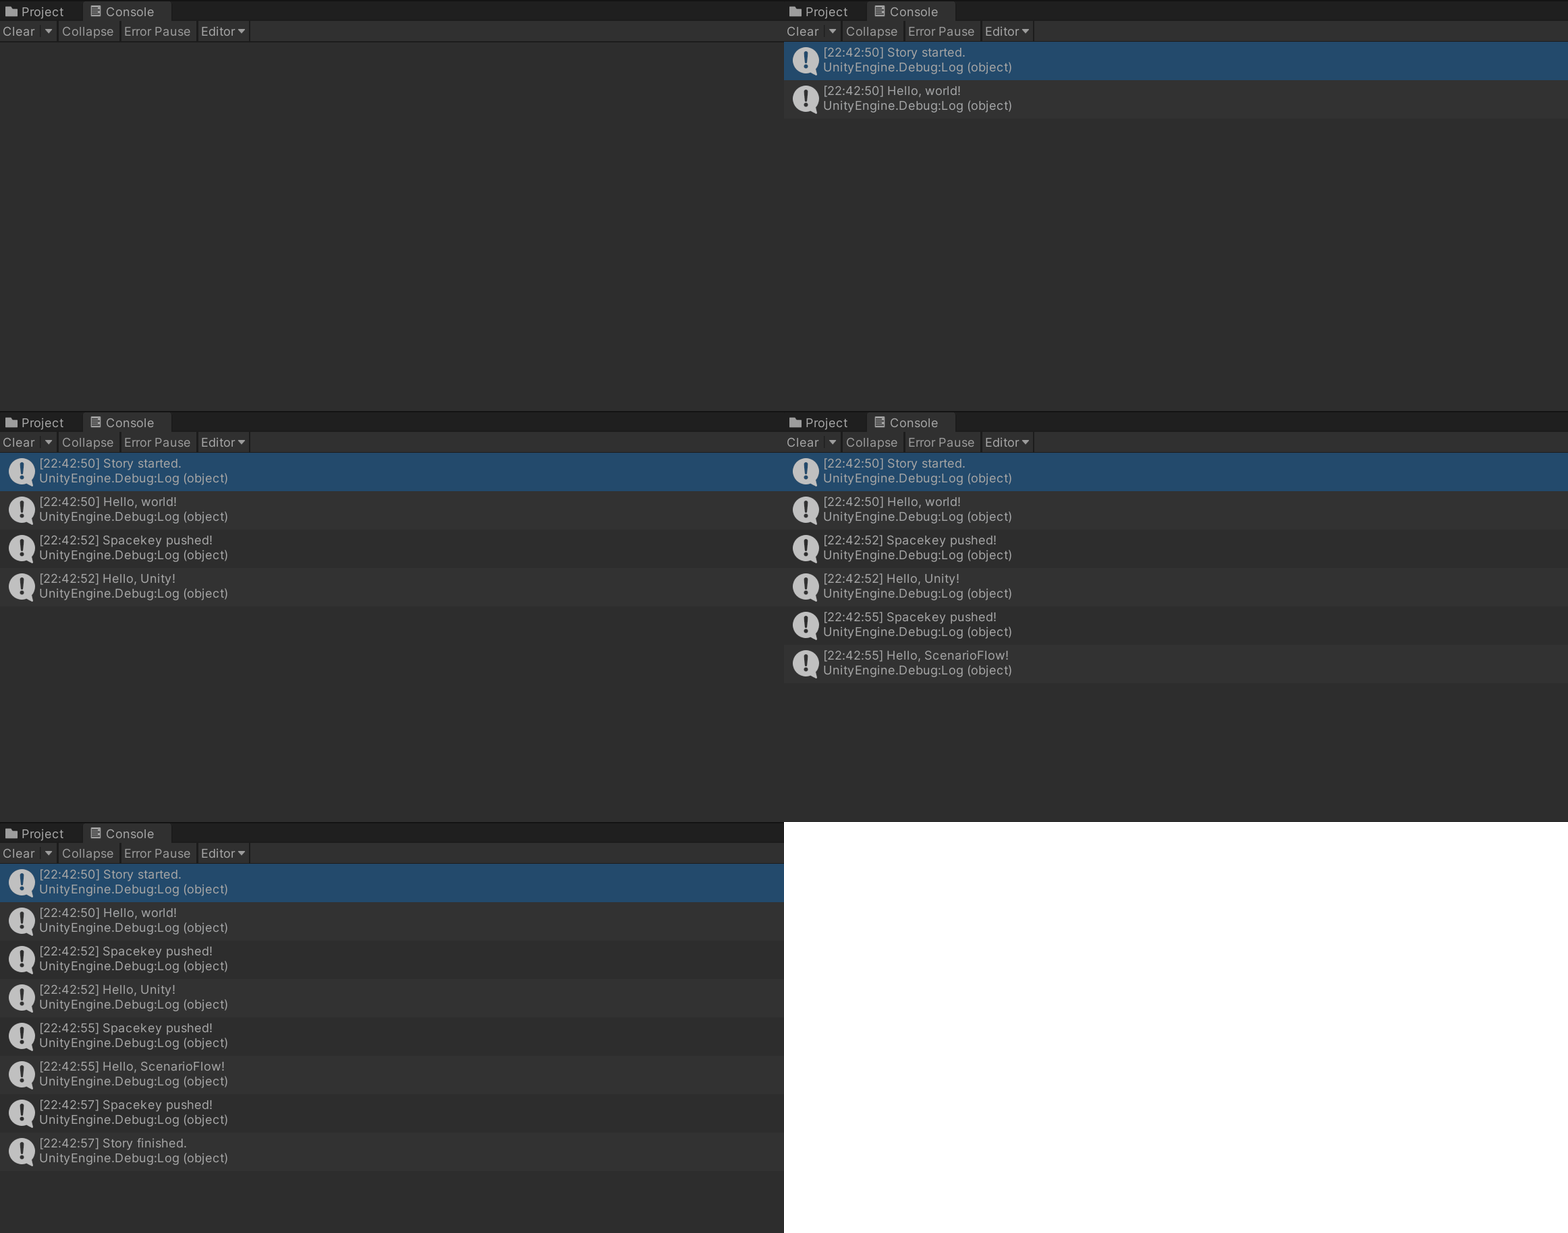
Second, with the EscapekeyCancellationNotifier class, if the escape key is pressed while one process of displaying a message is running (i.e. during delay time), that process is canceled.

In summary, the ScenarioBookReader class is composed of the ScenarioTaskExecutor class, and implementations of the INextNotifier interface and the ICancellationNotifier interface. A ScenarioBook object obtained from a scenario script is given to the ScenarioBookReader class, and then a dialogue scene is started. The ScenarioBookReader controls the execution order of processes while the ScenarioTaskExecutor class controls the execution of each process. And the INextNotifier interface defines a trigger for starting the next process after one process finishes while the ICancellationNotifier interface defines a trigger for canceling a running process.
Write a Scenario Script
We create a scenario script in which specific contents of a dialogue scene are described after building a dialogue system. We can use a scenario script with any format as long as it is imported to Unity as an object of the ScenarioScript class as we learned earlier, however, note that it is SFText script that ScenarioFlow provides as a standard format and is usually used as a scenario script.
We describe “commands” provided by a dialogue system with appropriate arguments in an appropriate order. Command is method of C#, which can be called from scenario scripts. If a command is called, a specific process bound to the command is performed based on given arguments.
In “Hello, world!” example, the command named log message async is called three times, and different arguments (i.e. shown messages) are given for each call. Note that a SFText script is used here.
$standard | log message async |
| {Hello, world!} |
$standard | log message async |
| {Hello, Unity!} |
$standard | log message async |
| {Hello, ScenarioFlow!} | This log message async command is defined as the LogMessageAsync method of the MessageLogger class in C#-side.
using Cysharp.Threading.Tasks;
using ScenarioFlow;
using System;
using System.Threading;
using UnityEngine;
public class MessageLogger : IReflectable
{
[CommandMethod("log message async")]
public async UniTask LogMessageAsync(string message, CancellationToken cancellationToken)
{
try
{
await UniTask.Delay(TimeSpan.FromSeconds(2.0f), cancellationToken: cancellationToken);
Debug.Log(message);
}
catch (OperationCanceledException)
{
Debug.Log("Message canceled!");
throw;
}
}
}“Hello, world!”, “Hello, Unity!”, and “Hello, ScenarioFlow!” correspond to the message parameter of the LogMessageAsync method, and $standard corresponds to the cancellationToken parameter.
We are going to learn about how commands are defined in C#-side in detail in the following section, but at this point, the thing is that “as commands are called in an appropriate order, it looks like a dialogue scene is being played.”
For now, we defined only the log message command that simply shows a message, however, defining a command that operates a TextMeshProUGUI component, we can display dialogues, and defining a command that operates SpriteRenderer component, we can display character images on the screen, for example. In this way, we can play intended dialogue scenes by firstly defining commands that perform necessary processes for dialogue scenes, secondly describing them with appropriate arguments in appropriate orders in scenario scripts, and finally running them in a dialogue system.
Convert/Run the Scenario Script
If a dialogue system and a scenario script in which a dialogue scene to play are ready, it’s time to run the scenario script in order to play the dialogue scene.
For that, we only need to convert a scenario script to a scenario book by the Publish method of the ScenarioBookPublisher class and run it by the ReadAsync method of the ScenarioBookReader class at the right timing.
// Convert a scenario script to a scenario book
ScenarioBook scenarioBook = scenarioBookPublisher.Publish(scenarioScript);
// Run the scenario book
Debug.Log("Story started.");
await scenarioBookReader.ReadAsync(scenarioBook, this.GetCancellationTokenOnDestroy());
Debug.Log("Story finished.");You can convet a scenario script whenever you like. You can do it right before starting a dialogue scene, and you can also do it even earlier. As a dialogue scene actually starts when the ReadAsync method is called, you call that method with a scenario book that has the information of a dialogue scene to play when you want to start it.
Primary Components of Dialogue System
Finally, we are going to learn about the primary functionalities of dialogue system, “command,” “decoder,” and “command control interfaces” for further details.
Command
Command is the minimum unit of instructions, which can be called from scenario-script-side. It is called with arguments, and it performs its specific process.
In ScenarioFlow, dialogue scenes are realized by calling commands again and again. For example, calling commands that show dialogues, commands that show character images, commands that play musics, and so on in an appropriate order, you can play a dialogue scene.
Export Methods
The most important idea about command in ScenarioFlow is that command is equivalent to method in C#. We can add a new command available in scenario scripts by exporting a C# method as a command.
To export a method as a command, we attach a CommandMethod attribute to a method with a command name.
public class CSharpClass : IReflectable
{
[Command Method("sync command name")]
public void CSharpSyncMethod(Type1 arg1, Type2 arg2, ...)
{
// Synchronous process
}
[CommandMethod("async command name")]
public UniTask CSharpAsyncMethod(Type1 arg1, Type2 arg2, ...,
CancellationToken cancellationToken)
{
// Asynchronous process
}
}The rules of exporting a method as a command are listed below:
- A method can be exported as a command by getting a
CommandMethodattribute with a command name - The access modifier of the method has to be
public - Methods whose return type is
UniTaskare exported as asynchronous commands; otherwise they are exported as synchronous methods. (To use onlyUniTaskandVoidis strongly recommended) CancellationTokentype parameter can be used only for asynchronous commands. Only single that type parameter can be set, and it has to be the last parameter
For return types of methods, we exported a method whose return type is UniTask as an asynchronous method in “Hello, wolrd!” example. On the other hand, if a mehtod has any other return type, it is exported as a synchronous method. The difference between synchronous commands and asynchronous commands is in how they are affected by implementations of the INextNotifier interface an those of the ICancellationNotifier interface. First of all, needless to say, synchronous commands can’t be canceled because thier processes finish immediately after they are called (CancellationToken is not given in the first place). Next, after one synchronous command finishes, the next command starts immediately regardless of implementation of the INextNotifier interface. You are going to take a look at this behavior with an example in the exercise section.
For prameter types of methods, there are few constraints against the CancellationToken type, however, they are hardly critical in practical use. Anyway, it is much more important to note that we can set any parameter types of an exported method freely, except for the CancellationToken type. In ScenarioFlow, we can export every method that requires arguments of any types such as int, GameObject, or any other user-defined type as a command. We are going to learn about this in detail in “Decoder” section.
Register Commands
After exporting a method as a command, we have to register a class that defines the command to the ScenarioBookPublisher class so that we can call the command in scenario scripts.
The ScenarioBookPublisher class converts a scenario script to a scenario book as we learned already. We can make the commands available by giving classes that define commands to its constructor.
The constructor of the ScenarioBookPublisher class requires IEnumerable<IReflectable>, and hence given classes have to implement IReflectable interface. Because this interface has no members, we only have to write : IReflectable next to class names.
ScenarioBookPublisher scenarioBookPublisher = new(
new IReflectable[]
{
new CSharpClass()
});Call Commands
Available commands can be called with command names and arguments in scenario scripts. With SFText, we can call commands as follows:
$sync | sync command name |
| {Arg1} {Arg2} ... |
$standard | async command name |
| {Arg1} {Arg2} ... |Although we are going to learn about the grammar of SFText in detail in another article, let’s focus on just CancellationToken type parameters here.
A parameter of the CancellationToken type is called “token code,” which is a special parameter and only a parameter that has constraints due to its type. In SFText, we describe command arguments in the same order as that of parameters of the corresponding C# method. However, only CancellationToken type parameters are described independently as token codes.
Token codes play a significant role in switching behavior of running asynchronous commands. For example, we can prohibit cancellation of asynchronous commands, or we can let a command ignore a trigger of the INextNotifier for that command, by specifying appropriate token codes. $standard, which is specified in the above example, means that “cancellation of the target command is permitted, and after the command finishes, the next command starts after a trigger from the INextNotifier interface arrives.” Also, note that synchronous commands don’t need token codes, and we specify $sync for them in SFText.
Token code is a very important idea because it makes grammar of scenario scripts simple while it significantly improves its flexibility. We are going to learn about token code in another article properly.
Decoders
In ScenarioFlow, we can freely specify any type parameters (except for CancellationToken type parameter) for commands exported as commands. Here, another important point for method parameters is that we don’t need to consider parameter conversion processes when describing methods.
Needless to say, arguments described in scenario scripts are imported to C# as objects of the string type. To call exported C# methods based on them, string type objects have to be converted to proper type objects. In ScenarioFlow, such conversion processes don’t have to be described in methods exported as commands, but they are described in methods only for conversion processes, each of which is called “decoder.”
Keep in mind that we have to prepare decoders for all types of command parameters. This applies to the string type.
As we used the string type and the CancellationToken type as command parameter types in “Hello, world!” example, we defined the decoders for them. If we want to use the int type as a command parameter type, we have to prepare a decoder for the int type.
We can create a decoder by following the steps below:
- Define a method that receives a
stringtype argument, whose return type is the target type, and whose access modifier ispublic - Attach a
DecoderMethodattribute to the method
public class DecoderClass : IReflectable
{
[DecoderMethod]
public TargetType DecoderForTargetType(string input)
{
// Conversion process
TargetType targetTypeObject = ConvertToTargetType(input);
return targetTypeObject;
}
}That is, we export a C# method as a decoder by attaching a DecoderMethod attribute to it. Also, we have to make sure that the class that defines the exported decoder implements the IReflectable interface and give it to the constructor of the ScenarioBookPublisher class.
ScenarioBookPublisher scenarioBookPublisher = new(
new IReflectable[]
{
new CSharpClass(),
new DecoderClass(),
});As you can see in the above code, instances of all classes that define commands and decoders you use are given to the constructor of the ScenarioBookPublisher class.
It is also imortant to note that although you have to prepare decoders by yourself basically, only a decoder for the CancellationToken type has to be created using the ScenarioTaskExecutor class provided by ScenarioFlow. The ScenarioTaskExecutor class implements the ICancellationTokenDecoder interface, and you can create a decode for the CancellationToken type easily using the member method CancellationToken Decode(string).
using ScenarioFlow;
using ScenarioFlow.Tasks;
using System;
using System.Threading;

public class CancellationTokenDecoder : IReflectable
{
    private readonly ICancellationTokenDecoder cancellationTokenDecoder;

    public CancellationTokenDecoder(ICancellationTokenDecoder cancellationTokenDecoder)
    {
        this.cancellationTokenDecoder = cancellationTokenDecoder ?? throw new ArgumentNullException(nameof(cancellationTokenDecoder));
    }

    [DecoderMethod]
    public CancellationToken ConvertToCancellationToken(string input)
    {
        return cancellationTokenDecoder.Decode(input);
    }
}ScenarioTaskExecutor scenarioTaskExecutor = new(
new NextNotifier(),
new CancellationNotifier());
CancellationTokenDecoder cancellationTokenDecoder = new(scenarioTaskExecutor);Command Control Interfaces
In ScenarioFlow, commands are called in order, resulting in a dialogue scene being played.
For practical dialogue scenes, after one dialogue is shown, it is natural to move on to the next dialogue when the player make a specific action (e.g. click the screen). This “moving on to the next dialogue” process corresponds to “moving on to the next command” process in ScenarioFlow, and a trigger that starts this process is defined by implementations of the INextNotifier interface.
Also, when a dialogue is shown, the full text is not not shown in no time, but the letters are shown one by one by taking a little time in general. If the player make a specific action (e.g. click the screen) during that process, the text animation is canceled, and the full text is shown immediately. This “canceling a dialogue animation” process corresponds to “canceling a command” process, and a trigger that executes this process is defined by implementations of the ICancellationNotifier interface.
public class NextNotifier : INextNotifier
{
public async UniTask NotifyNextAsync(CancellationToken cancellationToken)
{
// Any process that inserts delay
}
}public class CancellationNotifier : ICancellationNotifier
{
public async UniTask NotifyCancellationAsync(CancellationToken cancellationToken)
{
// Any process that inserts delay
}
}The INextNotifier interface and the ICancellationNotifier interface have the member methods NotifyNextAsync and NotifyCancellationAsync, respectively. Completion of these methods issues their triggers. In other words, the next command starts after one command finishes when the former process finishes, and a running command is canceled when the latter process finishes.
We make created implementations of the interfaces available by giving them to the constructor of the ScenarioTaskExecutor class.
ScenarioTaskExecutor scenarioTaskExecutor = new(
new NextNotifier(),
new CancellationNotifier());Summary
Let’s summarize what we learned in this article.
To create dialogue scenes with ScenarioFlow, we follow the 3 steps below:
- Create a dialogue system
- Create a scenario script
- Convert/Run the scenario script
A dialogue system is composed of two primary classes, ScenarioBookPublisher and ScenarioBookReader. The contents of a dialogue scene are described in a “scenario script,” and a scenario script is converted to a scenario book that is C#-executable by the ScenarioBookPublisher class. That scenario book is executed by the ScenarioBookReader class, and as a result, the dialogue scene described in the scenario book is played.
We describe “commands” to call and their arguments in a scenario script. Command is the minimum unit of instructions which can be called from scenraio scripts. When a command is called, its specific process is executed based on given arguments. In ScenarioFlow, a dialogue scene is played as the consequence of calling appropriate commands with appropriate arguments in an appropriate order. As a side note, any object that implements the ScenarioScript abstract class can be treated as a scenario script, and ScenarioFlow provides SFText script as a standard scenario script format.
We can create a command by simply exporting a C# method. A command inherits the parameters of the C# method, where we can freely use any parameter type except for the CancellationToken type. Commands are classified into asynchronous commands and synchronous commands according to the return types of their method, where execution methods of asynchronous commands can be switched by CancellationToken type arguments called “token codes.”
“Decoders,” which convert string type arguments, are required in order to call commands from scenario scripts. A decoder can be created by exporting a method that receives a string type argument and returns a target type object. We have to prepare decoders for all command parameter types including the string type.
While a scenario script is being run, a trigger that starts the next command after one command finishes is defined by implementations of the INextNotifier interface, and a trigger that cancels a running command is defined by implemantations of the ICancellationNotifier interface. Each trigger is issued when the process of the member method NotifyNextAsync or NotifyCancellationAsync defined by each of these interfaces finishes.
Exercise
Create a Synchronous Version of the Message Display Command
In “Hello, world!” example, you created the asynchronous command log message async that displays a message after inserted delay.
To understand the difference between synchronous commands and asynchronous commands, create a synchronous version of the message display command that shows a message immediately without delay.
Name the command log message, and add it to the MessageLogger class.
Run the following SFText after adding the command. You can use the ScenarioManager you created already without any changes because you don’t create any new classes.
$sync | log message |
| {This is a sync message A} |
$standard | log message async |
| {This is an async message A.} |
$sync | log message |
| {This is a sync message B-1.} |
$sync | log message |
| {This is a sync message B-2.} |
$standard | log message async |
| {This is an async message B.} | Create a Message Display Command with Font Size
Add a new asynchronous command that displays a message with a specified font size.
The command name is log adjustable message async, and add it to the MessageLogger class. It receives a string type argument that specifies a shown message and a int type argument that specifies the font size. Also, it performs the same process as that of the LogMessageAsync method except that a font size can be specified.
To call this comand, you have to add a decoder for the int type. Add this decoder to the PrimitiveDecoder class.
Finally, run the following SFText.
$standard | log adjustable message async |
| {Hello, world!} {10} |
$standard | log adjustable message async |
| {Hello, Unity!} {15} |
$standard | log adjustable message async |
| {Hello, ScenarioFlow!} {20} | 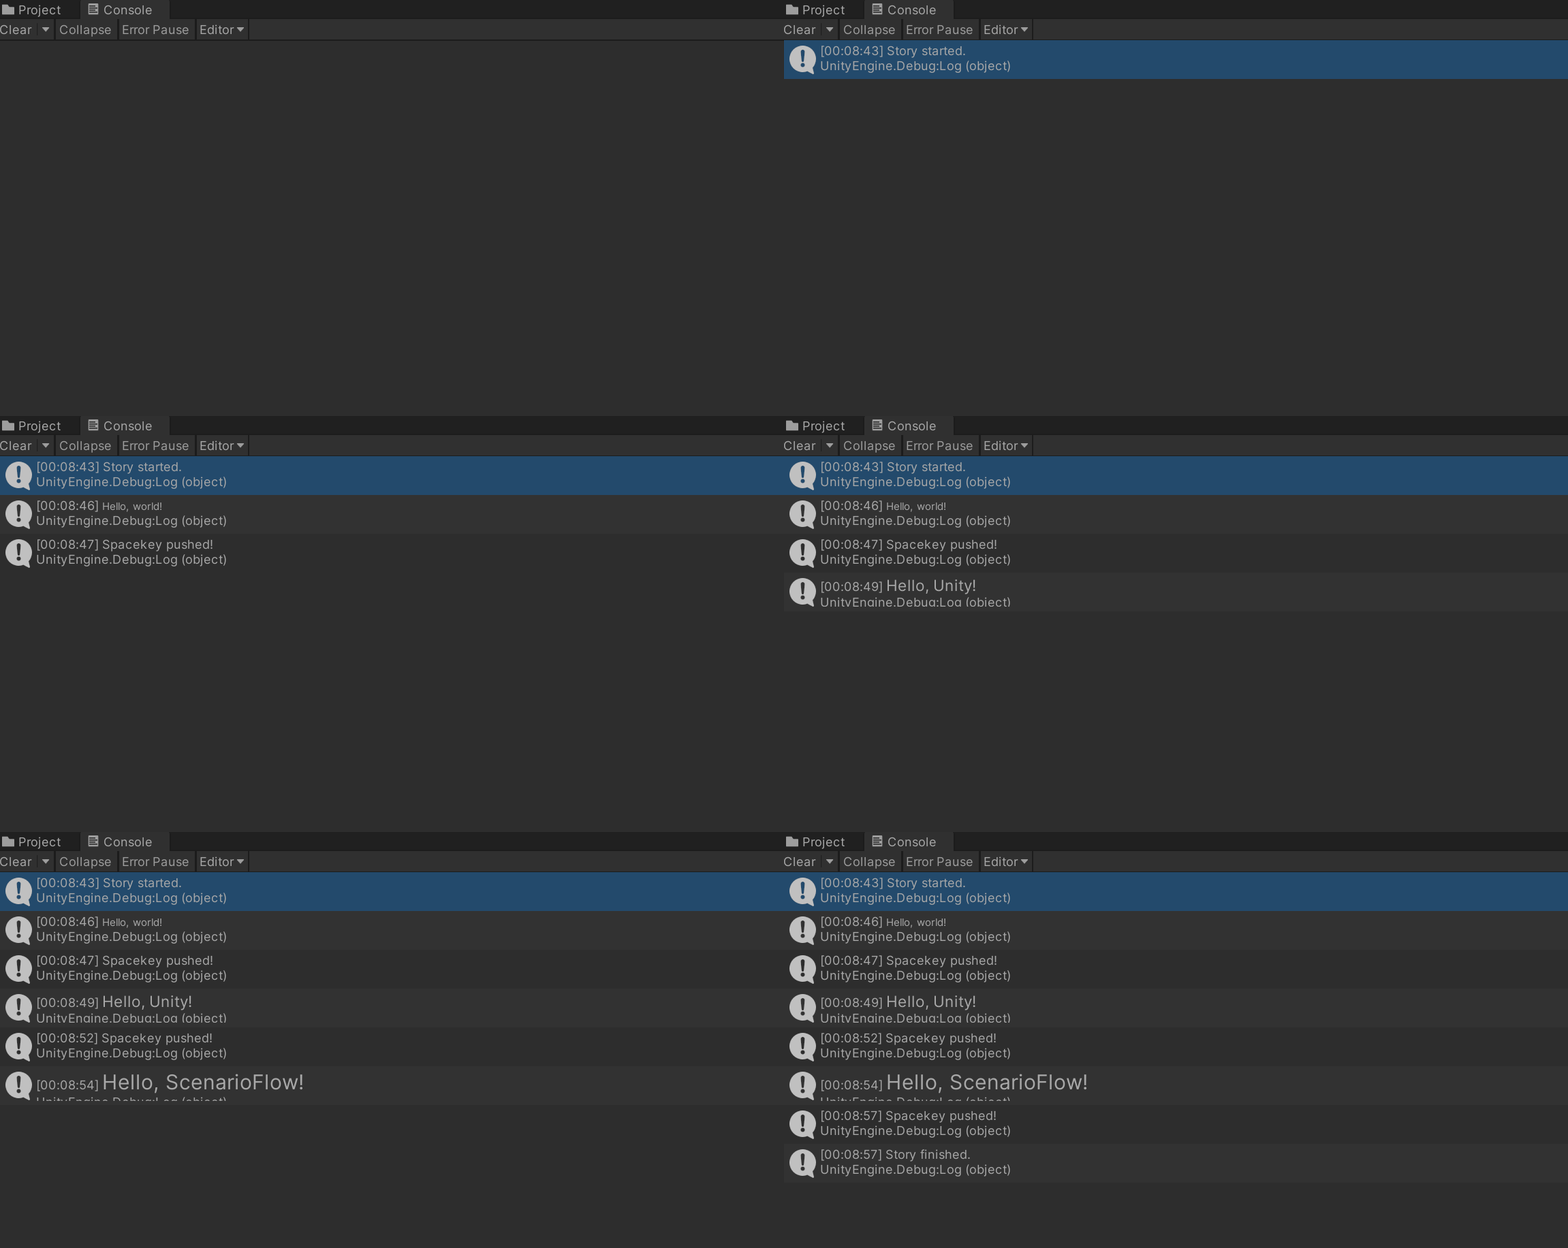
Create an Automated NextNotifier
Create a new class AutoNextNotifier that implements the INextNotifier interface to build a system that starts the next command in 1 second automatically after one asynchronous command finishes. You have to modify the ScenarioManager class to make this class available.
Run the following SFText.
$standard | log message async      |
          | {Hello, world!}        |
$standard | log message async      |
          | {Hello, Unity!}        |
$standard | log message async      |
| {Hello, ScenarioFlow!} | Make sure that after one asynchronous command finishes, the next command is automatically started in a little while without pressing the space key.
Sample Answers
Create a Synchronous Version of the Message Display Command
using Cysharp.Threading.Tasks;
using ScenarioFlow;
using System;
using System.Threading;
using UnityEngine;
public class MessageLogger : IReflectable
{
[CommandMethod("log message async")]
public async UniTask LogMessageAsync(string message, CancellationToken cancellationToken)
{
// Omitted
}
[CommandMethod("log message")]
public void LogMessage(string message)
{
Debug.Log(message);
}
}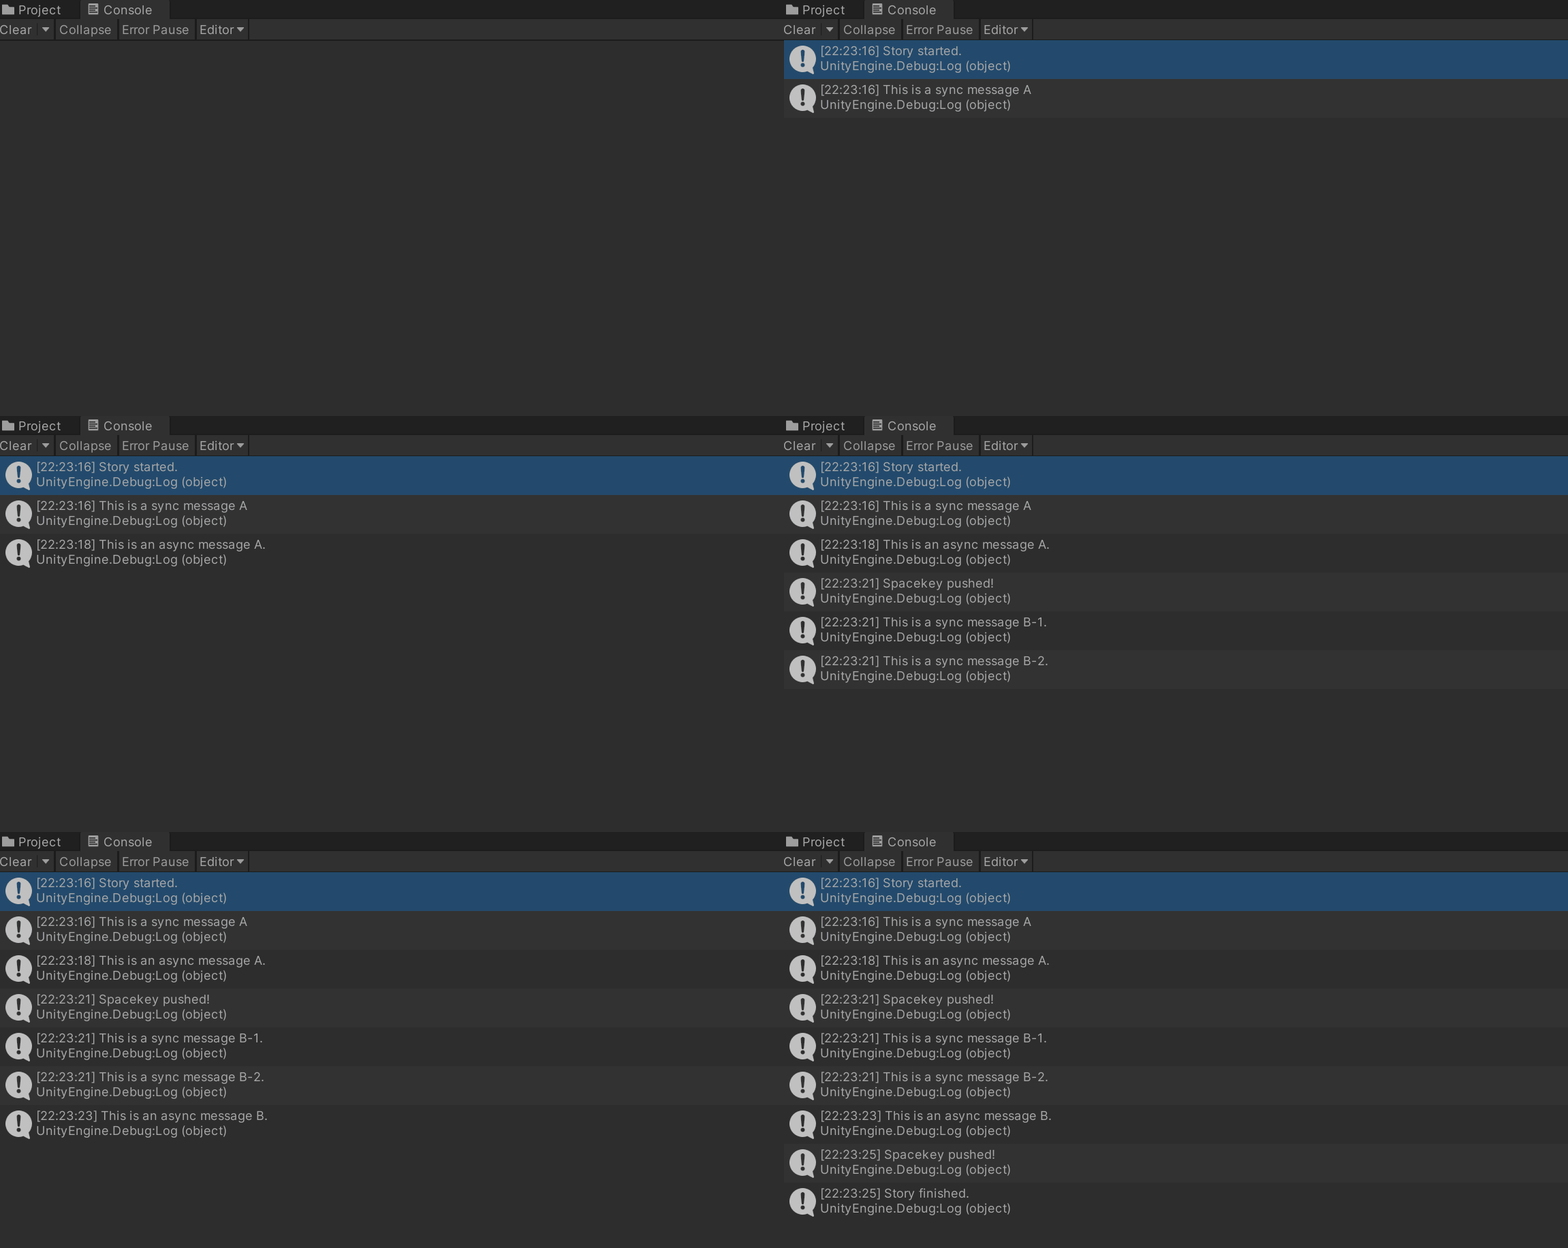
Unlike asynchronous commands, synchronous commands don’t wait for a trigger from implementations of the INextNotifier interface after their processes finish, but the next commands start immediately. Needless to say, they can’t be canceled.
Create a Message Display Command with Font Size
using Cysharp.Threading.Tasks;
using ScenarioFlow;
using System;
using System.Threading;
using UnityEngine;
public class MessageLogger : IReflectable
{
// Omitted
[CommandMethod("log adjustable message async")]
public UniTask LogAdjustableMessageAsync(string message, int size, CancellationToken cancellationToken)
{
return LogMessageAsync($"<size={size}>{message}</size>", cancellationToken);
}
}using ScenarioFlow;
public class PrimitiveDecoder : IReflectable
{
[DecoderMethod]
public string ConvertToString(string input)
{
return input;
}
[DecoderMethod]
public int ConvertToInt(string input)
{
return int.Parse(input);
}
}Create an Automated NextNotifier
using Cysharp.Threading.Tasks;
using ScenarioFlow.Tasks;
using System;
using System.Threading;
public class AutoNextNotifier : INextNotifier
{
public async UniTask NotifyNextAsync(CancellationToken cancellationToken)
{
await UniTask.Delay(TimeSpan.FromSeconds(1.0f), cancellationToken: cancellationToken);
}
}
using Cysharp.Threading.Tasks;
using ScenarioFlow;
using ScenarioFlow.Scripts;
using ScenarioFlow.Tasks;
using UnityEngine;
public class ScenarioManager : MonoBehaviour
{
// A scenario script to run
[SerializeField]
private ScenarioScript scenarioScript;
private async UniTaskVoid Start()
{
// Build a system that run scenario books
ScenarioTaskExecutor scenarioTaskExecutor = new(
new AutoNextNotifier(), // <-- Replace this
new EscapekeyCancellationNotifier());
ScenarioBookReader scenarioBookReader = new(scenarioTaskExecutor);
// Omitted
}
}


Comments