
- Unity: 2022.3.35f1
- ScenarioFlow: 1.1.0
What Is ScenarioFlow?

ScenarioFlow is a library for a game engine of Unity. Using this library, you can create dialogue scenes in games efficiently. Currently, this is available on the Unity Asset Store.
The feature of ScenarioFlow is that it is carefully designed to have high extensiblity in order to deal with all dialogue scenes in all projects. ScenarioFlow provides only functions which are intrinsically required for dialogue scenes, and that system has so high extensibility because of that design based on dependency injection pattern. The biggest value of ScenarioFlow comes from the novel architecture that has high scalability provided by this library.
While provideing high extensible system for programmers, ScenarioFlow also provides a new scenario description script. It is called SFText and has simple grammar and appearance like a real script for a play. In ScenarioFlow, running a scenario description script written by a writer with a program written by a programmer, a dialogue scene is played.
In summary, ScenarioFlow provides a highly extensible system for programmers and an easy-to-write/read script for writers. Using ScenarioFlow, programmers and writers will be able to improve their work efficiency.
When ScenarioFlow Sould/Shoudn’t Be Used
The purpose of ScenarioFlow is to enable developers to create dialogue scenes efficiently. However, more precisely, the true purpose of ScenarioFlow is to enable developers to create a system with which they can create dialogue scenes efficiently.
There are already several libraries for creating dialogue scenes other than ScenarioFlow (e.g. Utage and Naninovel), but the most important difference between ScenarioFlow and such existing libraries is tradeoff between difficulty level of developments and flexibity level of developments.
For example, in a typical library for creating dialogue scenes, dialogue scenes are played by calling “commands” from scripts in the first place. While existing libraries provide a lot of such commands from the beginning, ScenarioFlow doesn’t provide any such commands. Also, existing libraries provide functions for scenario progress management (e.g. moving on to the next dialogue with a click, logging, etc.) from the beginning, but ScenarioFlow doesn’t provide any such functions. It is the framework which enables developers to include necessary functions for creating dialogue scenes in their project successfully that ScenarioFlow provides. ScenarioFlow takes the position that it provides the framework with which new functions are added easily but asks developers to develop specific necessary functions for their project by themselves.
Let’s take a look at a metaphor to understand the relashonship between ScenarioFlow and existing libraries clearly. Assuming that you are hungry and would like to have a meal, using existing libraries is like going to a restaurant, while using ScenarioFlow is like going to a department store. If you go to a restaurant, you can have a great meal without doing anything, but you can only have dishes on the menu and the prices are somewhat expensive. On the other hand, if you go to a deparment store, you can buy ingredients and cooking utensils, therefore you can decide what type of meal you have relatively freely, although it takes time and effort.
That is, while in existing libraries, you can create dialogue scenes easily due to their lots of functions but adding new functionalities takes time and effort or to many functions are provided, in ScenarioFlow, the minimum functionality is providedk, but adding unique functionalities is easy and you only have to add only functionalities you need.
Here, a system that includes overall functions required to realize dialogue scenes such as commands to perform diretion of dialogue scenes, triggers to move on to the next dialogue, and etc. is called dialogue system. What you can do with ScenarioFlow is to create a suitable dialogue system for your project. As a result, you can create dialogue scenes efficiently with that.
In summary, it will be a great choice for you to use ScenarioFlow if you want to create highly unique dialogue scenes or create dialogue scenes with the minimum system. But note that you will have to necessary functions by yourself, which requires development cost to some degree.
Prerequisite
In ScenarioFlow, you need to some codes by yourself to build a dialogue system. It implies that you need to be familier with programming to some extent.
Specifically, knowledge about the following topoics is required:
- UniTask
- Dependency Injection (DI)
UniTask is a library for dealing with asynchronous processing in Unity efficiently. A lot of asynchronous processing is required to implement dialogue scenes, and ScenairoFlow employs UniTask to deal with asynchronous processing.
Dependency Injection (DI) is a design pattern used to build a highly extebsible system, and ScenarioFlow is designed based on it. If you have knowledge about interface in C#, you will be able to understand the usage of ScenarioFlow, even if you don’t know DI. However, you will be able to make use of ScenarioFlow more effectively if you are familier with DI.
If you know much about neither UniTask nor DI, you shouldn’t avoid using ScenarioFlow because of that. This blog was launched for you!
Surrounding knowledge required for making use of ScenarioFlow including UniTask and DI is going to be described on this blog. New articles are going to be published sequentially, so you can refer to them and comment if you have any question.
The Feature of ScenarioFlow: High Extensibility
As described earlier, the feature of ScenarioFlow is its high extensibility. It comes from application of DI and utilization of reflection, which contribute to the extensibility of the overall system and the extensibility of command, respectively.
Now, we are going to see benefits from these strategies with examples.
The Extensibility of the Overall System Based on DI
Briefly speaking, DI is a methodology that enhances the extensibility of system by making use of interface. In ScenarioFlow, to add a funtionality, we usually create a new class that implements a certain intarface.
For example, ScenarioFlow provides interfaces that define a trigger used for scenario progress management, and one of them is the INextNotifier interface. A trigger for moving on to the next dialogue after one dialogue is shown is defined through this interface (strictly speaking, this understanding is incorrect, but fine at this point).
For example, defining the following class that implements the INextNotifier interface, we can implement a function that drives dialogue when the spacekey is pressed.
using Cysharp.Threading.Tasks;
using Cysharp.Threading.Tasks.Linq;
using ScenarioFlow.Tasks;
using System.Threading;
using UnityEngine;

public class SpacekeyNextNotifier : INextNotifier
{
    public UniTask NotifyNextAsync(CancellationToken cancellationToken)
    {
        return UniTaskAsyncEnumerable.EveryUpdate()
            .Select(_ => Input.GetKeyDown(KeyCode.Space))
            .Where(x => x)
            .FirstOrDefaultAsync(cancellationToken: cancellationToken);
    }
}The SpaceKeNextNotifier class defines the NotifyNextAsync method that is a member method of the INextNotifier interface. Here, that method performs an asynchronous process that finishes when the spacekey is pressed once.
If we want to define a trigger that drives dialogue when a button is clicked, we define the following class.
using Cysharp.Threading.Tasks;
using Cysharp.Threading.Tasks.Linq;
using ScenarioFlow.Tasks;
using System.Threading;
using UnityEngine.UI;

public class SingleButtonNextNotifier : INextNotifier
{
	private readonly Button button;

	public SingleButtonNextNotifier(Button button)
	{
		this.button = button;
	}

	public UniTask NotifyNextAsync(CancellationToken cancellationToken)
	{
		return button.OnClickAsAsyncEnumerable(cancellationToken: cancellationToken)
			.FirstOrDefaultAsync(cancellationToken: cancellationToken);
	}
}The SingleButtonNextNotifier class also defines the NotifyNextAsync method, but in this case, its asynchronous process finishes when a button is clicked.
We can combine these two functionalities.
using Cysharp.Threading.Tasks;
using ScenarioFlow.Tasks;
using System;
using System.Collections.Generic;
using System.Linq;
using System.Threading;

public class CompositeAnyNextNotifier : INextNotifier
{
    private readonly IEnumerable<INextNotifier> nextNotifiers;

    public CompositeAnyNextNotifier(IEnumerable<INextNotifier> nextNotifiers)
    {
        this.nextNotifiers = nextNotifiers;
    }

    public UniTask NotifyNextAsync(CancellationToken cancellationToken)
    {
        return UniTask.WhenAny(nextNotifiers.Select(notifier => notifier.NotifyNextAsync(cancellationToken)));
    }
}The NotifyNextAsync method defined by the CompositeAnyNextNotifier class finishes its process when any process of the NotifyNextAsync methods of other classes that implement the INextNotifier interface and is given to the constructor finishes. That is, giving instances of the SpacekeyNextNotifier class and the SingleButtonNextNotifier class, we can realize a trigger that drives dialogue when the spacekey is pressed or a button is clicked.
Here, we extended the system based on DI. In particular, the CompositeAnyNextNotifier class employs composite pattern, which is one of design patterns of DI.
We are not going to learn the detail of DI, but the important thing in this example is that each functionality exists in each class independently. Thanks to this, the following benefits are gained, for example.
- Easy to replace implementation: for example, if we want to activate a specific function only when performing a test, we only have to replace an instance given to the
CompositeAnyNextNotifierclass to switch a function we use - Easy to reuse functionality: for example, if we want to reuse only the “spacekey functionality” in another project, we only have to transplant only the
SoacekeyNextNotifierclass as it is - Easy to perform maintenance: each functionality is distributed across classes, thus the responsibility of each class is clear. Also, the amount of code of a class is simply reduled, thus it is more readable.
Applying DI, we can gain various benefits in terms of system extensibility in many cases. In addition, the reason why we can extend the the system is that ScenarioFlow is designed based on DI in ther first place. In ScenarioFlow, we can extend system efficiently based on DI in many cases, not limited to the examples we considered here, and the maintenability of that system will be much higher.
The Extensibility of Command Based on Reflection
Command accounts for a large portion of dialogue system for dialogue scenes. Command, which is like a method in C#, is called by scenario description scripts. Command includes a command that changes a character image, a command that plays music, and so on. Calling such commands appropriately, a dialogue scene is played. As a side note, in ScenarioFlow, a function that shows a dialogue is also included in commands.
For example, we can implement a command that switches a character image in ScenarioFlow as follows:
[CommandMethod("change character's image")]
[Snippet("Change the characer {${1:name}}'s image to {${2:image}}.")]
public void ChangeCharacterImage(GameObject character, Sprite sprite)
{
    character.GetComponent<SpriteRenderer>().sprite = sprite;
}This command can be called by SFText (which is a a kind of scenario description script) as follows:
$sync  | change character's image                                | <- Command calling
       | Change the characer {Sheena}'s image to {Sheena_Smile}. |
Sheena | Hello, everyone! | <- This is a dialogueIn this SFText, the “change character’s image” command is called with two arguments, “Sheena” and “Sheena_Smile.
In ScenarioFlow, method in C# is equivalent to command as shown in the example above. In other words, a method in C# is called by a sceanrio description script as a command. In the example, the ChangeCharacterImage method is exported as the change character's image command.
You might find this situation weird, because the arguments described in the SFText are recognized as just texts, however, the types of the ChangeCharacterImage method parameters are GameObject and Sprite. How are these texts converted into proper type objects?
It is decoder, which is a kind of method, that performs argument conversion. In ScenarioFlow, we have to prepare decoders for all types of command parameters used.
In the example, we have to prepare decoders for GameObject and Sprite to be able to call the change character's image command. They are implemented as follows:
[DecoderMethod]
public GameObject ConvertToGameObject(string input)
{
 	  return GameObject.Find(input);
}[DecoderMethod]
public Sprite ConvertToSprite(string input)
{
return Resources.Load<Sprite>(input);
}In ScenarioFlow, when a command is called, a method corresponding to that command is searched based on the specified command name. Then, the parameter types of the corresponding method are determined, proper decoders are chosen from all registered decoders, and the given “text” arguments are converted into the proper type objects using the selected decoders. Finally, the method is called with the converted arguments. Reflection is utilized in this process.
The advantage of this methodology is that command process and text conversion process are isolated completely. The command definition side doesn’t take care of how texts are converted, can have convenient parameter types freely, and only has to have intrinsically needed process. Also, it implies that we can write natural C# program when we write command process. Not only don’t we have to take care of text conversion process, but we can also reuse a command as a normal method due to its natural parameter types.
The feature that we can add a new command by writing natural code is a great benefit for programmers, but it never makes writers’ work heavier. Defining logically reasonable decoders, the command caller side can use commands intuitively. Rather, that feature reduces the cost for adding commands, which enables programmers to add useful commands easily, therefore writers’ task shoud be reduced as a result.
In conclusion, SceanarioFlow achives much higher command extensibility due to command-decoder methodology based on reflection.
Asynchronous command
The change character's image comand is a synchronous method that performs a synchronous process. In ScenarioFlow, we can also call a asynchronous method that performs an asynchronous process as a asynchronous command.
[CommandMethod("change character's image async")]
[Snippet("Change {${1:name}}'s image to {${2:image}}.")]
public async UniTask ChangeCharacterImageAsync(GameObject character, Sprite sprite, CancellationToken cancellationToken)
{
    // 省略
}$parallel | change character's image async | <- Command calling
| Change the characer {Sheena}'s image to {Sheena_Smile}. |
Sheena | Hello, everyone! | <- DialogueA CancellationToken object is given to an asynchronous method as an argument in order to be able to cancel the process. It corresponds $parallel in the SFText.
Arguments corresponding to the CancellationToken object determine a way of asynchronous processing execution. The detail of that will be explained in other articles, but at this point, note that the way where the command is executed with the next one in parallel is specified here.
SFText:New Easy-to-Write/Read Script for Scenario Description
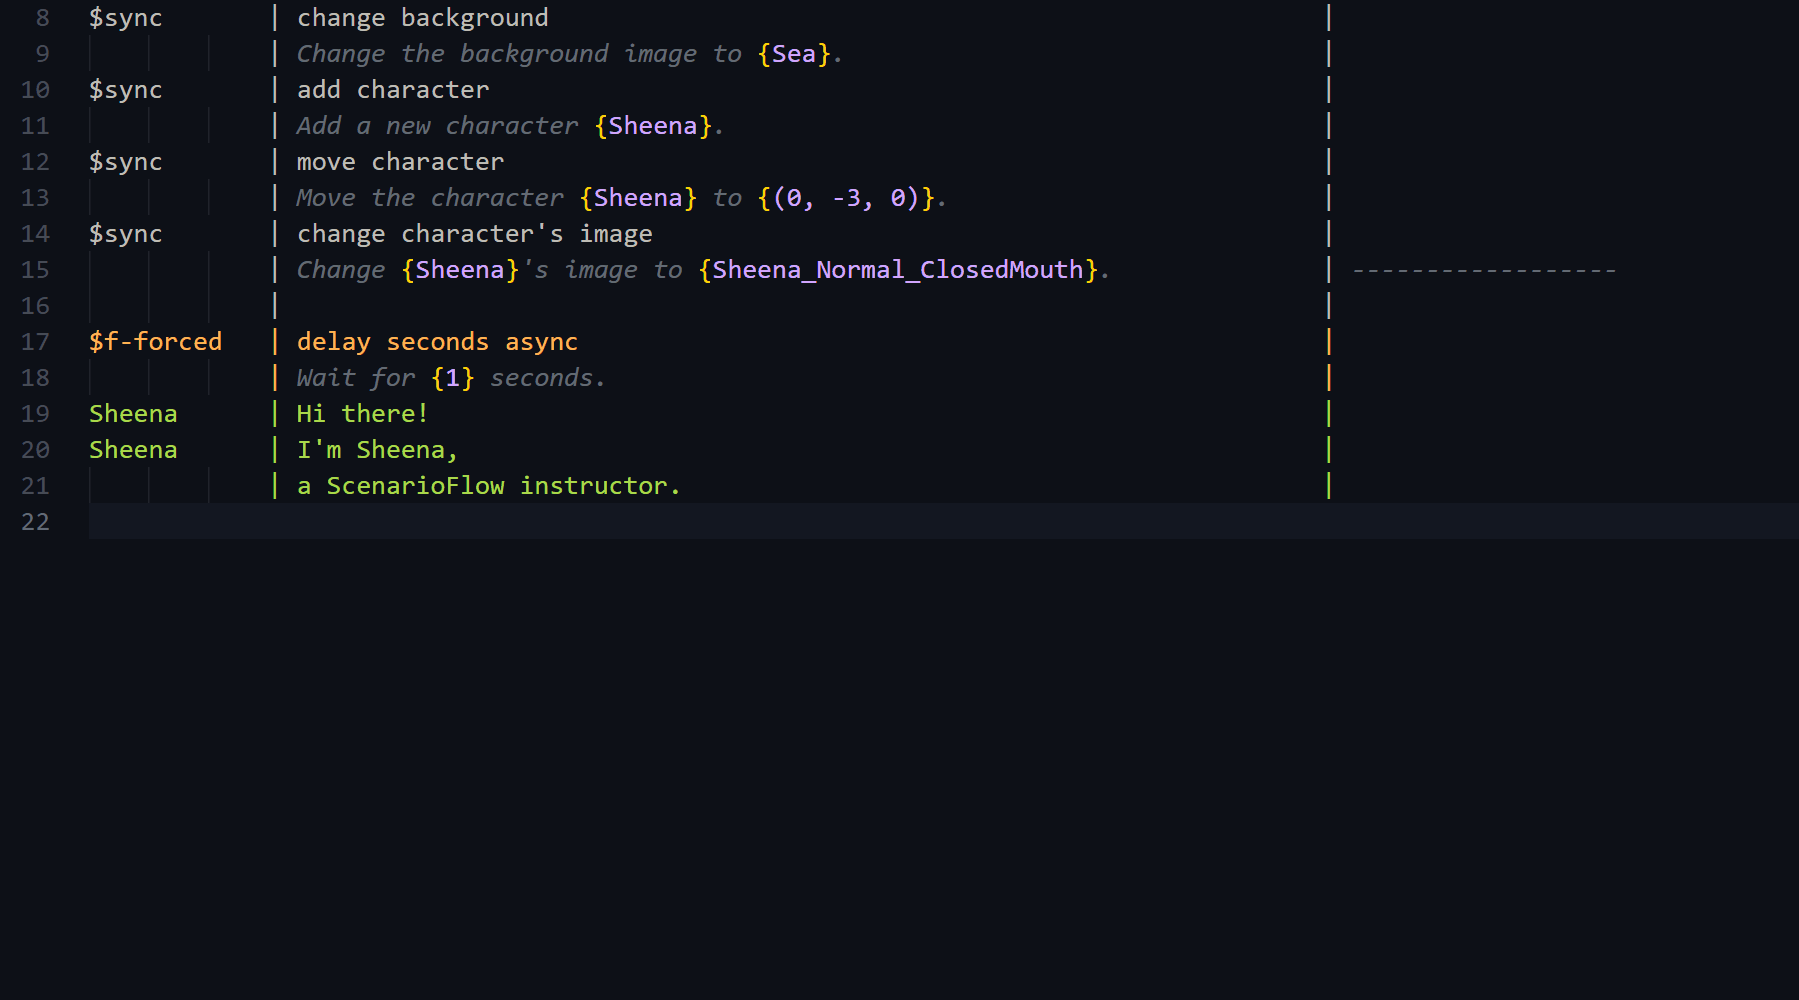
In ScenarioFlow, dialogue scenes are played by running a script for scenario description with a created dialogue system. ScenarioFlow provides SFText as a default scenario description script. “Default” means that a script format we can use in ScenarioFlow is not limited to SFText (we don’t learn about the detail of it in this article).
SFText is a script format with the concept, “easy-to-write and easy-to-read.” It has appearance like a real script for a play and simple grammar. Now, we are going to see its grammar and a script edit tool briefly.
Simple Grammar

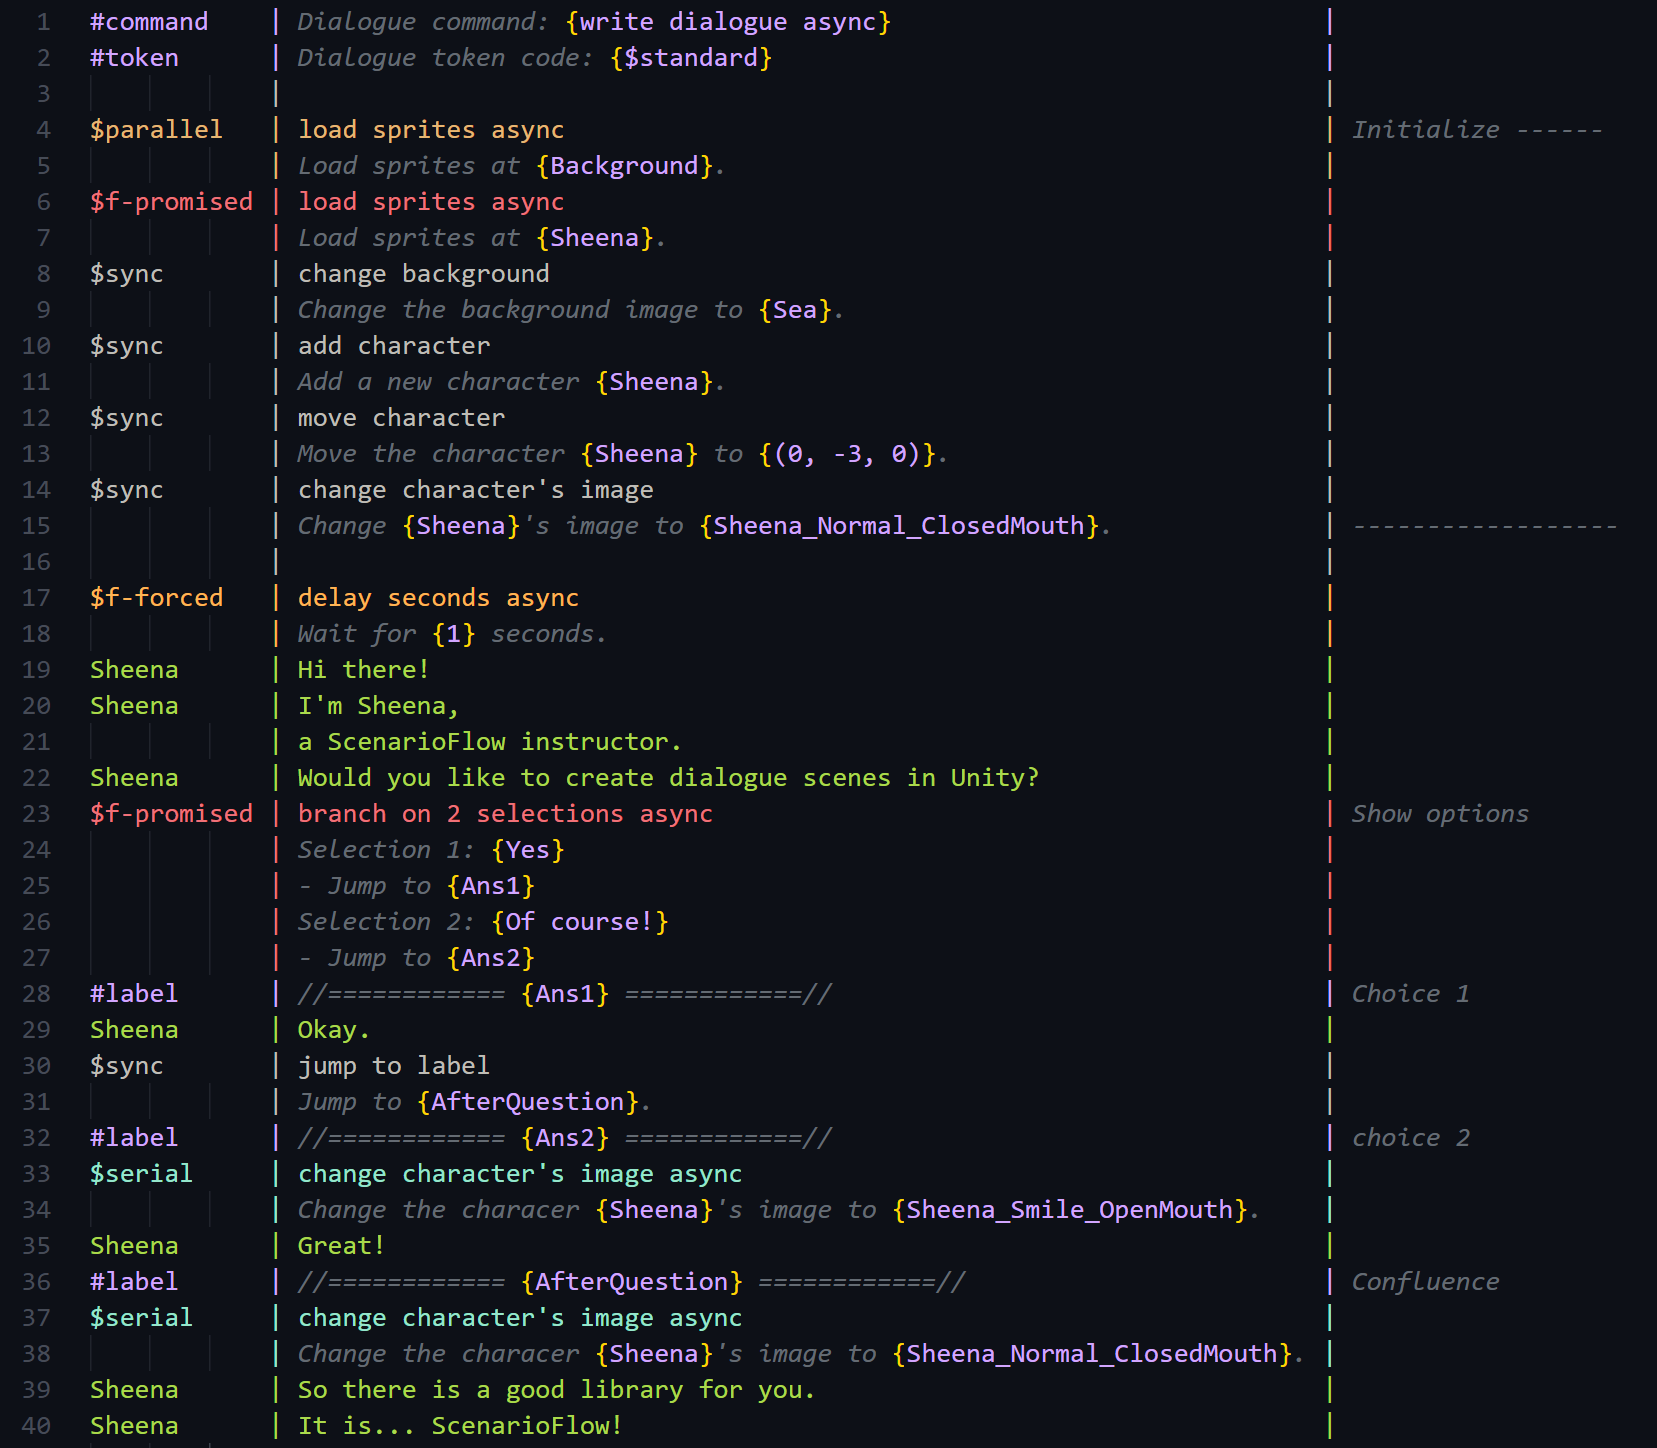
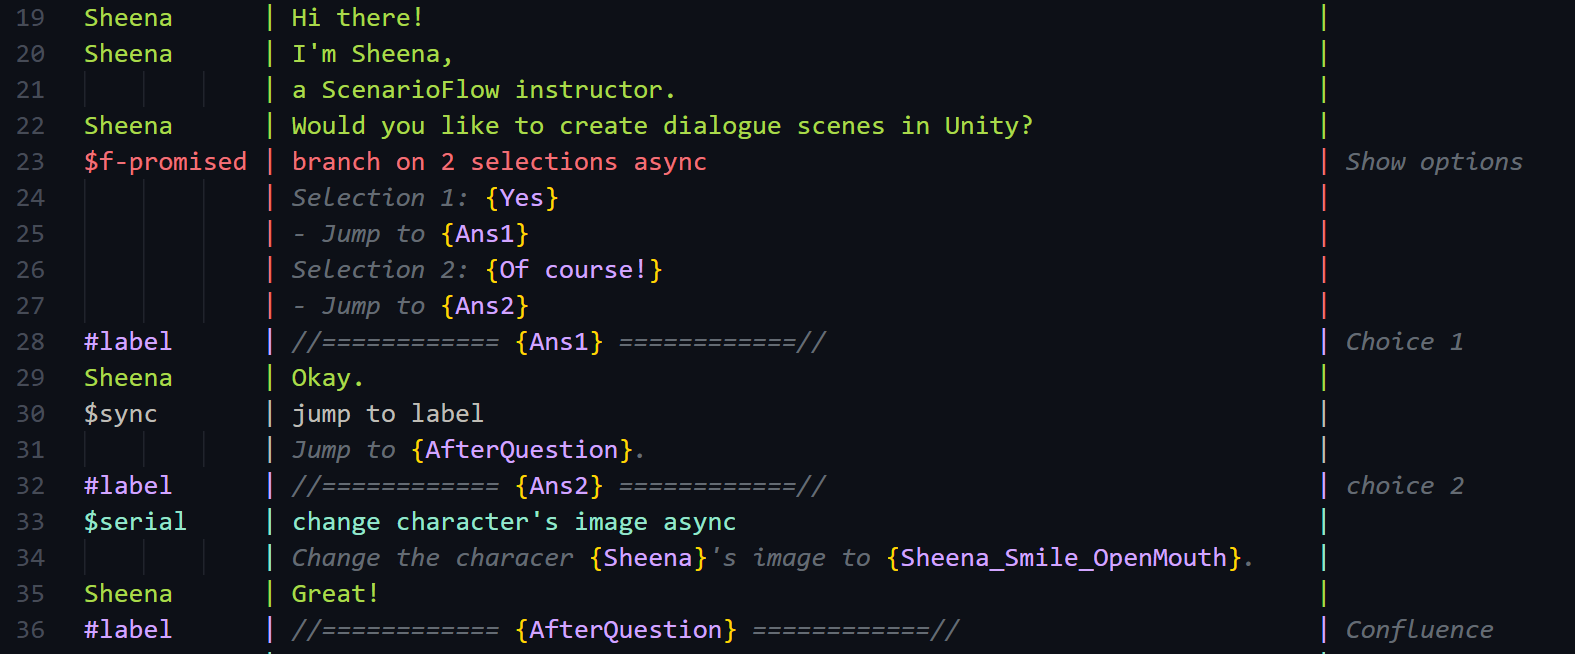
A example of SFText is shown above. As shown in the example, each line is split into three areas in SFText. Character names, dialogues, command names, arguments, and etc. are written on the left and center parts, and comments are written in the right part.
What we do in SFText is basically to write down commands in the order you want to call them.
We call a command with the following format.
$TokenCode  | Command Name     |
            | {Arg1} {Arg2}    |
| {Arg3} ... |$TokenCode is a kind of parameter called token code. With a token code, we decide how to perform an asynchronous command. For example, we can execute a command and the following one simultaneously, or we can allow/prohibit the cancellation of the process, which depends on the specified token code. We specify $sync when just calling a synchronous command.
In ScenarioFlow, it is a command that shows dialogues. As such a dialogue command is used relatively frequently in dialogue scenes, SFText provides syntactic sugar (simpler form) for showing dialogue.
#command       | {Command A}    | <- Specify command name
#token         | {$TokenX}      | <- Specify token code
Character Name | Text1          | <- Speaker name and dialogue
               | Text2          |
| Text3 |We can realize scenario branching using #label to label a block.
#label | {Label Name} | <- Specify label nameAlthough there are other functionalities such as specifying additional arguments for a dialogue block and writing comments on the right side of each line, the grammar explained above are the foundation. In SFText, we create dialogue scenes by following this grammar and writing down dialogues and commands from the top to the bottom.
By the way, the most important thing in SFText (precisely, scenario description in ScenarioFlow) is to understand the difference of token codes we specify for asynchronous commands. We are going to learn it in other articles.
Edit Support by VSCode Extension
We can make use of the extension for Visual Studio Code (VSCode) in order to edit SFTexts comfortably.
This extension provides syntax highlighting and autocomplete.
Summary
ScenarioFlow is a library for creating a dialogue system with which you can create dialogue scenes. You can implement your own dialogue system for your project. Now, you can download it on the Unity Asset Store.
The big advantage of ScenarioFlow is that it has high flexibility and high extensibility. As this library is designed based on DI, the flexibility of the overall system is high. Also, the command extensibility is so high due to the command-decoder methodology based on reflection. In particular, the methodology of command extension is revolutionary. You can call a C# method as a command simply and set any parameter types freely in ScenarioFlow. You can add new commands by writing natural C# program.
Furthermore, ScenarioFlow provides a new scenario description script called SFText. SFText has simple grammar and appearance like a real script for a play. It was designed with the concept, “easy-to-write and easy-to-read.” You can edit SFTexts comfortably with the VSCode plugins.
SceanrioFlow is a great choice if you want to create dialogue scenes that requries unique functionalities or implement a compact system with the minimum functionalities. You will be able to build a highly extensible dialogue system that is suitable for your project with ScenarioFlow.
In this article, the feature of ScenarioFlow is introduced. The detaile of usage of ScenarioFlow is going to be explained in other articles. Look forward to it!


Comments