- Unity: 2022.3.35f1
- UniTask: 2.5.4
- ScenarioFlow: 1.1.0
- SFText Extension Pack: 1.1.0
- Syntax: v1.1.0
- Formatter: v1.0.0
- Utility: v1.0.0
In ScenarioFlow, we describe the content of a dialogue scene in a scenario script and run it with a dialogue system in order to play the dialogue scene. SFText is a standard scenario script provided by ScenarioFlow.
In this article, we are going to learn about the grammar of SFText and the Visual Studio Code (VSCode) extensions which enable us to edit scripts comfortably.
Introduction
What is SFText
SFText is a kind of scenario script that can be used in ScenarioFlow and designed with the concept, “easy-to-read and easy-to-write.” It has appearance like a real script for a play and also has simple grammar. We can edit scripts comfortably using useful functionalities such as syntax highlighting and autocomplete provided by Visual Studio Code (VSCode) extensions.
Install the VSCode Extensions
Visual Studio Code (VSCode) is a free source code editor provided by Microsoft. The extensions of VSCode for comfortable SFText editing are available.
Let’s install VSCode at first, and then install “SFText Extension Pack.”
VSCode:
SFText Extension Pack:
Additionally, it is recommended to use “Ayu” as the color theme of VSCode, although it is option.
Prepare Programs
Import the Sample Project
Programs and objects used in this article are included in the following Unity Package file. You download the file and import it to Unity. Also, note that you also have to import ScenarioFlow and UniTask.
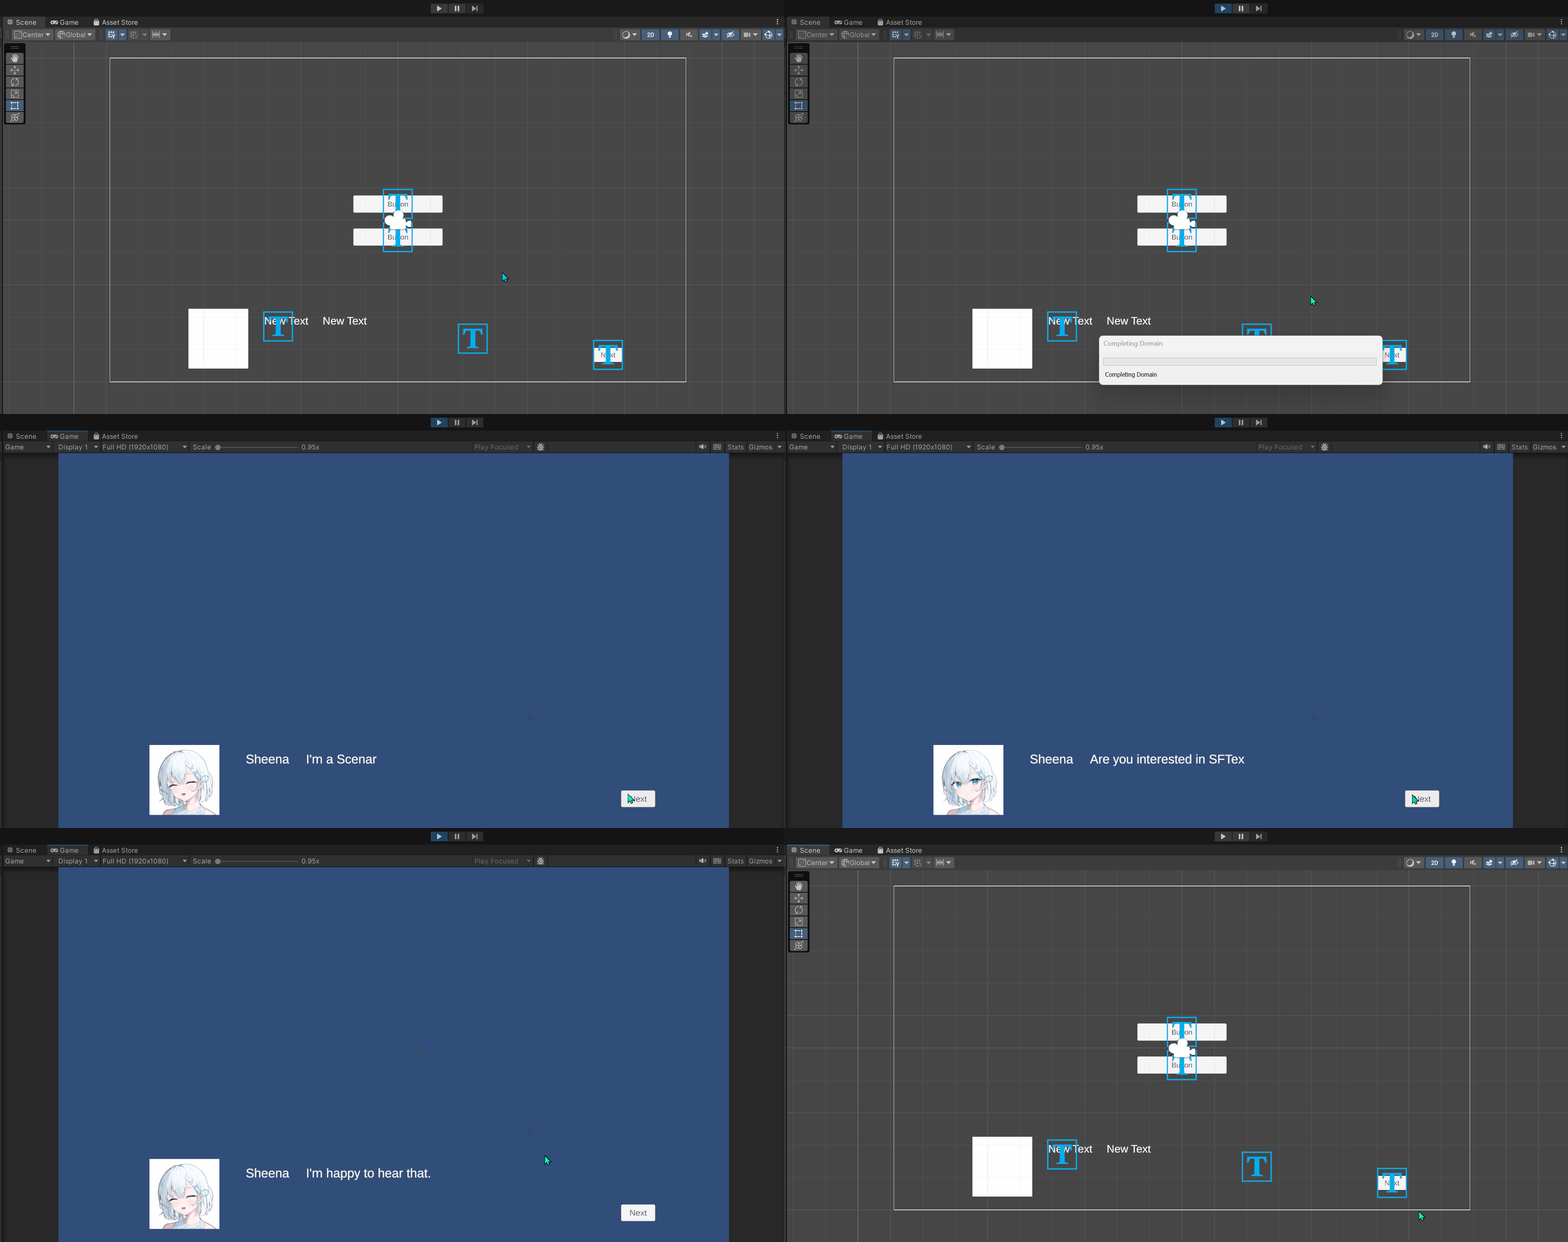
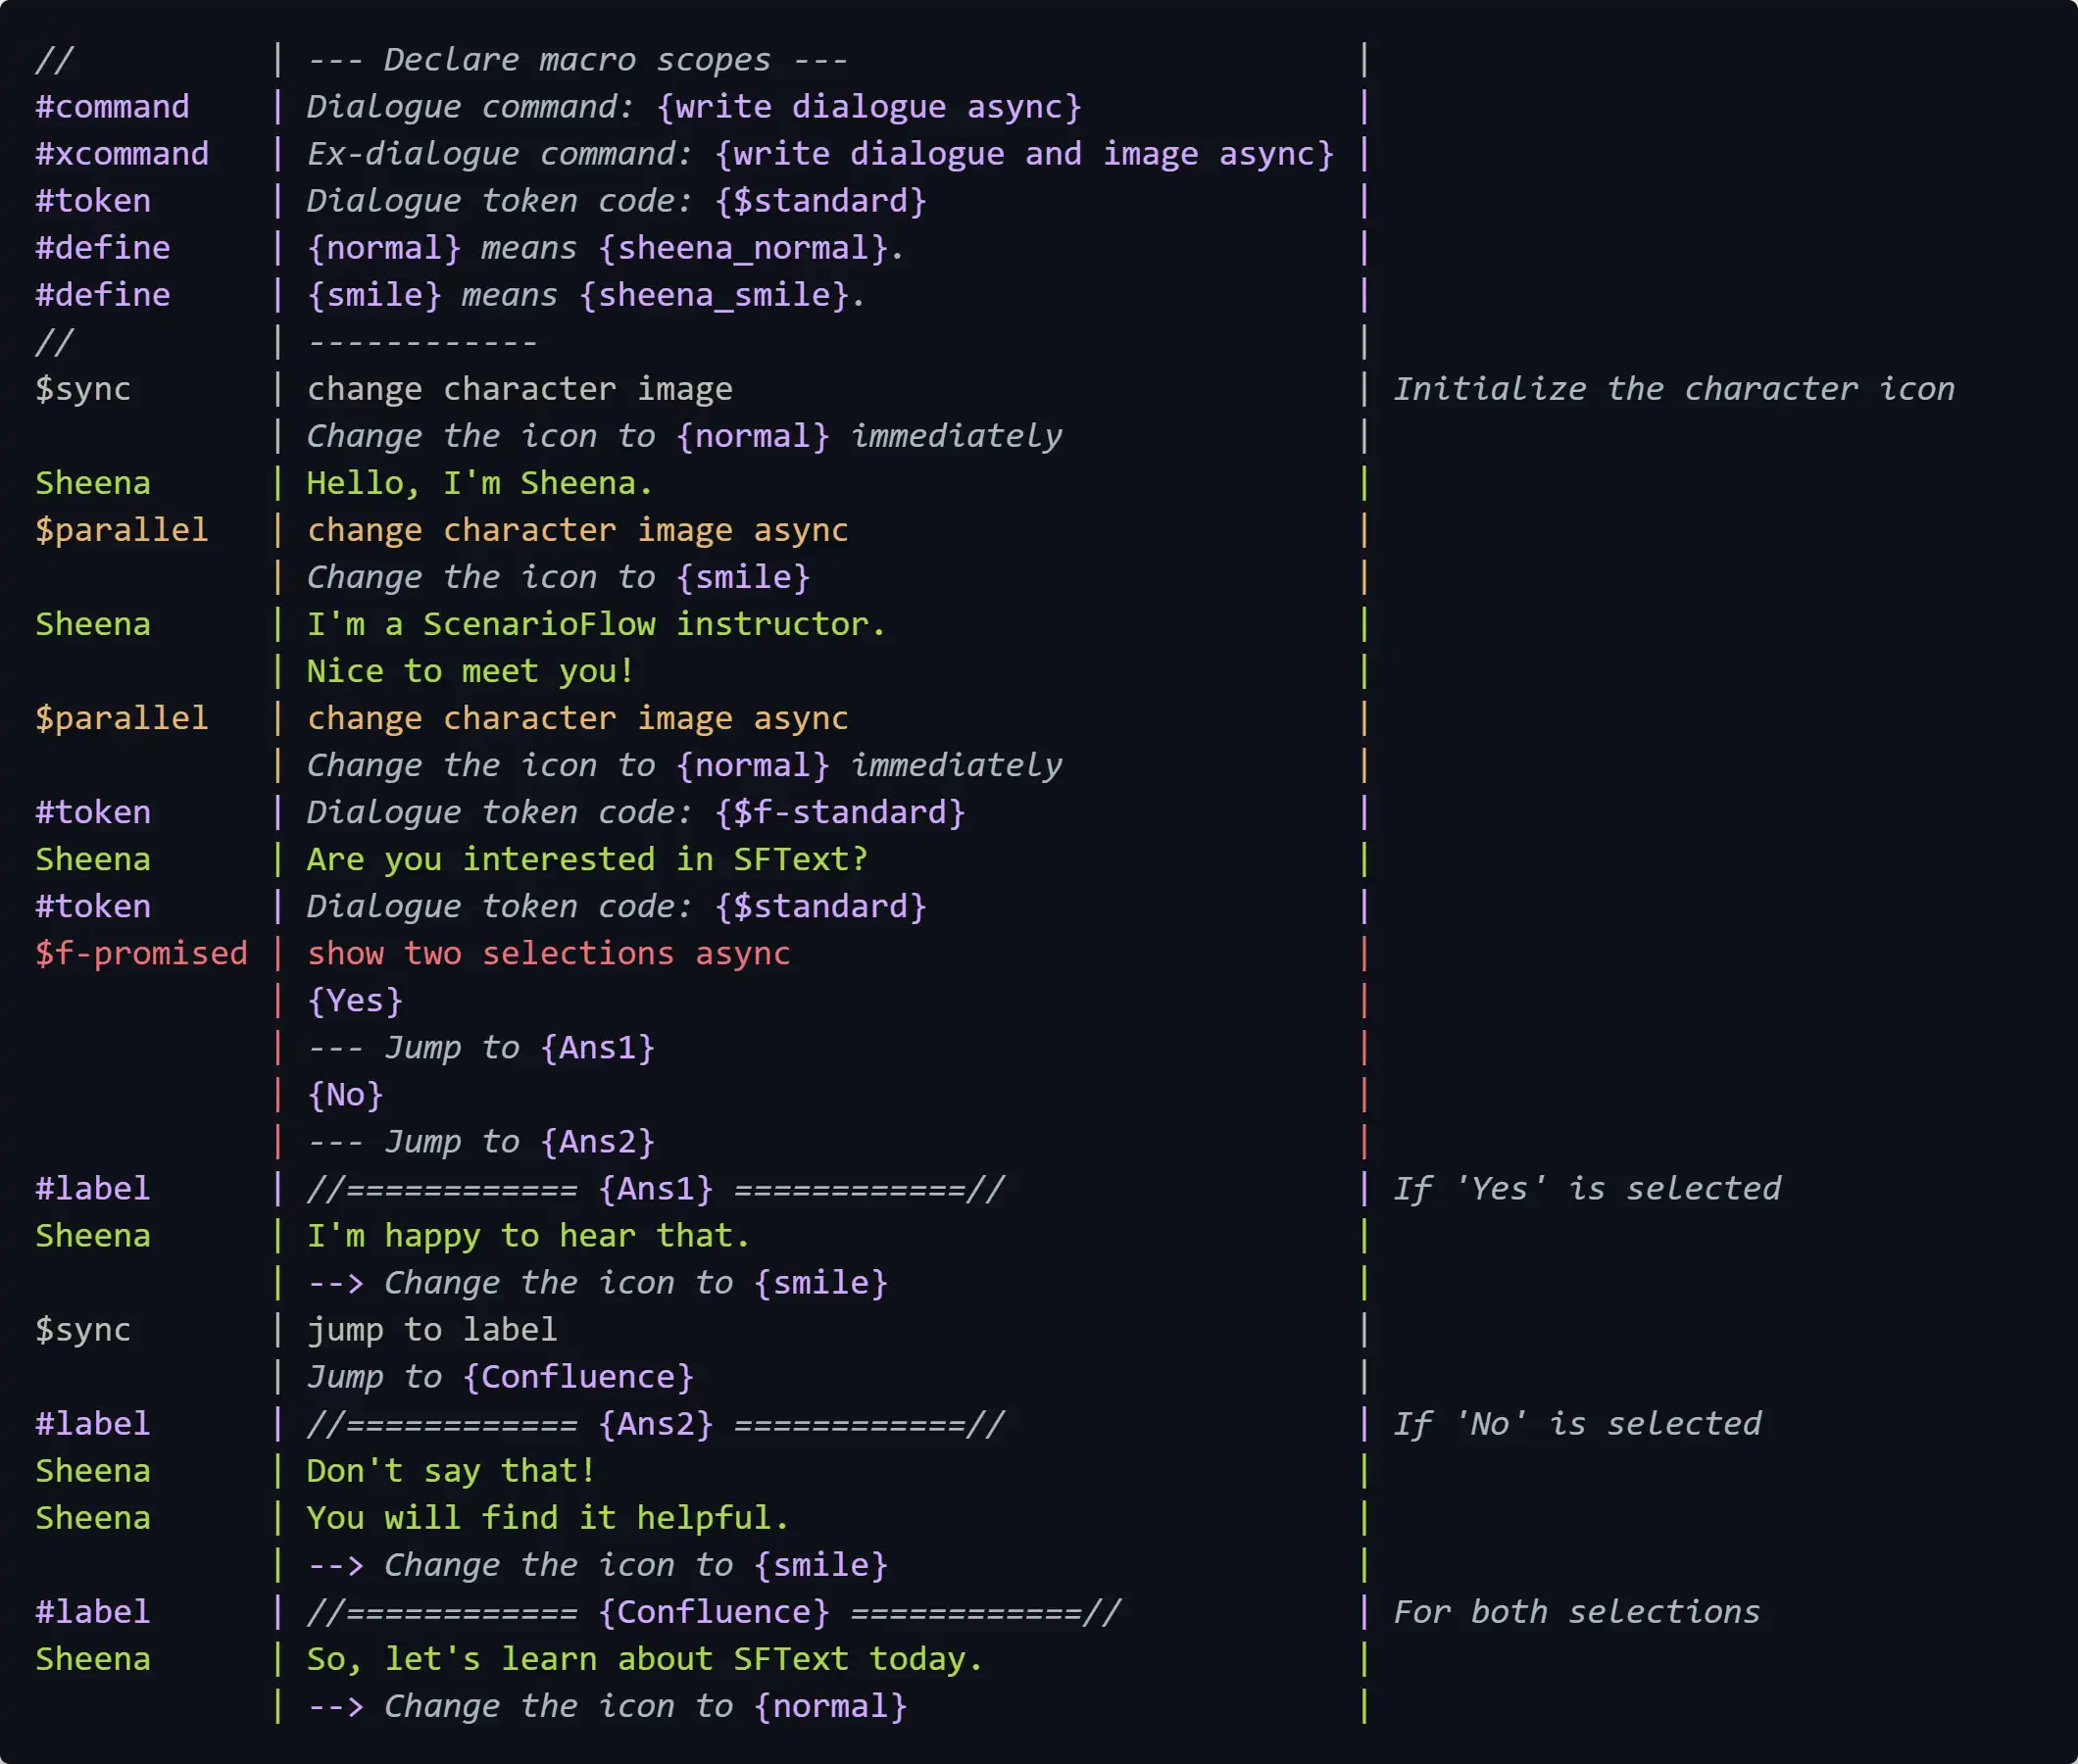
After importing the sample project, open the how-to-write-SFText scene included in the Unity Package file, and then enter the play mode. The SFText script Stroy.sftxt will be run and a dialogue scene will be played. The dialogue scene being played here is a simple one that includes direction that show character’s dialogues, change the character image, and perform scenario branching based on two selections. You can proceed with the dialogue scene by pressing the Next button.
Summary of the Sample Project
The classes included in the sample project and their roles are shown below:
| Class | Summary |
|---|---|
| ScenarioManager | A manager class that supervises other classes |
| ButtonNotifier | Implements a functionality of proceeding with dialogue scenes by pressing the Next button |
| CancellationTokenDecoder | Implements a decoder for the CancellationToken type |
| PrimitiveDecoder | Implements a decoder for the string type |
| SpriteProvider | Implements a decoder for the Sprite type |
| CharacterAnimator | Implements process that changes the character image |
| DialogueWriter | Implements process that shows character’s dialogue |
| ScenarioBranchMaker | Implements scenario branching process |
The dialogue system composed of these classes provides the following commands:
| Command | Direction | Declared in |
|---|---|---|
| write dialogue async | Shows a dialogue | DialogueWriter |
| write dialogue and image async | Shows a dialogue and gradually changes the character image simultaneously | DialogueWriter |
| change character image async | Gradually changes the character image | CharacterAnimator |
| change character image | Immediately changes the character image | CharacterAnimator |
| show two selections async | Shows two selections, and the scenario branches off into two routes depending on the answer | ScenarioBranchMaker |
| jump to label | The scenario branches off into another route with a specified label | ScenarioBranchMaker |
Now, let’s confirm correspondence between Story.sftxt and the dialogue scene.
Grammar of SFText
Basic Rules
First of all, let’s take a look at the two principles to understand how to write SFText.
- All lines are divided into three areas by vertical bars “|”
- A SFText script is composed of “scopes”
First, all lines in SFText are divided into the following three areas by vertical bars, which is a major feature of appearance of SFText.
| Area | What is Described |
|---|---|
| Scope Declaration Part | Symbol to start a scope |
| Content Description Part | Content of a scope (e.g., arguments) |
| Comment Description Part | Comment text (that don’t affect a dialogue scene) |
Scope Declaration Part | Content Description Part | Comment Description PartSecond, a SFText script is composed of basic blocks, where one basic block is called “scope.” Described scopes are retrieved from the top to the bottom.
There are the following 4 types of scopes.
| Scope | Summary |
|---|---|
| Command Scope | Causes command call |
| Dialogue Scope | Causes command call for displaying a dialogue |
| Macro Scope | Supports command scopes and dialogue scopes |
| Comment Scopes | Comment (that doesn’t affect a dialogue scene) is described |
The scope classification for Story.sftxt is shown below:
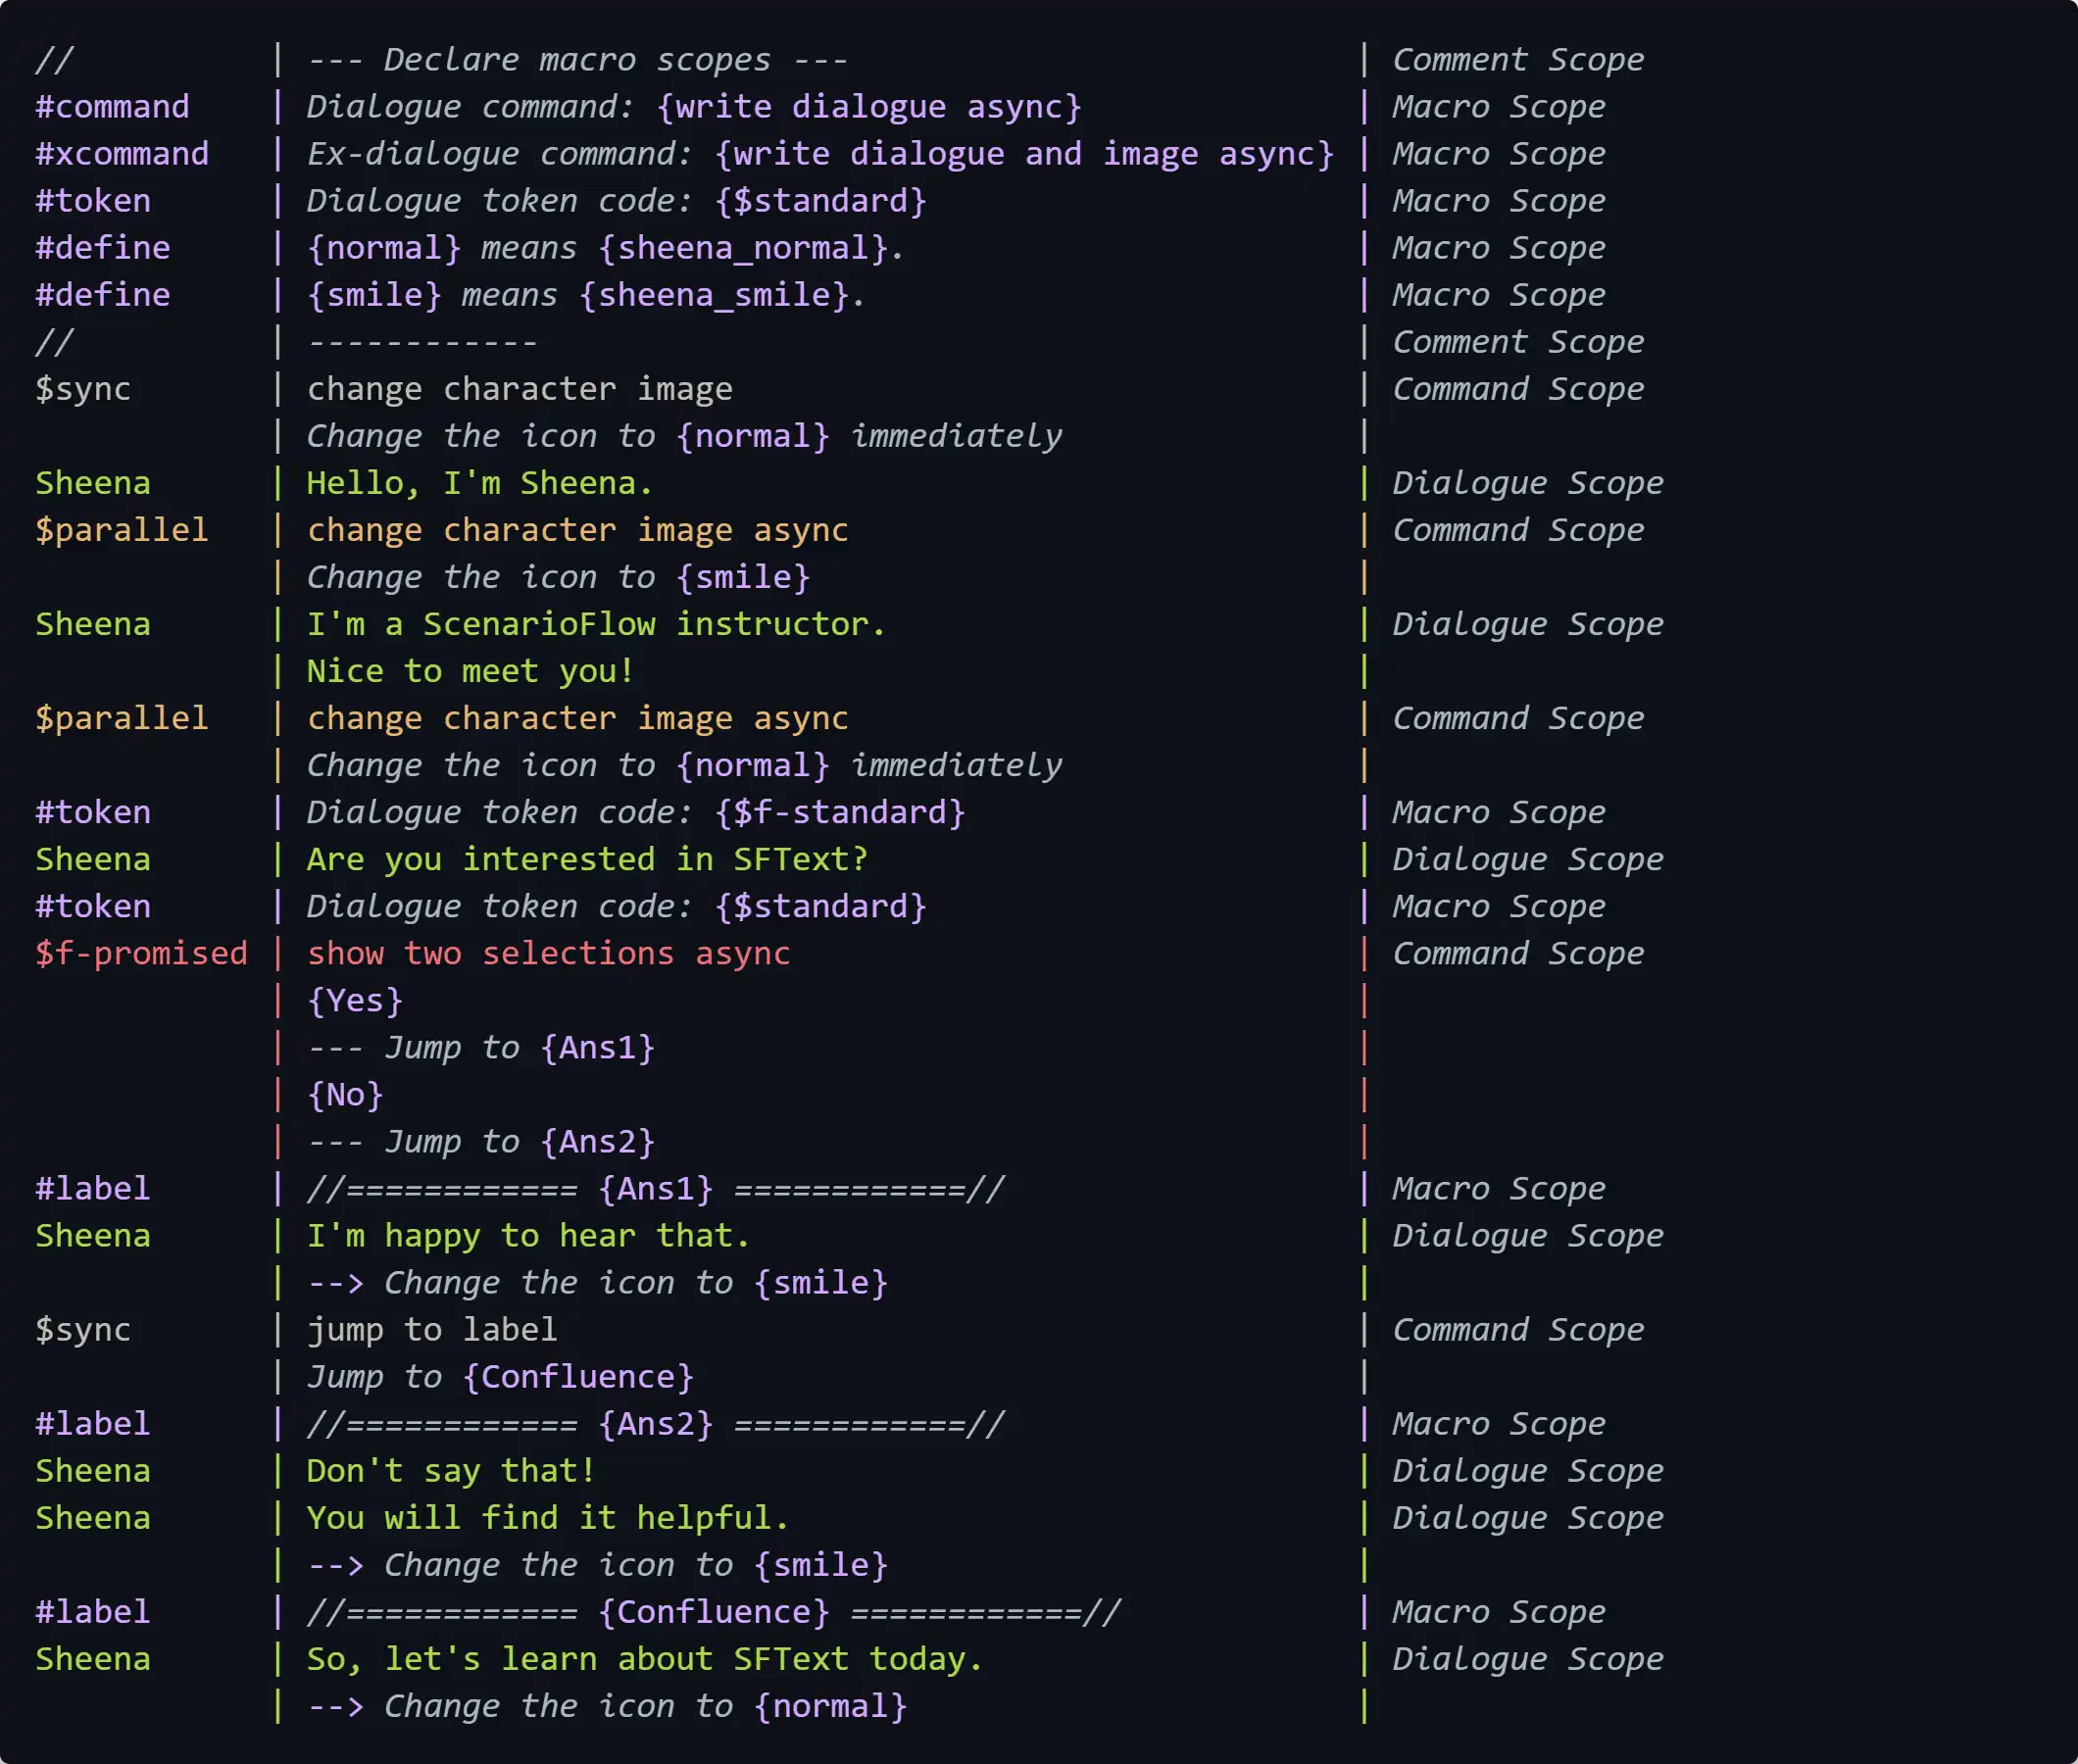
As shown in the table above, in SFText, command scopes and dialogue scopes cause command calls. As a dialogue scene is played as a result of calling different commands repeatedly in ScenarioFlow, you could say that what we have to do to describe a dialogue scene with SFText is to list command scopes and dialogue scopes in an appropriate order and add macro scopes as necessary.
To be able to write a SFText script, you have to understand about each scope at least. Then, we are going to learn about the role of each scope and how to write it in order from the next section.
Command Scope
Command scope calls any command and is the core of SFText. It is described by following the rules belo.
- Describe
$(token code)in a scope declaration part to start a command scope - Describe a command name to be called in the content description part of the same line from which the scope starts
- Describe arguments except for a token code in the content description parts after the start line
- For argument description, texts have to be enclosed in
{}in order to be recognized as arguments; otherwise they are treated as comment texts and therefore ignored
$tokencode | command name                          |
           | comment {arg1} comment {arg2} comment |
| {arg3} {arg4} {arg5} ... | The following example calls the change character image async with the token code parallel and the other argument smile.
$parallel   | change character image async                          |
| Change the icon to {smile} | Also, note that while appropriate token codes have to be specified for asynchronous commands, $sync have to be specified for synchronous commands.
$tokencode | asynchronous command             |
           | {arg1} {arg2} ...                |
$sync      | synchronous command              |
| {arg1} {arg2} ... | Token Code and Asynchronous Command
There are two types of commands, synchronous command whose process finishes immediately and asynchronous command whose process takes time to finish. Asynchronous commands are usually used in dialogue scenes, for example, for showing dialogues or showing character animations. However, synchronous commands can also be used effectively, for example, when we want to switch settings in program.
Token code is a kind of parameter that switches execution method of asynchronous method. For example, an asynchronous command is capable to be canceled before it finishes its process. Then, we can permit this cancellation functionality by specifying standard while we can prohibit it strictly by specifying promised. We choose an appropriate token code depending on the characteristic of a command we call or the significance of the directioin caused by the command. For example, for a command that shows the player some selections, the cancellation has to be prohibited becuase any of the selections has to be chosen by the player. On ther other hand, for a command that shows a dialogue, whether the cancellation should be permitted so that the player can skip reading the text or prohibited so that the player will definitely read the full text depends on the significance of the dialogue.
We are going to learn how to make use of token code in another article. At this point, keep in mind the following two points.
- Token code changes asynchronous command behavior
synchas to be specified for synchronous commands because they don’t need token codes
Dialogue Scope
In ScenarioFlow, since a dialogue scene is played by calling different commands repeatedly, even direction that shows a dialogue has to be realized by calling a command that performs such direction. This command call can be described with a command scope, but considering clarity and high frequency of showing a dialogue in dialogue scenes, SFText provides a syntax dedicated to calling a command that shows a dialogue. It is dialogue scope.
We follow the rules below when writing a dialogue scope.
- Describe a character name in a scope declaration part to start a dialogue scope
- Describe a dialouge in the content description parts of the start line and the following lines
- Specify a command to be called and a token code to be given by macro scopes
Character Name | Dialogue Text |It is very important to note that dialogue scope is jsut a shorthand notation of command scope. Described command scopes are replaced with equivalent command scopes based on command names and token codes specified by macro scopes, #command and #token. An example is shown below.
#command  | {write dialogue async}           | <-- Specify a command
#token    | {$standard}                      | <-- Specify a token code
Sheena    | Hello, I'm Sheena.               | <-- A dialogue scope
          |                                  |
$standard | write dialogue async             | <-- The equivalent command scope
| {Sheena} {Hello, I'm Sheena.} | As shown in the example above, we have to specify a command that requires a speaker name as the first parameter and a dialogue text as the second paramter for use in dialogue scopes.
Now, we already learned the three rules, and we can write the simplest dialogue scope by following them. But let’s remember the following additional two rules to use dialogue scope more effectively.
- A dialogue can be described across multiple lines, where the texts are joined by
<bk> - Extra arguments can be given to a dialogue scope by beginning a content description part with
-->, where the arguments are described in the same way as in the case of command scope
Let’s see the details of these rules one by one.
Combination of Dialogue Texts Described across Multiple Lines
First of all, we can describe a dialogue across multiple lines in a dialogue scope, and in that case, the described texts will be joined by <bk> (that means “line break”). Let’s see the example below.
#command  | {write dialogue async}                                         | <-- Specify a command
#token    | {$standard}                                                    | <-- Specify a token code
Sheena    | I'm a ScenarioFlow instructor.                                     | <-- A dialogue scope
          | Nice to meet you!                                                  |
          |                                                                |
$standard | write dialogue async                                           | <-- The equivalent command scope
| {Sheena} {I'm a ScenarioFlow instructor.<bk>Nice to meet you!} | A joined text is given to a decoder and then given to a command as an argument, so <bk>s can be replaced with any word in the decoder or the command. That word can be a white space, a new line, or any other word that suits your requirement. The following example shows a decoder that replaces <bk> with new lines. We can use the SFText.LineBreakSymbol static field that is defined in the ScenarioFlow.Scripts.SFText namespace and holds the symbol <bk>.
using ScenarioFlow.Scripts.SFText;

[DecoderMethod]
public string ConvertToString(string input)
{
    return input.Replace(SFText.LineBreakSymbol, "\n");
}Dialogue Scope with Extra Arguments
The simplest command used in dialogue scope takes three arguments, speaker name, dialogue text, and token code. However, there are some cases in which we want to specify some arguments other than them in practice. One reasonable scenario is when we want to specify a new character image with a dialogue to show the dialogue and change the character image on the screen simultaneously.
In a dialogue scope, we can give extra arguments by beginning a content description part with -->. The grammar is the same as that of command scope, so only texts enclosed in {} are recognized as arguments, and arguments can be described in multiple texts (note that every line has to begin with -->). Also, note that a command to be called in dialogue scopes with extra arguments is specified by #command macro scope unlike in the case of standard dialogue scope with no extra arguments. As a side note, a token code specified by #token is used by both two types of dialogue scope.
An example is shown below. --> may be displayed as single right arrow “→”, but it is actually composed of two hyphens “-” and one greater than mark “>”.
#xcommand | {write dialogue and image async}           | <-- Specify a command
#token    | {$standard}                                | <-- Specify a token code
Sheena    | So, let's learn about SFText today.            |
          | --> Change the icon to {normal}                |
          |                                            |
$standard | write dialogue and image async             | <-- The equivalent command scope
          | {Sheena} {So, let's learn about SFText today.} |
| {Smile} | When we distinguish between dialogue scope with no extra arguments and dialogue scope that has any extra argument, we call the former “standard dialogue scope,” while we call the latter “extended dialogue scope.” Standard dialogue scope and extended dialogue scope can coexist, so you may want to choose appropriate one case by case.
#command  | {write dialogue async}                 |
#xcommand | {write dialogue and image async}       |
#token    | {$standard}                            |
Sheena    | Don't say that!                            |
Sheena    | You will find it helpful.                  |
| --> Change the icon to {smile} | Macro Scope
Macro scope is auxiliary scope that supports command scope and dialogue scope. There are 5 types of macro scope, all of which are described by following rules.
- Describe
#(macro name)in a scope declaration part to start a macro scope - Describe arguments in content description parts of the start line and the following lines. Arguments are described in the same way as in the case of command scope. That is, only texts enclosed in
{}are recognized as arguments
#(macro-name) | comment {Arg1} comment {Arg2} comment .... |Let’s learn about the role of each macro scope and how to use them.
#command Macro Scope
In a #command macro scope, you specify a command used in standard dialogue scopes which have no extra arguments.
#command | {command name} |A declared #command is valid until it is overridden by a new #command macro scope.
#command   | {write dialogue async}           |
#token     | {$standard}                      |
Sheena     | Hello, I'm Sheena.               | <-- 'write dialogue async' is used
Sheena     | I'm a ScenarioFlow instructor.   | <-- 'write dialogue async' is used
           | Nice to meet you!                |
#command   | {update diaogue async}           |
Sheena | Are you interested in SFText? | <-- 'update dialogue async' is used#xcommand Macro Scope
In a #command macro scope, you specify a command used in extended dialogue scopes which have extra arguments.
#xcommand | {command name} |A declared #xcommand is valid until it is overridden by a new #xcommand macro scope.
#token Macro Scope
In a #token macro scope, you specify a token code used in dialogue scopes. A token code you specify in this macro scope is used in both standard/extended dialogue scopes.
#token | {token code} |A declared #token is valid until it is overridden by a new #token macro scope.
#label Macro Scope
#label macro scope is used to implement scenario branching. In a #label macro scope, you specify a label name.
#label | {label name} |When a #label macro scope is declared, the command scope or dialogue scope under that macro scope gets a label. Then, you can refer to that label in a C# script in order to realize scenario branching. We are going to learn how to implement scenario branching in C# in another article.
$f-promised | show two selections async                             |
            | {Yes}                                                 |
            | --- Jump to {Ans1}                                    |
            | {No}                                                  |
            | --- Jump to {Ans2}                                    |
#label      | //============ {Ans1} ============//                  | If 'Yes' is selected
Sheena      | I'm happy to hear that.                               |
            | --> Change the icon to {smile}                        |
$sync       | jump to label                                         |
            | Jump to {Confluence}                                  |
#label      | //============ {Ans2} ============//                  | If 'No' is selected
Sheena | Don't say that! | Note that a label name has to be unique in a SFText.
#define Macro Scope
You can define a constant that you can specify as an argument with #define macro scope. You specify a symbol to be replaced and a value with which the symbol is replaced in this scope.
#define | {symbol} {value} |If a #define scope is declared in a SFText, all arguments that match with the specified symbol are replaced with the specified value when the SFText is imported to Unity.
$serial     | change character image async       |
            | Change {X}'s image to {Normal}     |
X           | Hello, I'm Sheena.                 |
#define     | {X} {Sheena}.                      |
$serial     | change character image async       |
            | Change {X}'s image to {Smile}      |
X           | I'm a ScenarioFlow instructor.     |
            | Nice to meet you!                  |
//          | ---------------------------------- | The script above will change as follows
$serial     | change character image async       |
            | Change {X}'s image to {Normal}     |
X           | Hello, I'm Sheena.                 |
$serial     | change character image async       |
            | Change {Sheena}'s image to {Smile} |
Sheena      | I'm a ScenarioFlow instructor.     |
| Nice to meet you! |A #define macro scope affects lines after the line at which the macro scope is declared. And the effect of #define can be overriden. If more than one #define macro scope is declared for the same symbol, an argument is replaced with the value of the latest one of the macro scopes before the line at which the argument is written.
Also, note that only the following types of arguments are replaced with symbols by #define.
- Arguments in command scopes (except for token codes)
- Character names in dialogue scopes
- Extra arguments in extended dialogue scopes
What Do Macro Scopes Affect?
A macro scope declared in a SFText script has an effect on the entire script, but it doesn’t affect other SFText scripts.
For example, if a #define macro scope is declared in a SFText script, arguments in other SFText scripts that match with the specified symbol are never replaced.
Also, a label name specified in a #label macro scope has to be unique in a SFText script as mentioned earlier. That is, labels with the same name can coexist if they are declared in different two SFText scripts. In other words, when writing a SFText script, we can’t directly refer to a label declared in another SFText script for scenario branching.
Comment Scope
In comment scope, you can describe comment that has no effect on actual dialogue scenes. You describe this scope by following the rules below.
- Begin a scope declaration part with
//to start a comment scope - In a comment scope, you can describe comment in both content description part and comment description part
// (any text) | comment | commnetYou use this scope to tell your intention to your team members or comment out temporarily unnecessary scopes.
#command    | {write dialogue async}             |
#token      | {$standard}                        |
// Sheena   | Hello, I'm Sheena.                 |
Sheena      | I'm a ScenarioFlow instructor.     |
            | Nice to meet you!                  |
SFText Editing
As desribed earlier, we can comfortably edit SFText scripts using Visual Studio Code (VSCode) and the extensions. We have learned about the grammar of SFText, but from now on we will fucus on the environment in which we create SFText scripts and how we can write scripts efficiently. Let’s learn what kind of functionalities are provided and how we can make use of them.
Syntax Highlighting
After the VSCode extensions are installed, syntax highlighting for SFText will be available.
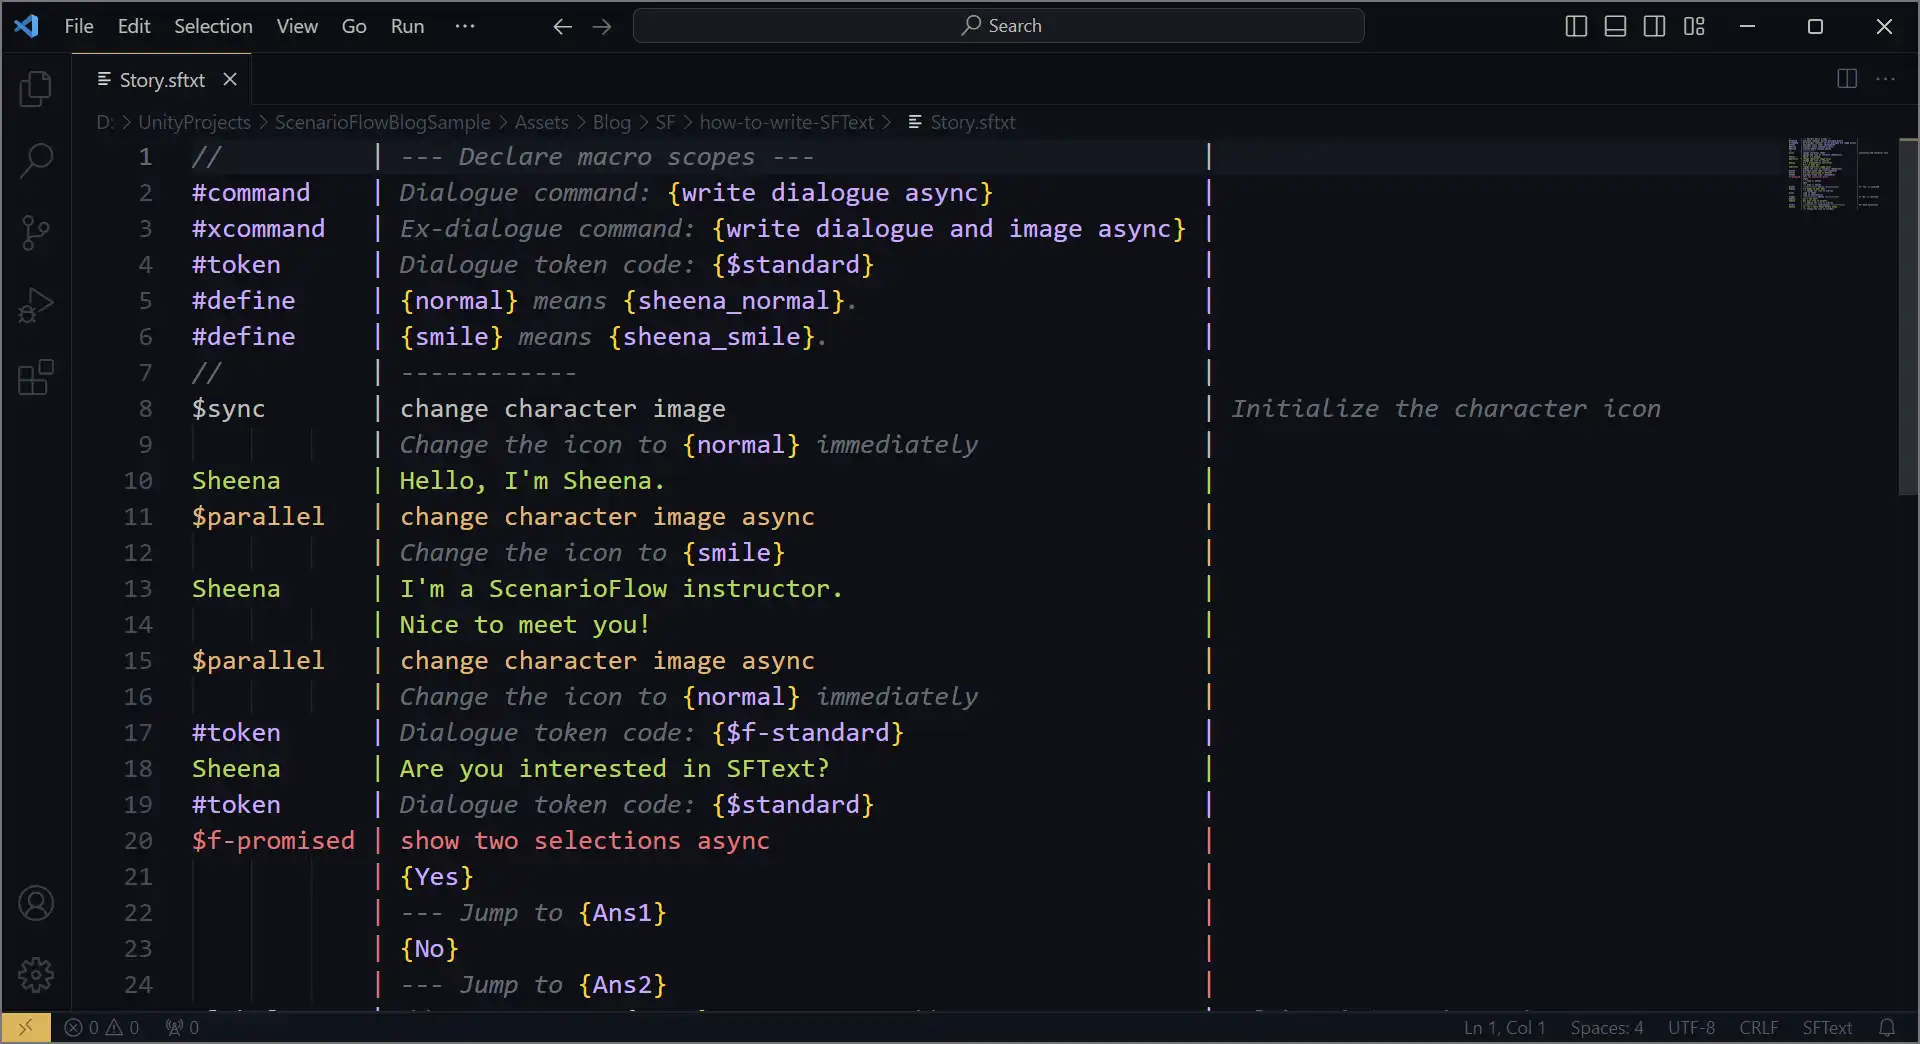
The color theme is “Ayu Dark Bordered” in the figure above. Although you can choose any color theme as you like in VSCode, it is recommended to use any of Ayu themes because the syntax highlighting for SFText is optimized for the color theme “Ayu.”
Formatter
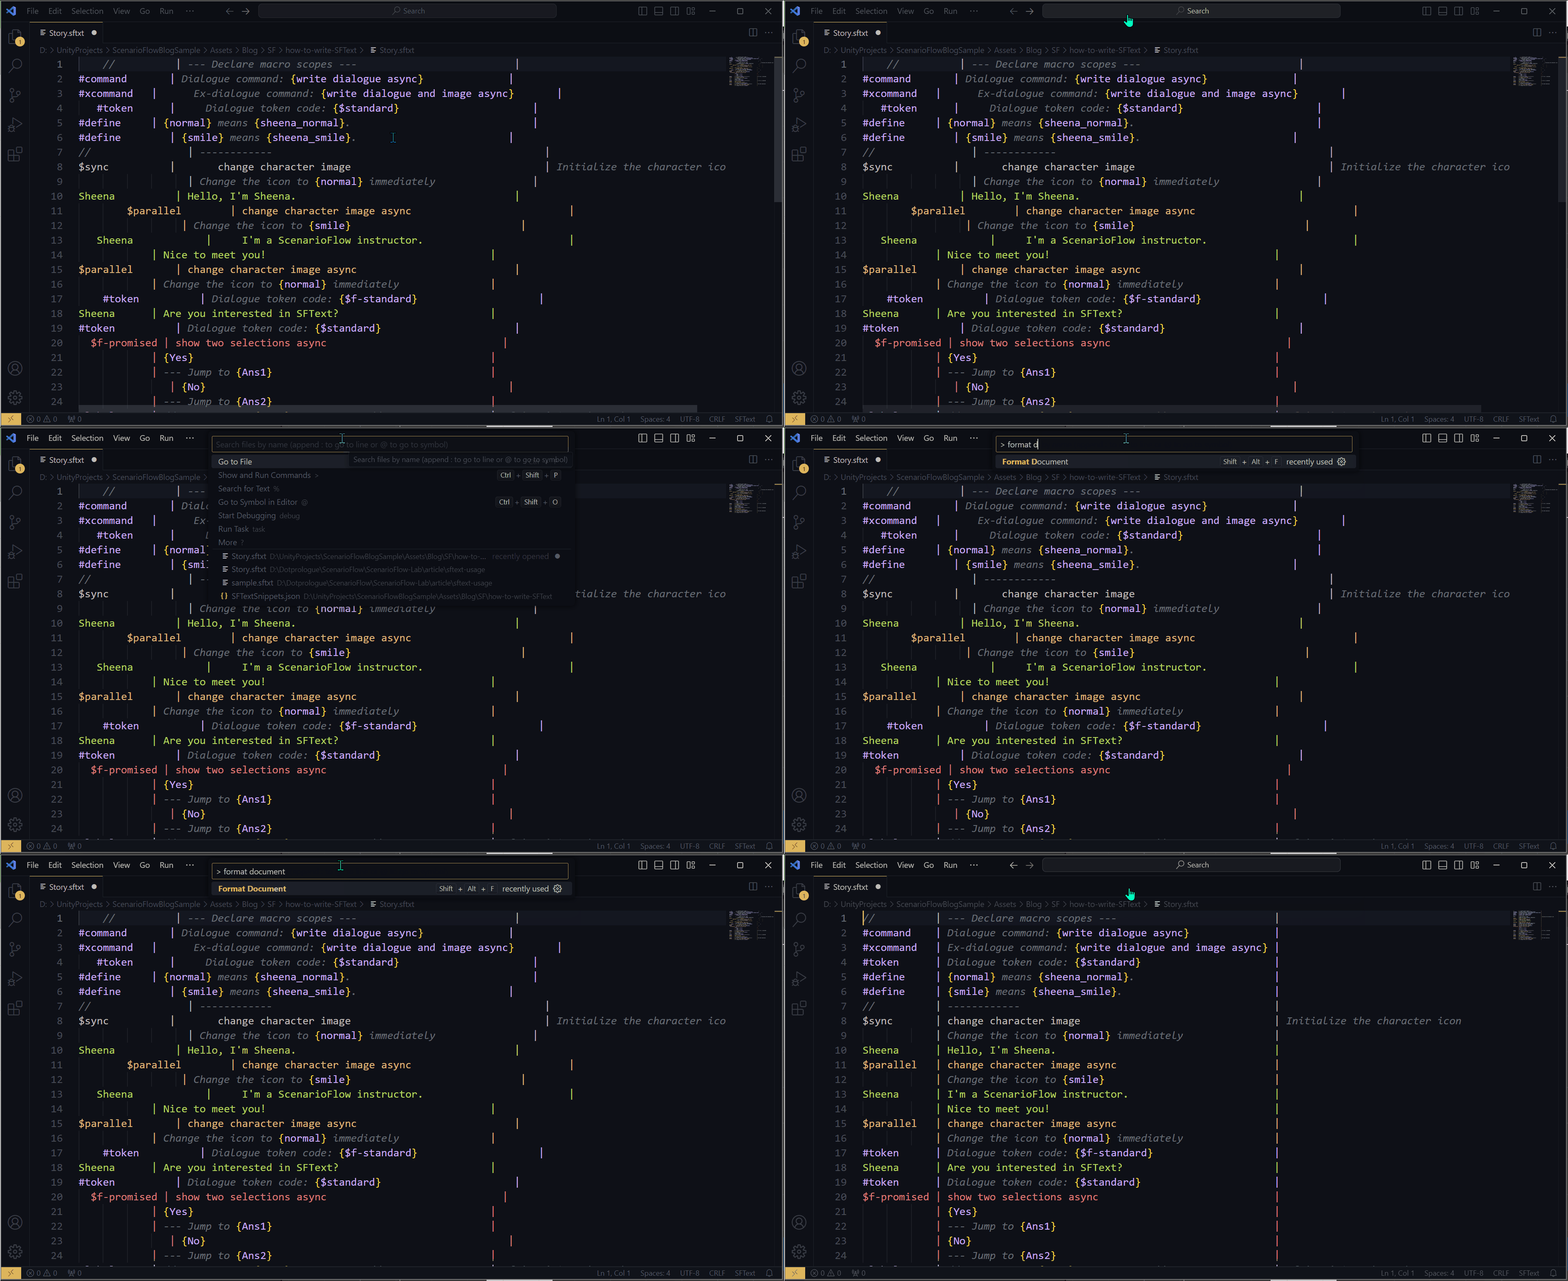
The extension provides the SFText formatter that aligns text.
We can call formatter by selecting Format Dcument in the command palette or Shift+Alt+F (for Windows). But we don’t directly call only formatter when editing SFTexts in practice because it is automatically invoked when we call other functions that we use very frequently. As a side note, we can change the settings of VSCode so that formatter is invoked every time we save the file.
Fast Editing Using Autocomplete and Shortcut Keys
We can edit SFTexts efficiently and quickly by making use of the autocomplete and shortcut keys provided by the extensions. In this section, we are going to learn how to set up these functions and how to use them in detail.
Register Command Information
To fully utilize the autocomplete and shortcut keys, we need to give information of commands defined in C# to the extension. The necessary steps for that are shown below.
- Attach necessary attributes to C# methods that are exported as commands
- Generate a JSON file by SFText Snippets Builder
- In VSCode, select the JSON file by the
Select JSON Pathcommand and load it by theLoad JSON file
Let’s take a look at the details of these steps one by one.
1. Attach attributes
First of all, we attach several attributes to C# methods that are exported as commands. As an example, the ShowTwoSelectionsAsync method exported as the show two selections async command and the WriteDialogueAndChangeImageAsync method exported as the dialogue and image async command are shown below.
using ScenarioFlow;
using ScenarioFlow.Scripts.SFText;

[CommandMethod("show two selections async")]
[Category("Branch")]
[Description("Show two selections two the player.")]
[Description("Move on to one of specified labels that correspondes to the answer.")]
[Snippet("{${1:selection1}}")]
[Snippet("--- Jump to {${2:label1}}")]
[Snippet("{${3:selection2}}")]
[Snippet("--- Jump to {${4:label2}}")]
public async UniTask ShowTwoSelectionsAsync(string selection1, string label1, string selection2, string label2, CancellationToken cancellationToken)
{
    // Omitted
}

[CommandMethod("write dialogue and image async")]
[Category("Dialogue")]
[Description("Show a dialogue on the screren.")]
[Description("Also, change the character icon.")]
[DialogueSnippet("Change the icon to {${1:image}}")]
[Snippet("{${1:speaker}}")]
[Snippet("{${2:dialogue}}")]
[Snippet("Change the icon to {${3:image}}")]
public async UniTask WriteDialogueAndChangeImageAsync(string speaker, string dialogue, Sprite sprite, CancellationToken cancellationToken)
{
    // Omitted
}The summary of each attribute are shown below. All of the attributes other than the CommandMethod attribute are defined in the ScenarioFlow.Scripts.SFText namespace.
| Attribute | Summary |
|---|---|
| CommandMethod | Specify the command name |
| Category | Specify the category of the command |
| Description | Describe the description of the command. It can be split and described in multiple attributes |
| Snippet | Describe the snippet to be inserted into command scopes. More than one instance of this attribute can be specified, and in this case the snippet is inserted across multiple lines |
| DialogueSnippet | Describe the snippet to be inserted into dialogue scopes. More than one instance of this attribute can be specified, and in this case the snippet is inserted across multiple lines |
All of the attributes other than the CommandMethod attributes are option, however, all of them are used for editing support in VSCode. Especially, you may want to attach the Snippet and DialogueSnippet attributes at least in order to improve editing efficiency.
We give texts that let us imagine what will happen with a command or dialouge scope that invokes a command to instances of the Snippet or DialogueSnippet attribute. Then, we embed parameters of the command in those texts with the format {${n:name}}, where n is a parameter number and name is a parameter name. By doing this, we will be able to efficiently type in arguments of command or extended dialogue scopes with the shortcut key, and the behavior of each scope will be clearly shown as texts.
Note that we don’t embed a token code as a parameter in snippet texts, and we skip parameters that correspond to a character name and dialogue text for the DialogueSnippet attribute. Also, keep in mind that instances of the Snippet attribute and instances of the DialogueSnippet attribute can coexist. (Recall that a command used in dialogue scopes can be called with “normal” command scopes as dialogue scope is just shorthand notation of command scope.)
2. Generate a JSON file
We open the SFText Snippets Builder window by selecting Window/ScenarioFlow/SFTextSnippetsBuilder on the top menu bar in Unity editor. Then, we generate a JSON file by following the steps below.
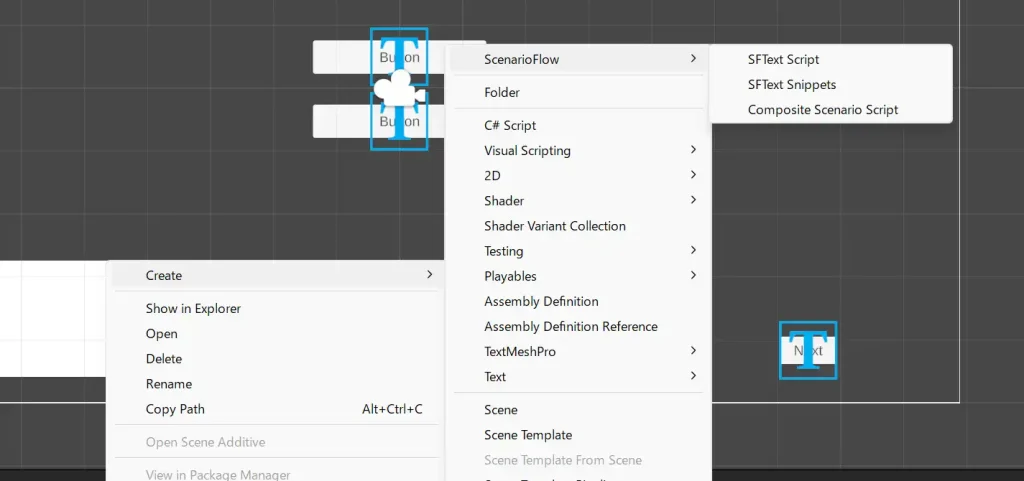
- Right-click on the Project window, and generate an empty JSON file by selecting
Create/ScenarioFlow/SFText Snippets - Click the
Editbutton on the SFText Snippets Builder window, add a new slot by clicking theAdd JSON Textbutton, attach the created JSON file to the new slot by drag and drop, and then save it by clicking theSavebutton - Click the
Update JSON Filesbutton to write command information on the registered JSON file
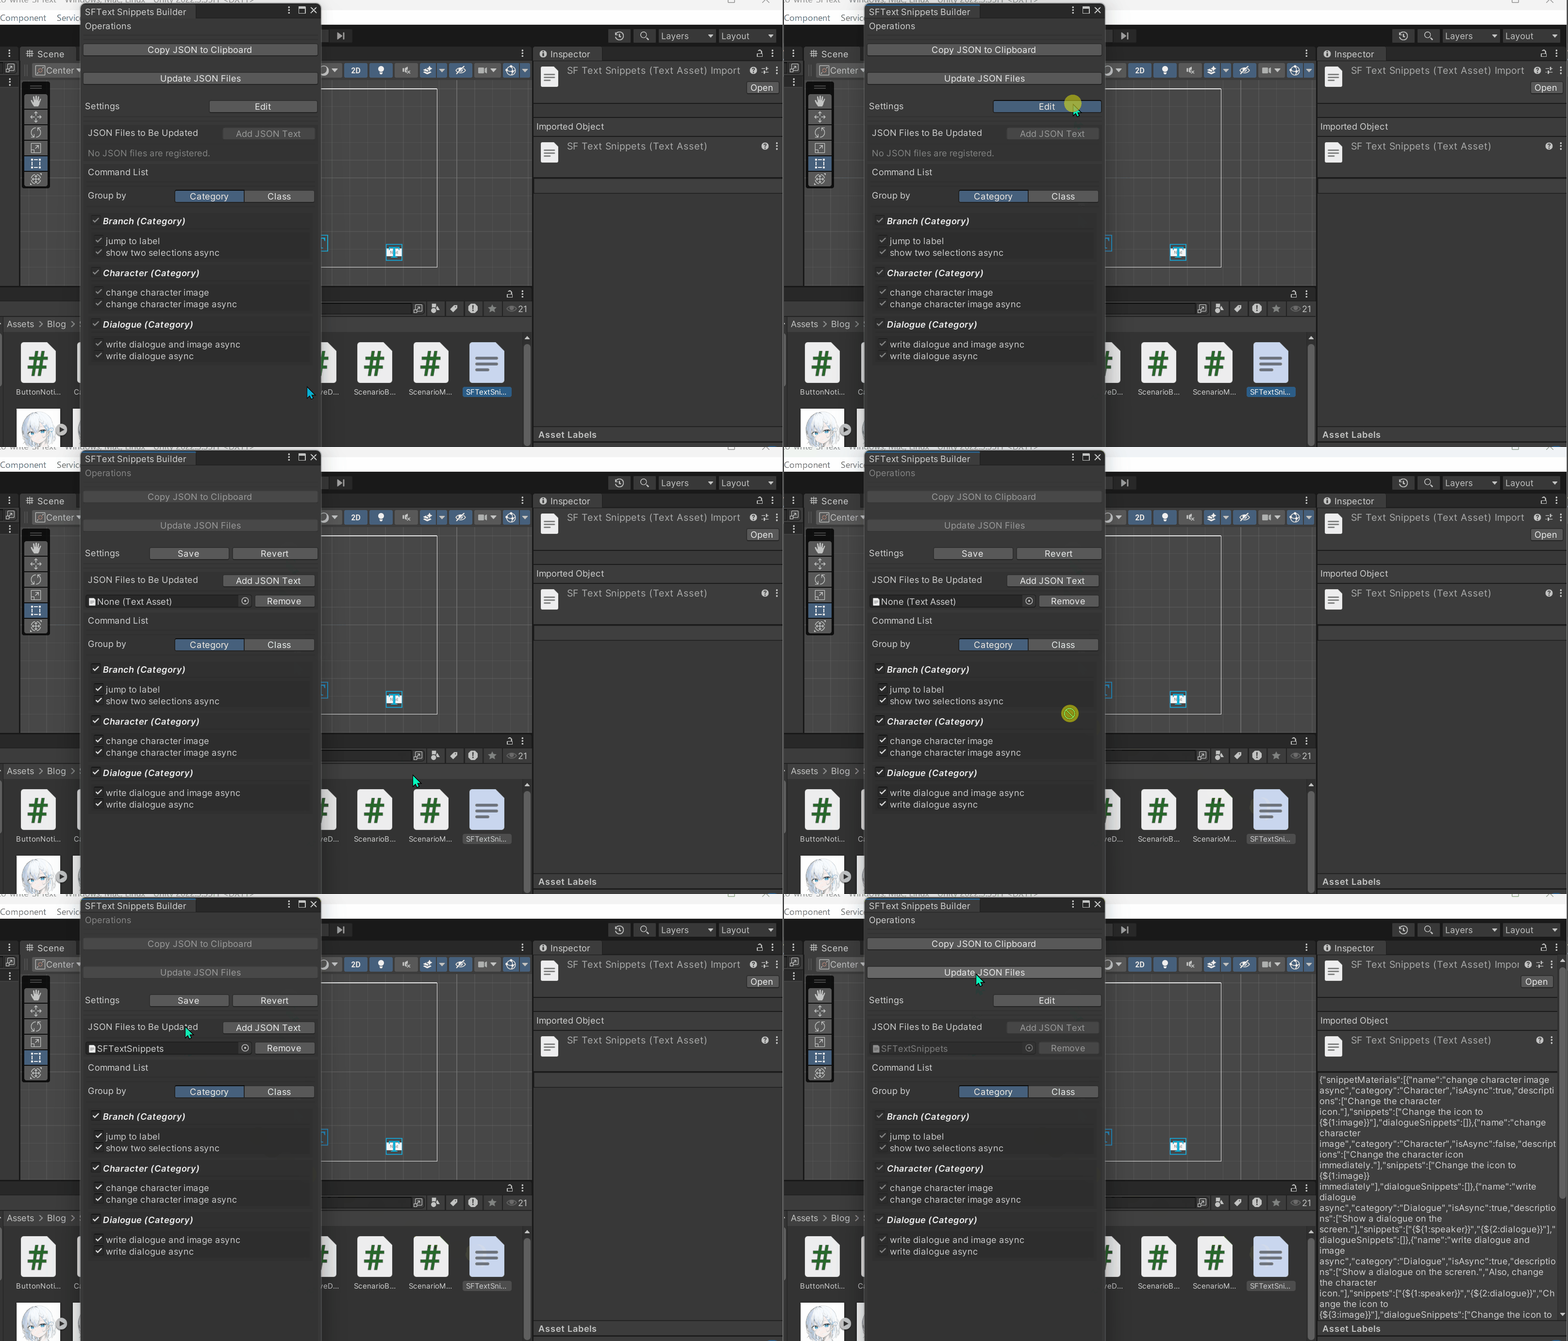
As a side note, only commands that are enabled by its check box in the Command List are written on a JSON file. Also, you can copy a JSON text manually by clicking the Copy JSON to Clipboard button.
3. Register the JSON file
We register the created JSON file with VSCode by following the steps below.
- Call
Select JSON Pathin the command palette, and then select the JSON file we created - Call
Load JSON Fileto load the selected JSON file
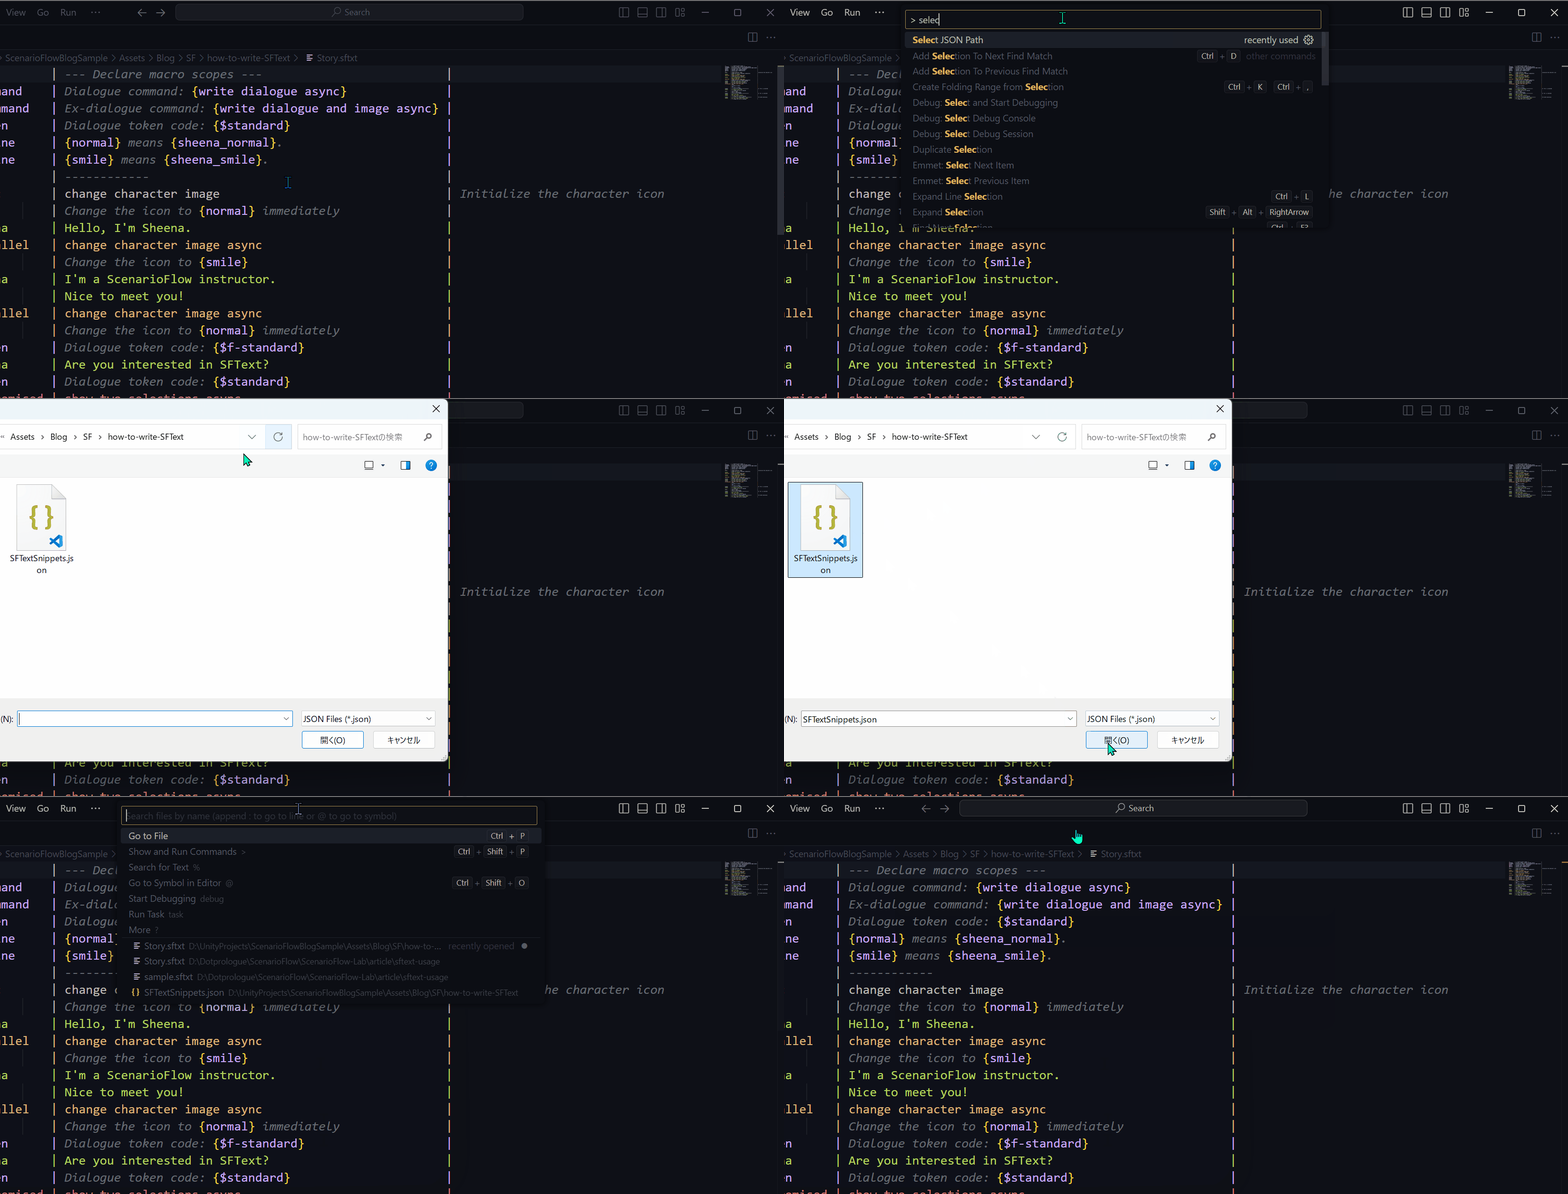
Now, the command information has been registered with VSCode, and editing support by the extension is fully available. When you define a new command in C# or make a change to an attribute, you can make the change reflected by (1) updating the JSON file on the SFText Snippets Builder window and (2) loading the updated JSON file by Load JSON File in VSCode, as long as the JSON file path is the same. By the way, if you don’t want to update the information of the registered JSON file but simply want to delete it, you can achieve it by calling Clear JSON Data in VSCode.
SFText Command List
You can open the SFText Command List window by selecting Window/ScenarioFlow/SFText Command List on the top menu to see information of defined commands and decoders in list-form.
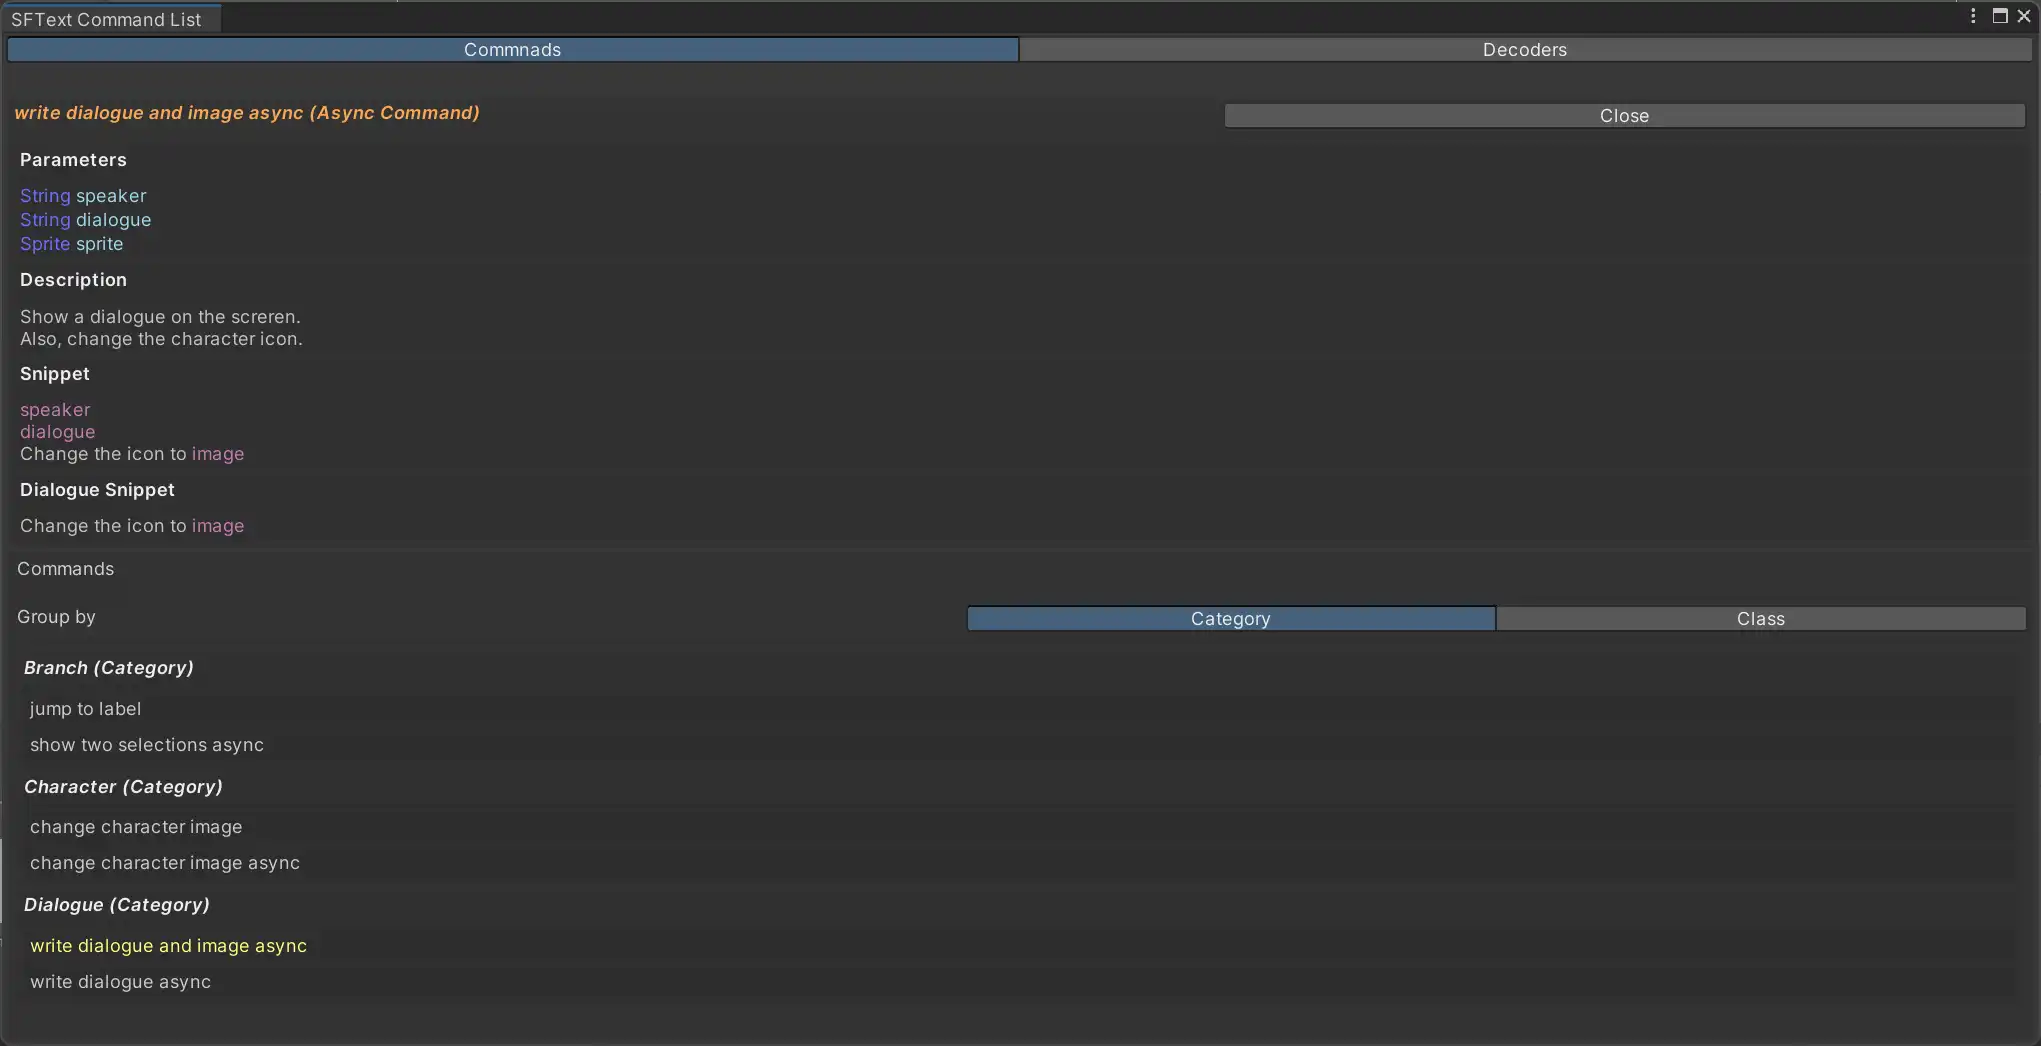
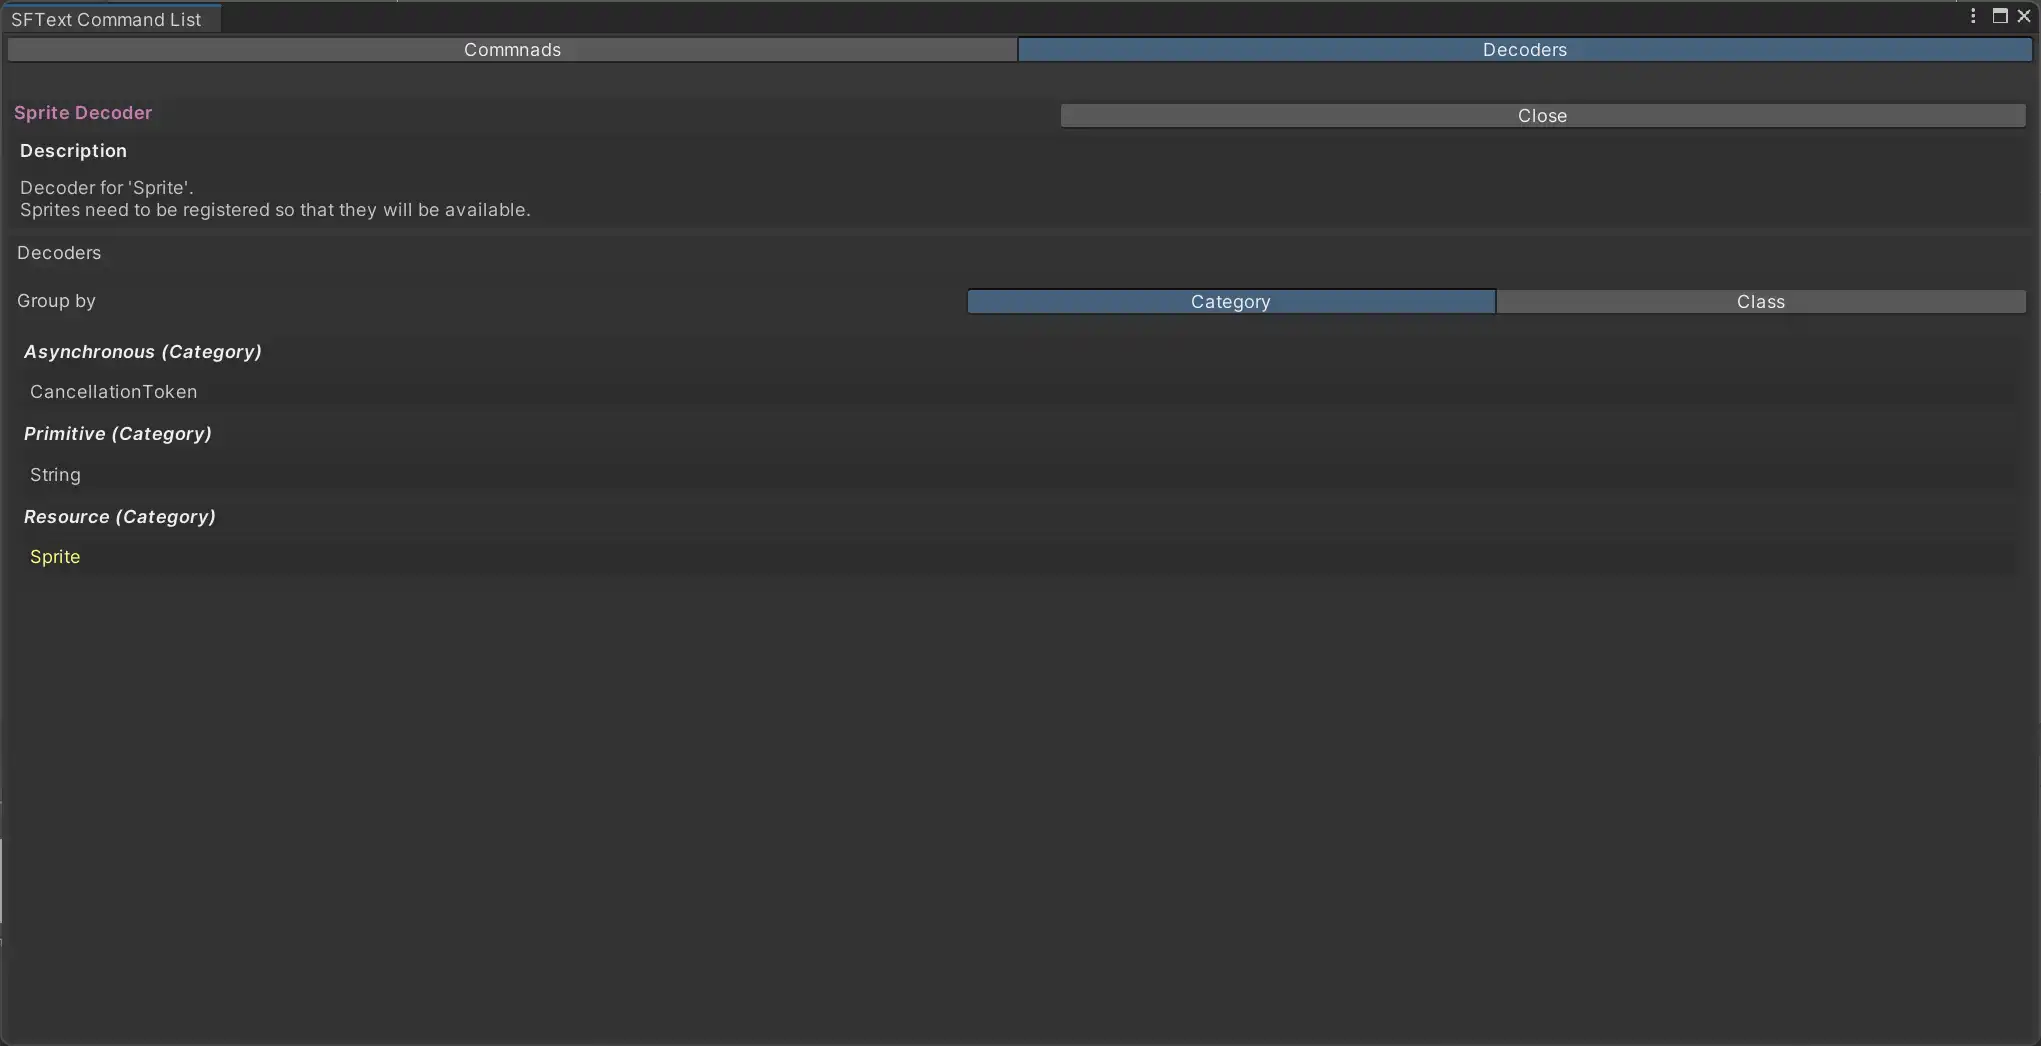
As shown in the second figure, the Category and Description attributes, which are attached to commands, can also be attached to decoders actually.
using ScenarioFlow;
using ScenarioFlow.Scripts.SFText;

[DecoderMethod]
[Category("Resource")]
[Description("Decoder for 'Sprite'.")]
[Description("Sprites need to be registered so that they will be available.")]
public Sprite GetSprite(string name)
{
    if (spriteDictionary.TryGetValue(name, out var sprite))
    {
        return sprite;
    }
    else
    {
        throw new ArgumentException($"Sprite '{name}' does not exist.");
    }
}Autocomplete
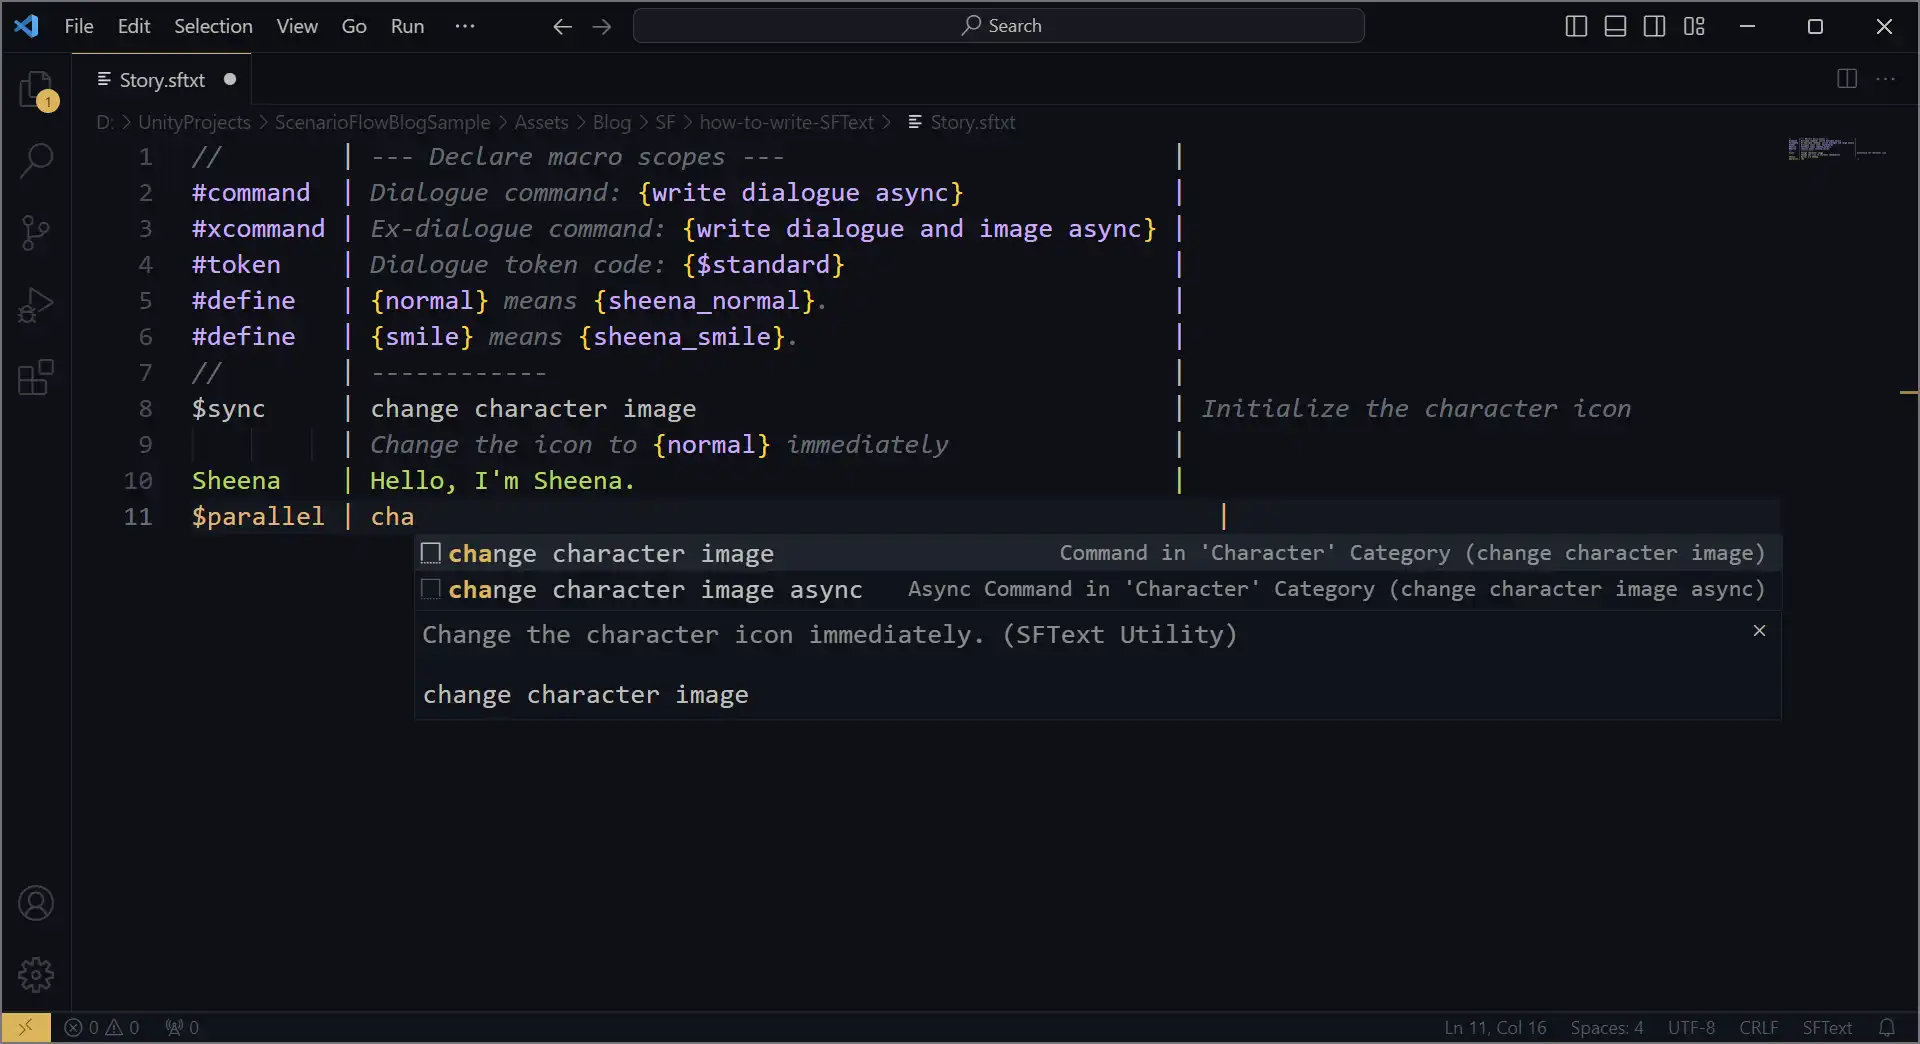
Autocomplete suggestion is available for the following elements. Especially, note that command information from a JSON file is reflected in autocomplete for command.
- Macro name in macro scope
- Token code in command scope
- Command name in command scope
Shortcut keys
We can describe SFTexts more efficiently using the following three commands in addition to autocomplete. Commands can be invoked from the command palette, but we usually call them quickly using the shortcut keys. Also, note that all of the shortcut keys invoke formatter, which aligns the script.
| Command | Shortcut Key (Windows) | Summary |
|---|---|---|
| Move Cursor | Shift+Enter | Move the cursor to the tail of scope declaration part, content description part, and comment description part in order |
| Insert Arguments | Alt+Enter | Insert the snippet into the scope at which the cursor locates for typing in the necessary arguments |
| Insert Line Below | Ctrl+Enter | Insert a new line after the line at which the cursor locates |
Editing Example for Each Scope
We are going to see examples that show how we can describe each scope efficiently.
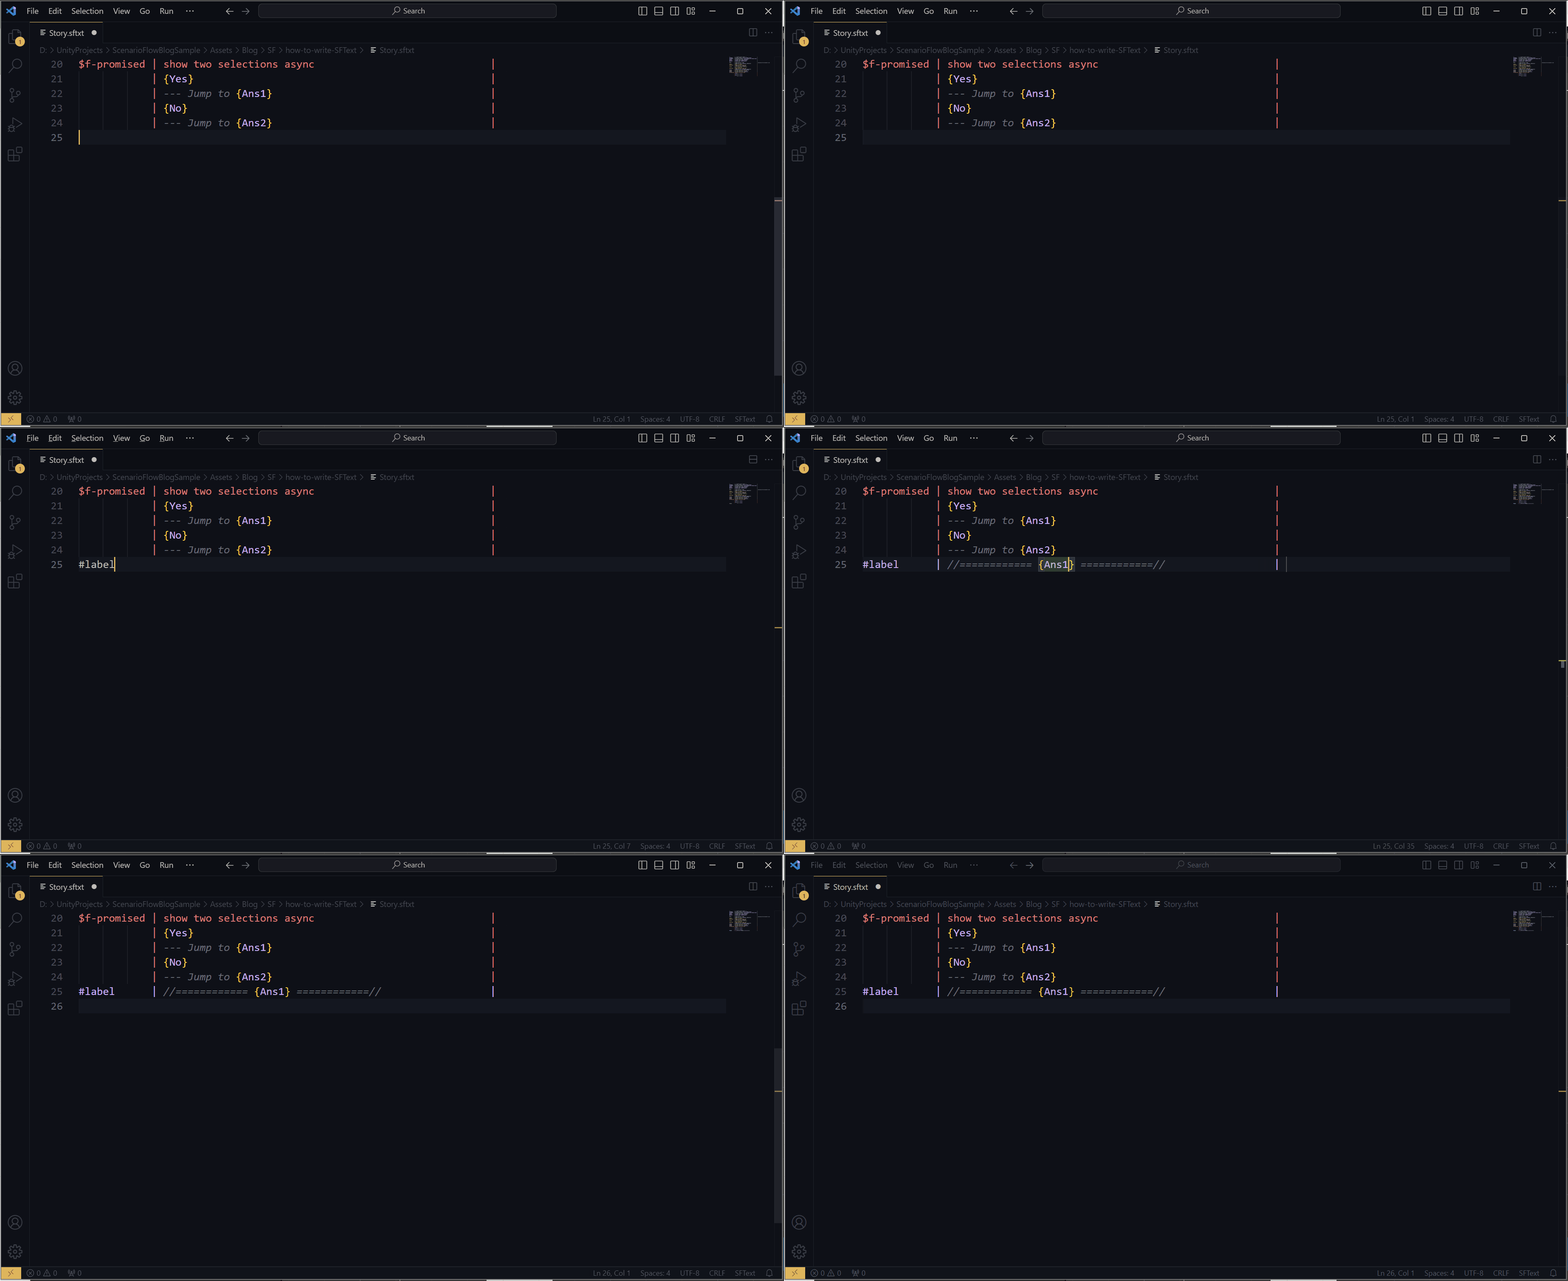
Macro Scope
Macro scope is the easiest to write of all the scopes. You only have to type in a macro name with autocomplete and type in arguments after inesrting a snippet by Alt+Enter.
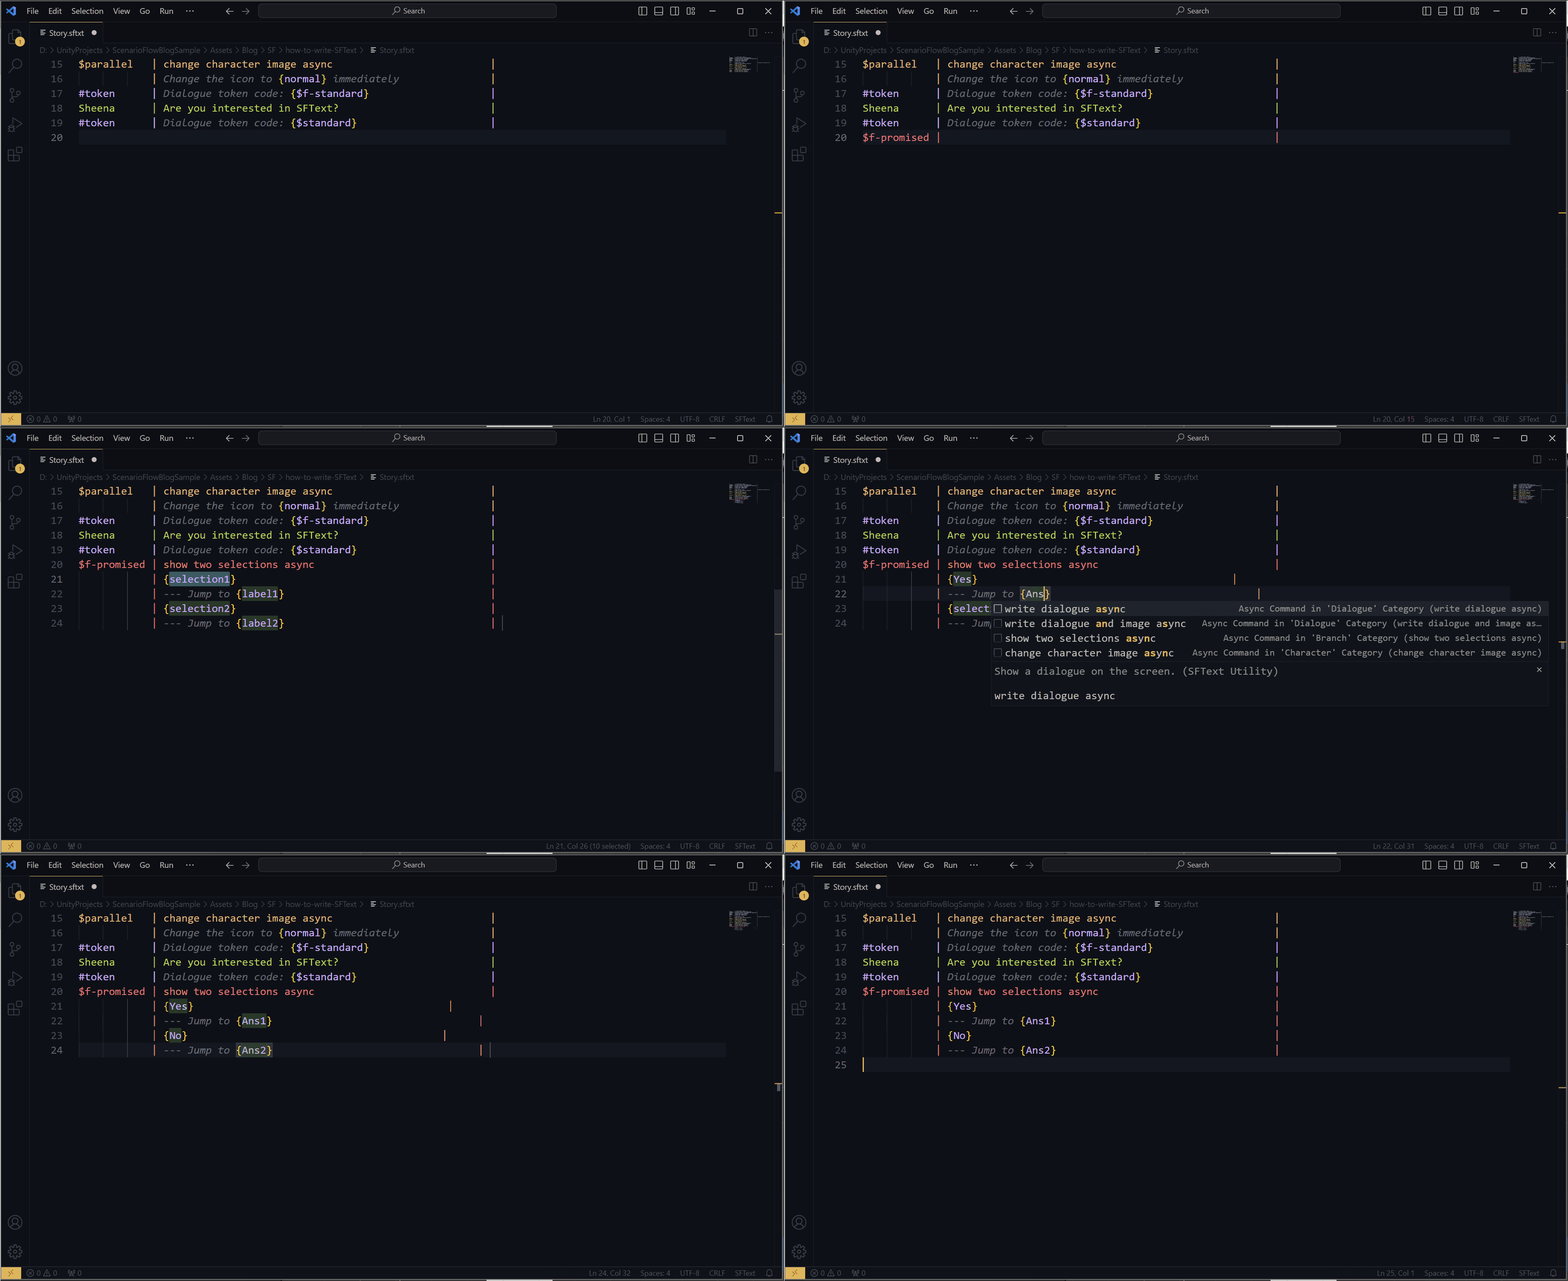
Command Scope
- Type in a token code, and then press
Shift+Enter - Type in a command name, and then press
Shift+Enter - Type in arguments with a snippet, and then press
Ctrl+Enter
When writing arguments with a snippet, you can move the cursor to the next slot by the Tab key.
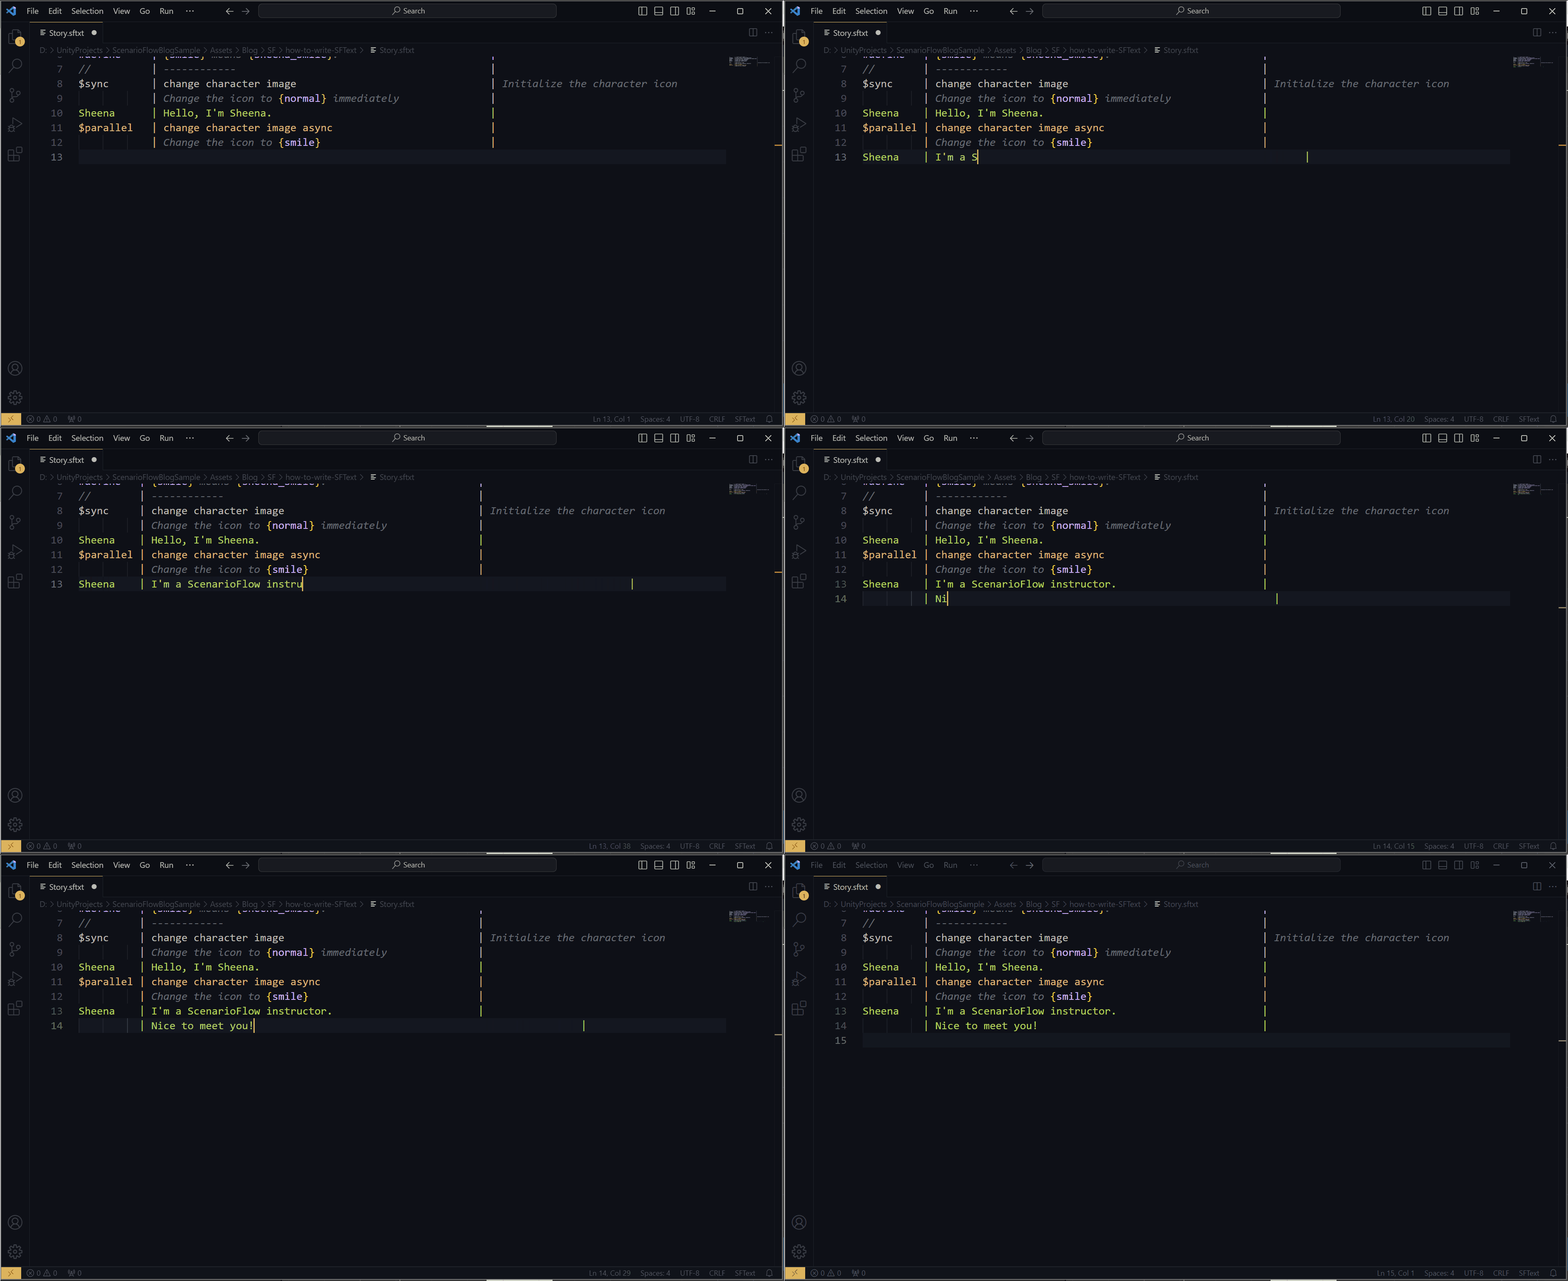
Dialogue Scope
- Type in a character name, and then press
Shift+Enter - Type in a dialogue text, and then press
Ctrl+Enter - If another dialogue to be written remains, write nothing but press
Shift+Enter, and then go back to the step 2; otherwise start the next scope
When you write an extended dialogue scope that has extra arguemnts, you make sure that the cursor locates at the scope and press Alt+Enter after you finish writing a dialogue in order to insert a snippet.
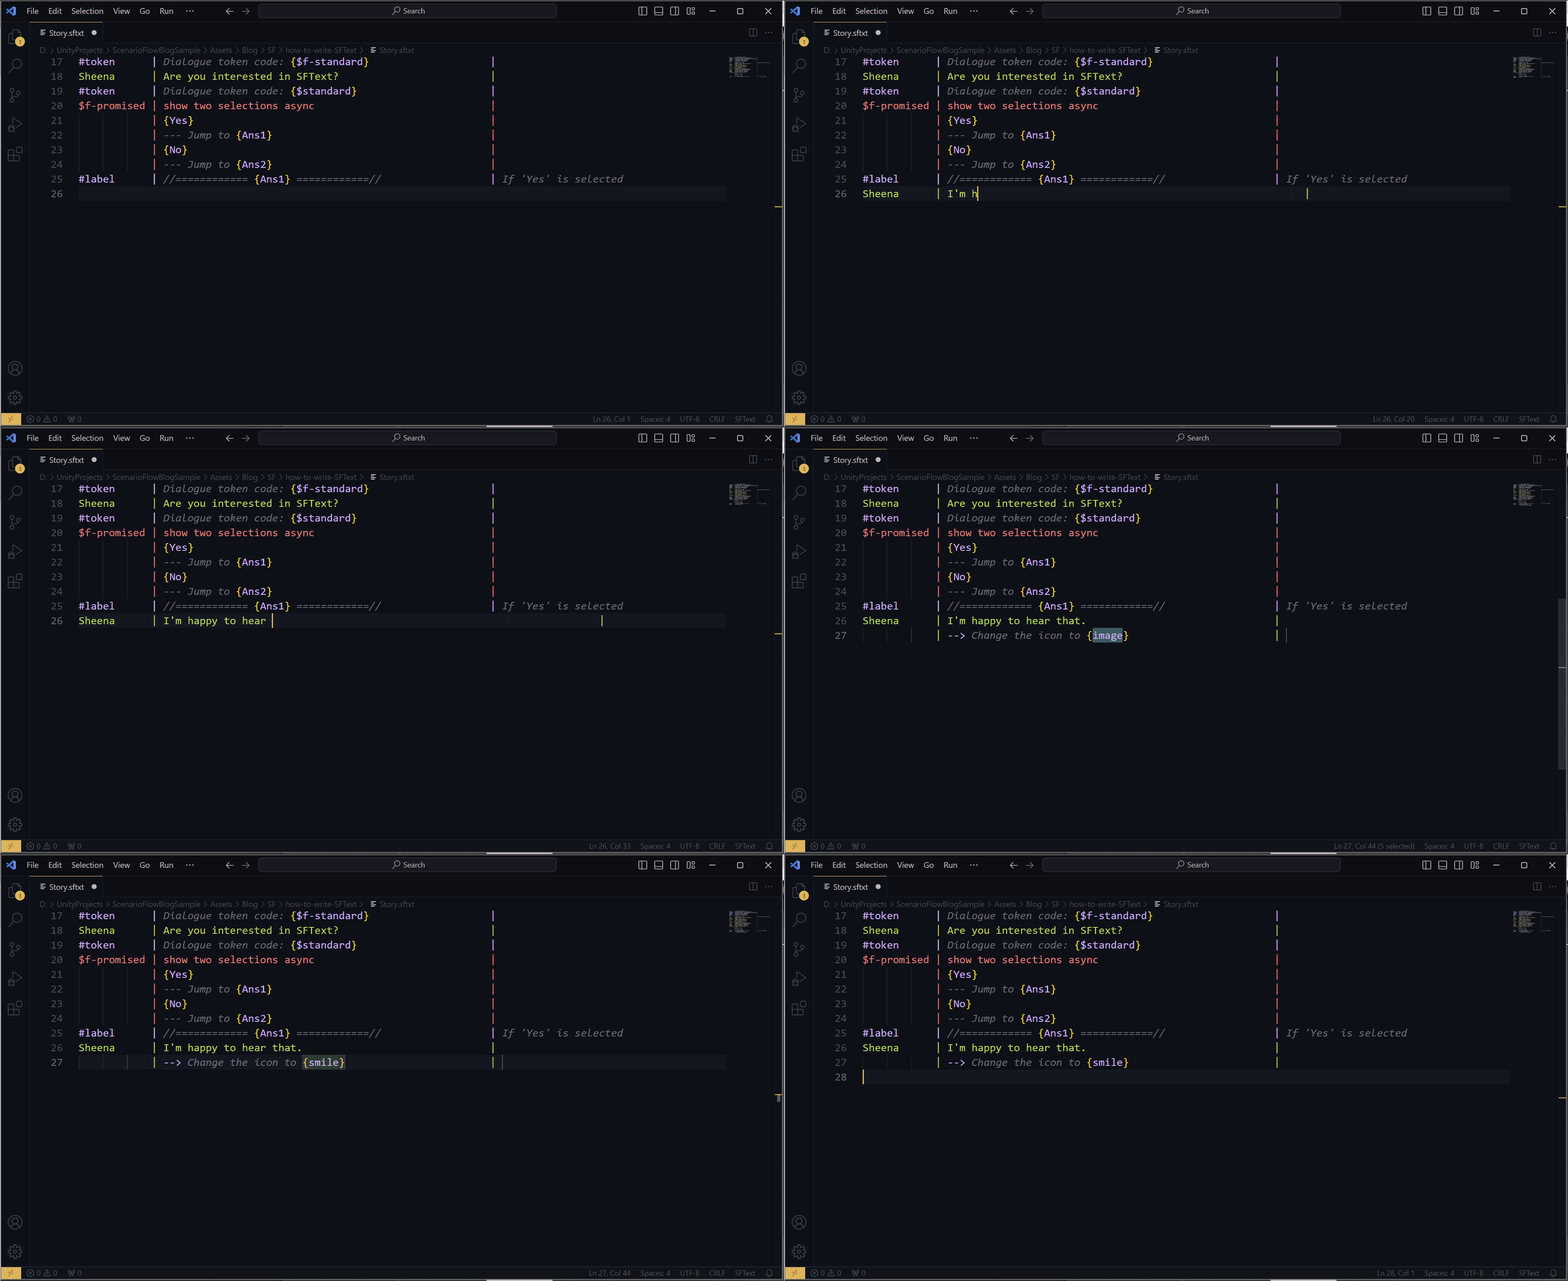
A snippet that is inserted into an extended dialogue scope when Alt+Enter are pressed correspondes to the value of the instance of the DialogueCommand attribute attached to the command specified by the latest #xcommand macro scope of all the #xcommand macro scopes declared before the target extended macro scope. Also, note that a snippet can’t be inserted if no #xcommand macro scope is declared before the target extended macro scope.
Sheena      | Good morning!         | Snippet can't be inserted here
#xcommand   | {Command A}           |
Sheena      | Hello!                | The snippet for Command A is inserted here
#xcommand   | {Command B}           |
Sheena | Hi! | The snippet for Command B is inserted hereSettings of the Extensions
Register Half-Width Characters
The formatter provided by the extension adusts the positions of all vertical bars in a SFText, where the formatter determines whether each character is half-width or full-width. The problem is that commonly used half-width characters such as alphabets and general half-width symbols are properly treated as half-width characters but some unusual characters are not. For example, “…” is a half-width character, but it’s recognized as a full-width character, and hence text aligment that includes this character is not completed properly.
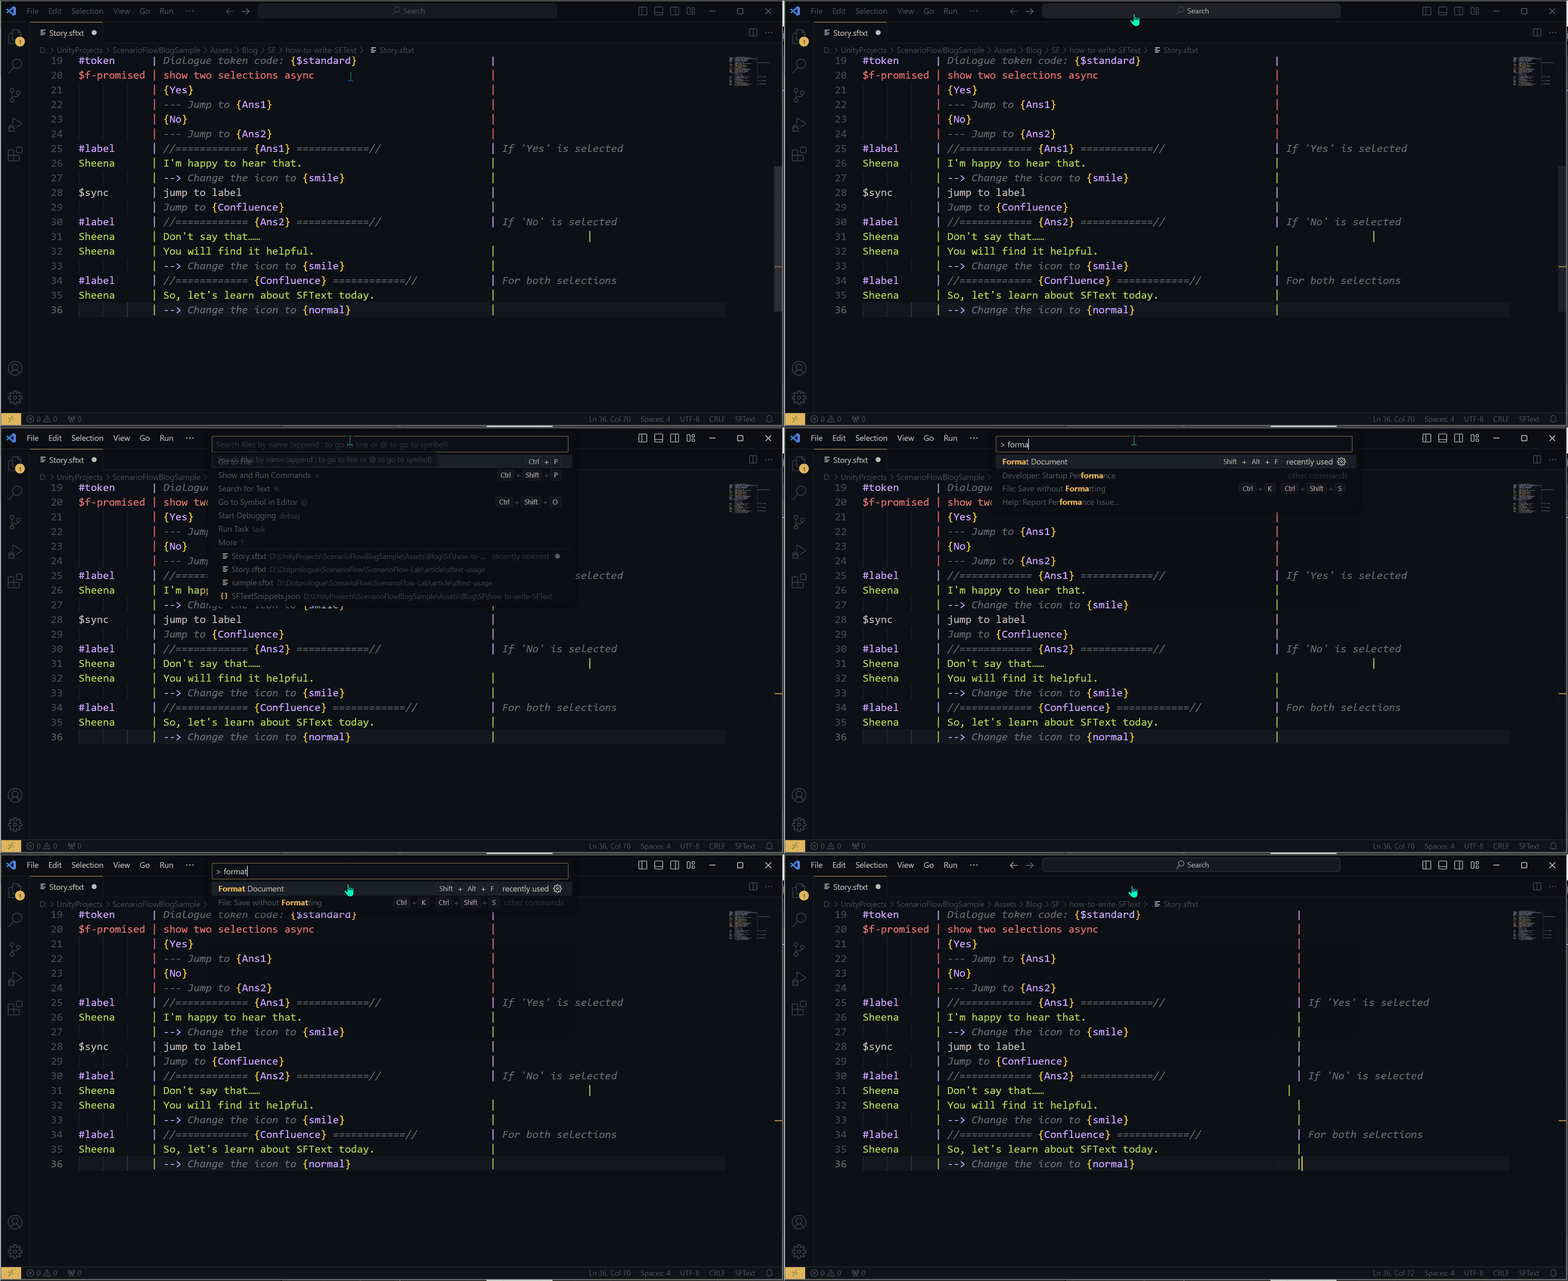
When a half-width character you want to use is not recognized as a half-width cahracter properly, you can resolve this problem by changing the settings.
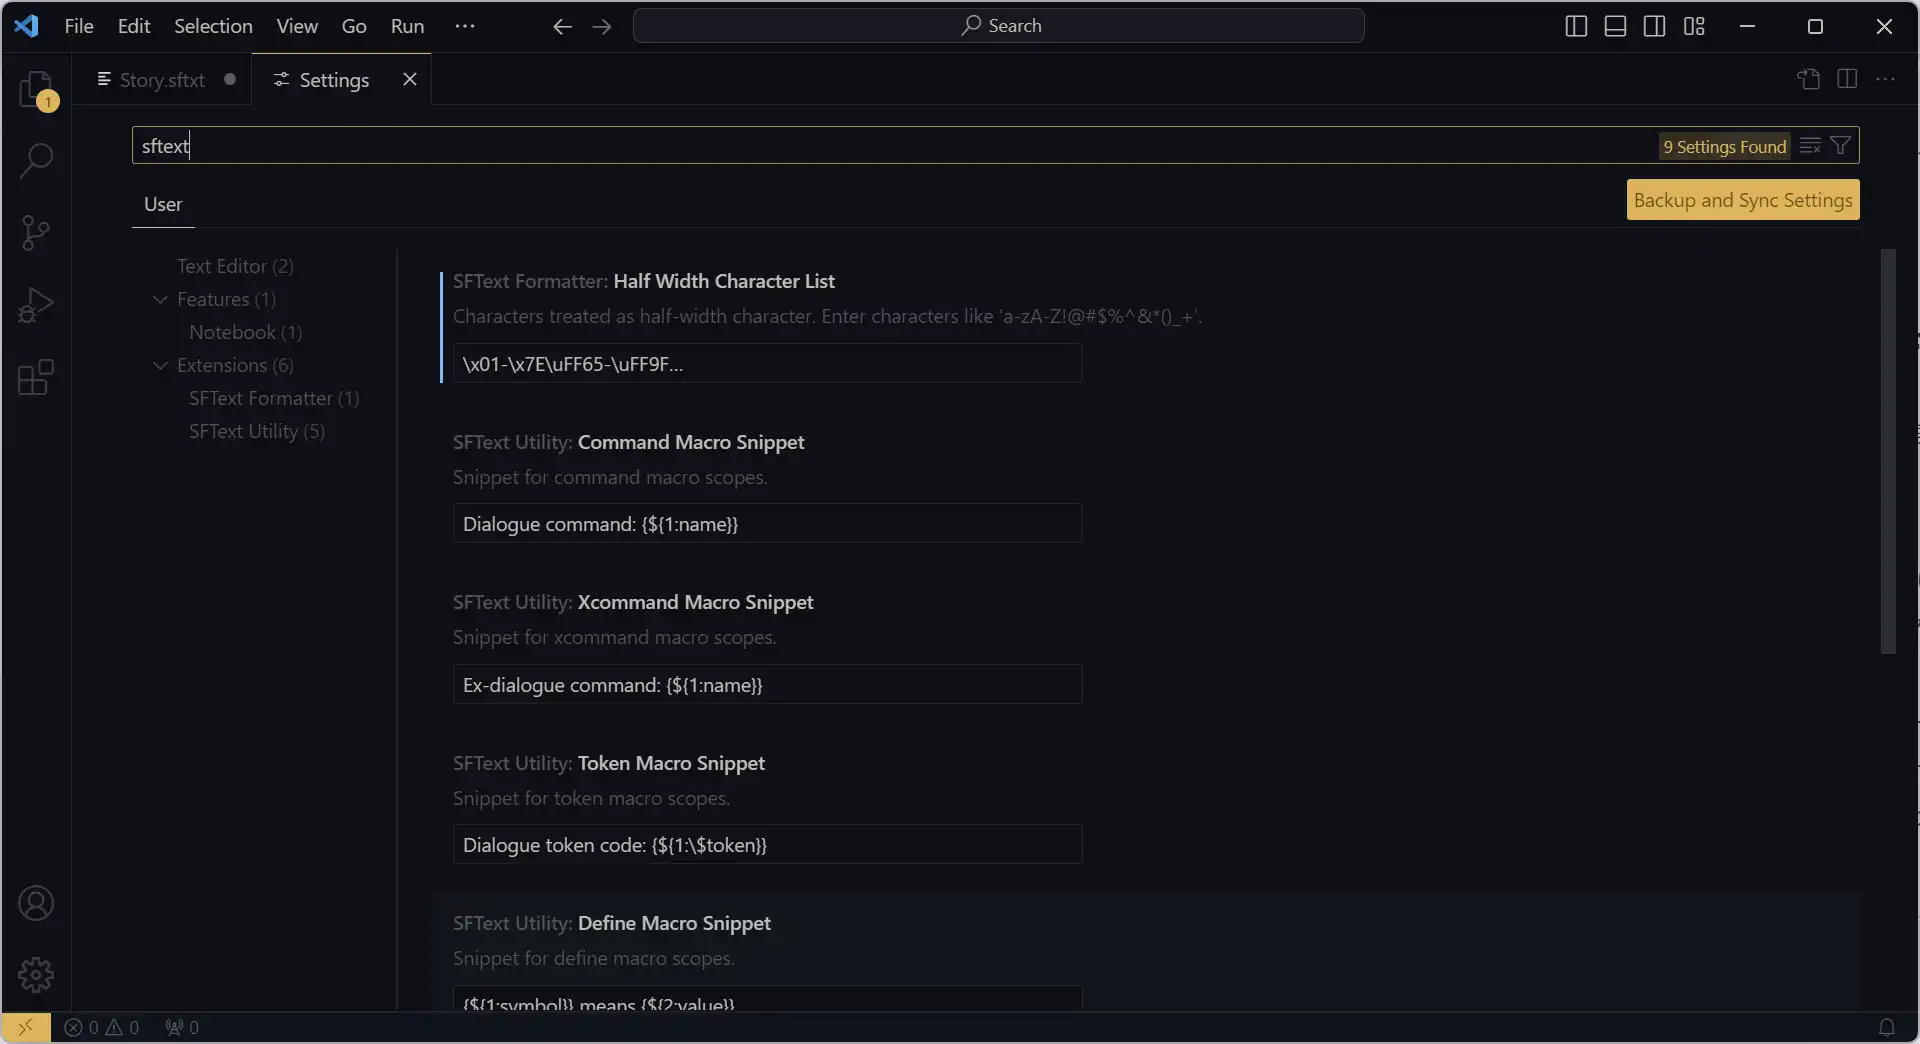
To resolve the problem, you open the settings in VSCode firstly, and then you type in “sftext” in the search bar. After that, the section “Half Width Chracter List” will appear. You type in characters to be recognized as half-width characters with a regular expression. By default, \x01-\x7E\uFF65-\uFF9F, which includes commonly used half-width characters, is specified. The initial value is written in UTF-8 to cover wide range characters, but you only have to add new characters to be treated as half-width characters as they are in practice when changing this setting.
For this example, you add “…” to the setting value.
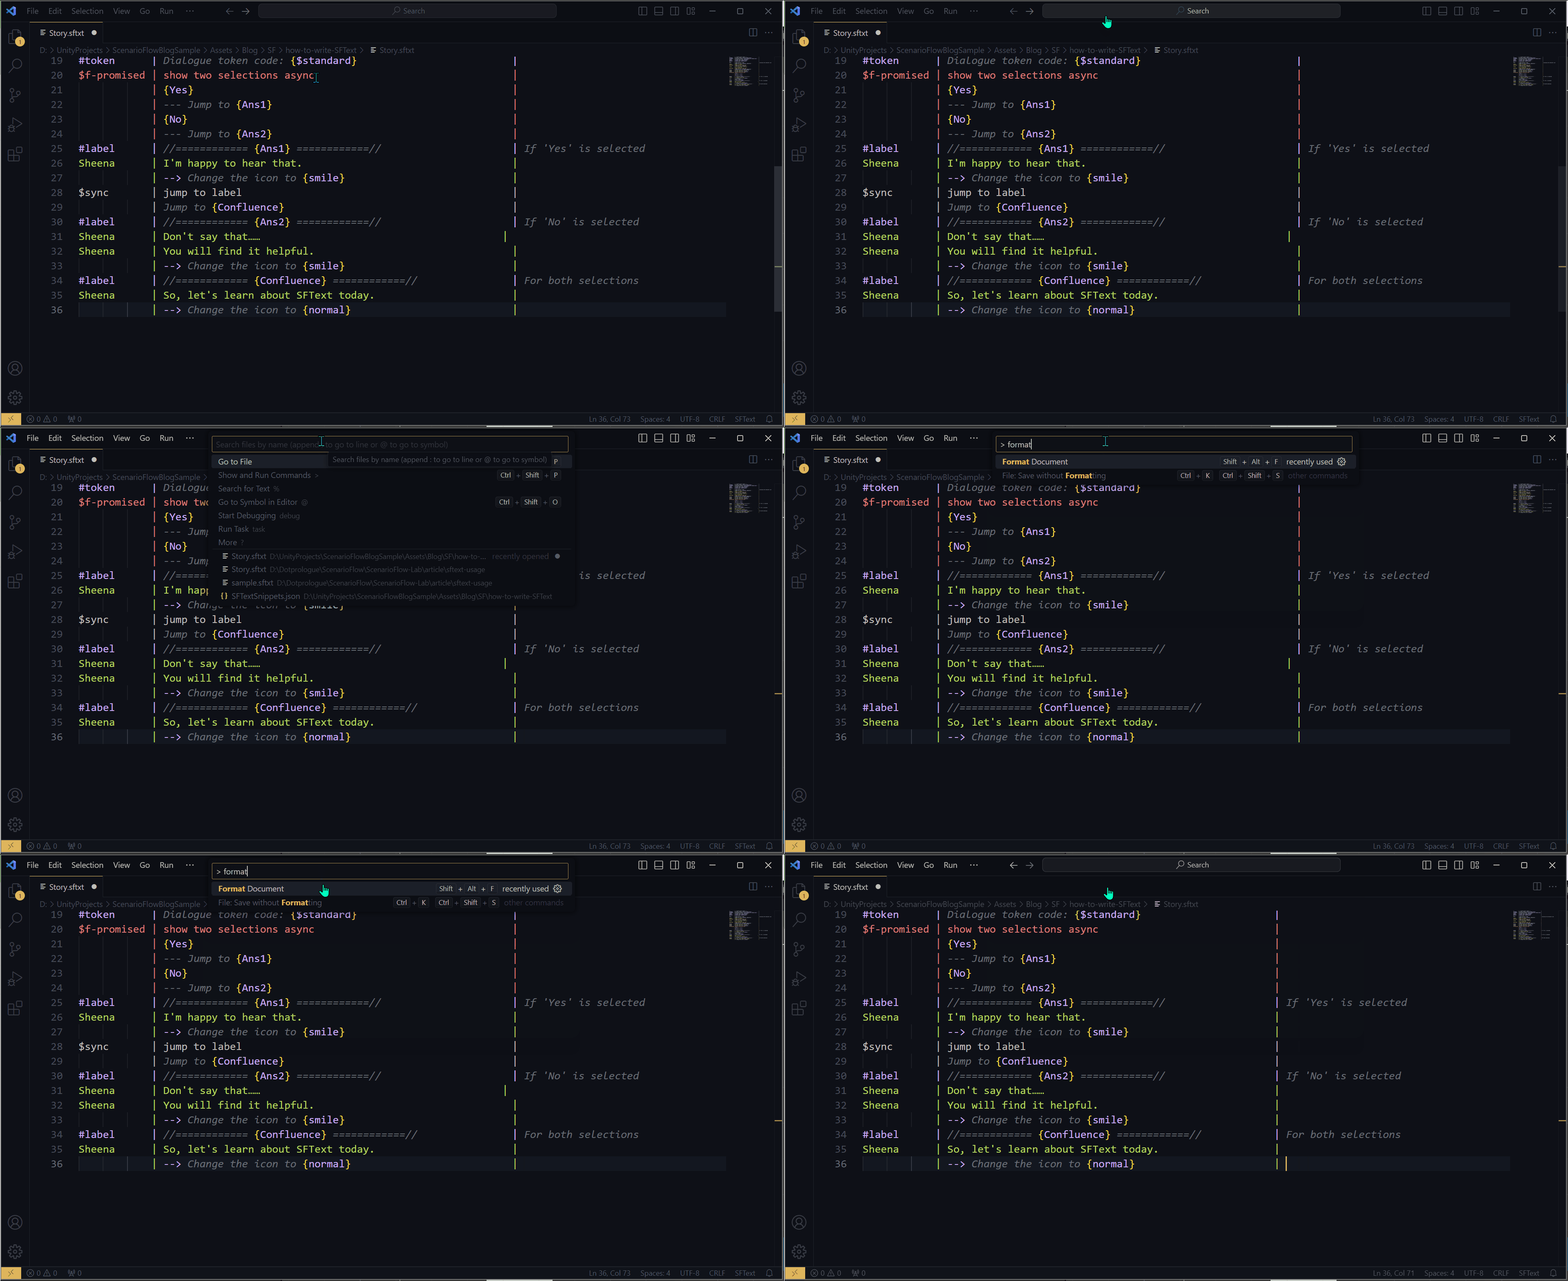
After that, text that includes “…” will be properly aligned.
Customize Snippets for Macro Scopes
You can define snippets for macros scopes by changing the settings in VSCode while you can do that for command scopes by adding attributes in C#. After opening the settings and typing in “sftext” in the search bar, you will see the sections of the snippets for all of the macro scopes under the Half Width Character List section.
You can register any snippet for each macro scope by setting a text to be inserted as a snippet to the corresponding section with the same format as in the case of the Snippet attribute.

Summary
In this article, we learned about the grammar of SFText and efficient editing with the VSCode extensions.
In SFText, each line is divided into the three areas, scope declaration part, content description part, and comment description part.
| Area | What is Described |
|---|---|
| Scope Declaration Part | Symbol to start a scope |
| Content Description Part | Content of a scope (e.g., arguments) |
| Comment Description Part | Comment text (that don’t affect a dialogue scene) |
Scope Declaration Part | Content Description Part | Comment Description PartA SFText is composed of “scopes.” There are 4 types of scopes.
| Scope | Summary |
|---|---|
| Command Scope | Causes command call |
| Dialogue Scope | Causes command call for displaying a dialogue |
| Macro Scope | Supports command scopes and dialogue scopes |
| Comment Scopes | Comment (that doesn’t affect a dialogue scene) is described |

As command scopes and dialogue scopes cause command calls, with SFText, you describe dialogue scenes by listing command scopes and dialogue scopes in an appropriate order and attaching macro scopes to them. The following dialogue scene will be played when you run “Story.sftxt” above in the dialogue system in the sample project.

When editing SFText scripts, you can efficiently write scripts using the autocomplete and shortcut keys provided by the VSCode extensions. The important shortcut keys are the following three:
| Command | Shortcut Key (Windows) | Summary |
|---|---|---|
| Move Cursor | Shift+Enter | Move the cursor to the tail of scope declaration part, content description part, and comment description part in order |
| Insert Arguments | Alt+Enter | Insert the snippet into the scope at which the cursor locates for typing in the necessary arguments |
| Insert Line Below | Ctrl+Enter | Insert a new line after the line at which the cursor locates |
Using these shortcut keys, for example, a command scope is described quickly as follows:

Note that you have to add attributes to methods exported as commands in C# as necessary in order to be able to fully make use of the autocomplete and shortcut keys. You also have to generate a JSON file based on the information of these attributes and register it with VSCode.
To be able to write dialogue scenes efficiently, let’s begin with understanding the SFText grammar and getting used to operations in VSCode. You can practice writing SFText scripts using the sample project we used in this article.


Comments